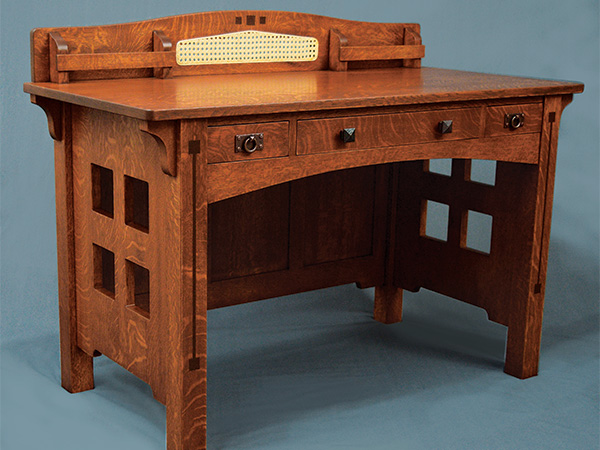
As I flipped through an old Charles Limbert catalog, a postcard desk caught my attention. The desk appears in the 1915 catalog, labeled #801-24. While this petite desk was too small for my needs, the details of craftsmanship and design were fascinating. Part of his “Ebon-Oak” line of furniture, Limbert’s #801-24 featured inlaid ebony designs and natural cane webbing adorning the backsplash.
I felt that a few changes were in order, but I wanted to maintain the essence of the original piece. The entire desk was scaled up in size, and I added solid plank sides featuring rectilinear cutouts. The desk’s back is closed in with a sturdy frame and panel, and I changed the original single-drawer design to a bank of three drawers instead.
Click Here to Download the Drawings and Materials List.
Begin with Some Leg Work
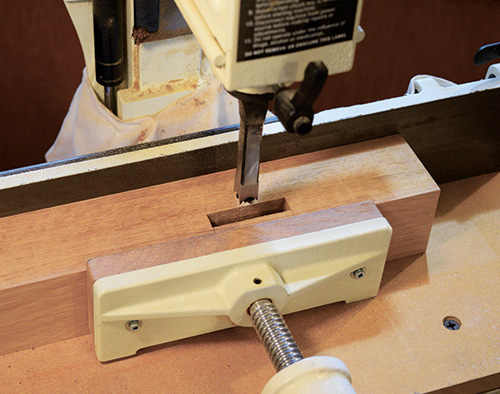
The legs involve a deceptive amount of woodworking and are a good place to start. They measure 2-1/2″ square by 30″ long, and I chose to laminate them for quartersawn figure on each face. (Riftsawn stock also works well and skips the laminating step.) Once the leg blanks are milled to final dimension, you can lay out and cut the mortises. There’s a mortise in each front leg for the front arched rail and a pair of mortises in each rear leg for the upper and lower back rails: all of them are 1/2″ wide and 1-1/2″ deep.
Now lay out the square inlay design on the two front legs. By hand or with your largest hollow mortising chisel, carefully excavate the 1″ x 1″ square mortises. While the original Ebon-Oak line of furniture used ebony, I find walnut is a reasonable substitute. Rip a strip of walnut until it just fits into the square mortises. Carefully crosscut the pieces to size, and chamfer their back edges slightly to ease the fit into the mortises.
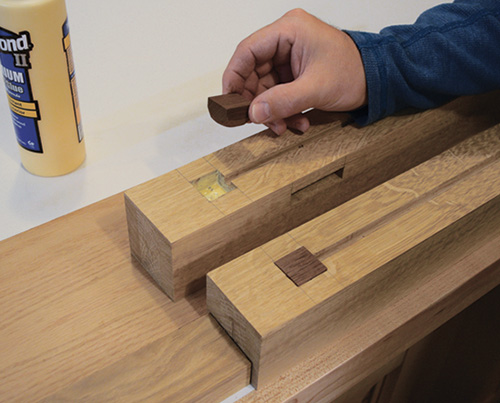
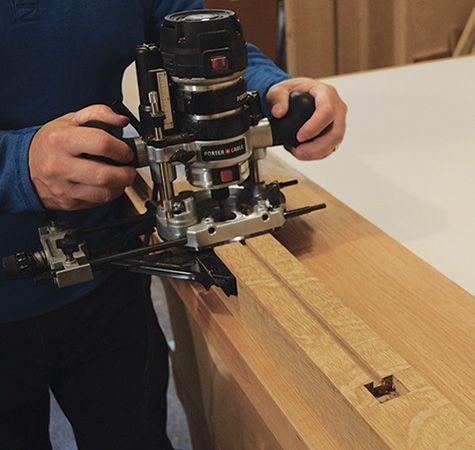
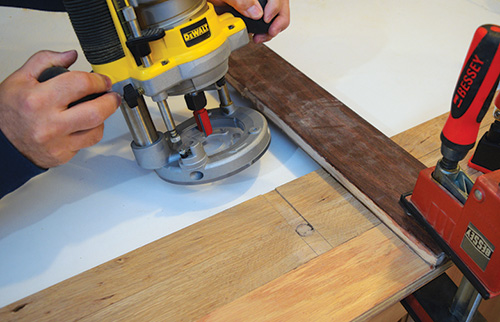
Install an edge guide and 1/4″ spiral bit in your router to mill the channel that connects the two square mortises. This groove is 3/8″ wide and 1/4″ deep; be sure to center it carefully on each leg. Glue the square walnut plugs in place, and measure the required length for walnut strips in the channels. Cut them to fit, and glue them in, too. When the inlay dries, it can be planed or sanded flush. Knock the corners off the legs with a small roundover bit at the router table, then chuck in a 3/4″-dia. straight bit for the next operation.
Attaching Corbels

There must be a half dozen ways to mount corbels, but my favorite is to form a groove in the leg and a mating stub tenon on the corbel. This requires a bit more work, but it registers the corbel in position for a simple glue-up. Set and lock your router table fence to center the bit on the legs.

Install a stop block on the router table fence as well, to limit the corbel groove to 4-1/4″ long, and use a pair of featherboards to hold the leg blank against the fence. Mill the 1/4″-deep groove in two successively deeper passes for the cleanest possible cut.
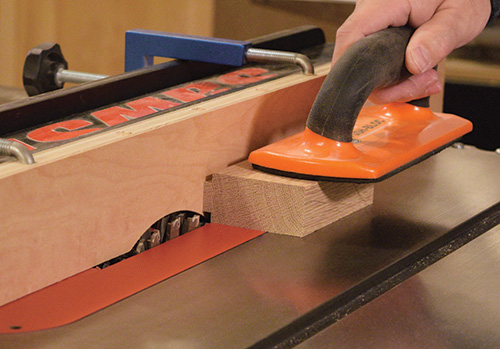
Now prepare four corbel blanks, and raise their stub tenons with a dado blade. Size the tenons to fit the leg grooves, but plan for a tenon length that doesn’t completely bottom out in the groove. This will prevent excessive glue squeeze-out when you install the corbels.

Next, turn the corbel blanks on end to cut bottom shoulders on the tenons. Use a miter gauge with auxiliary fence to safely guide these cuts. When the corbels fit correctly, go ahead and cut their curved shapes and sand them smooth.
Making the Side Panels
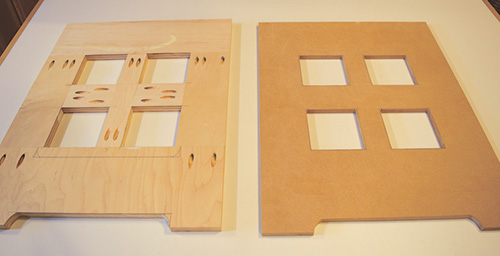
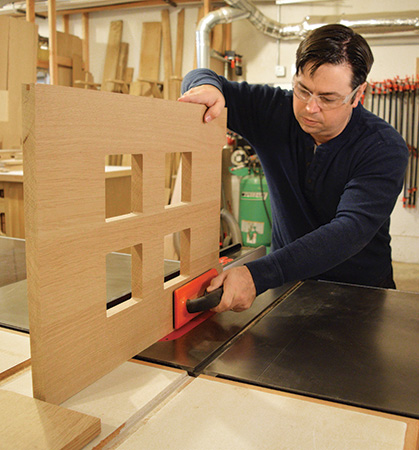
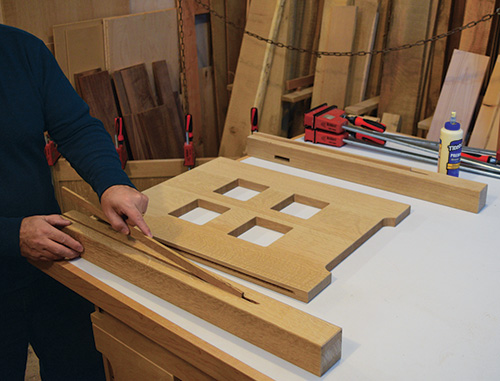
Glue up two solid wood side panels. To duplicate their interesting cutouts and shapes, you’ll need a full-sized template. The easiest way to make the template is by assembling plywood strips with pocket-hole screws. This plywood template can be used as is, or use it to make a more permanent one-piece template from 1/2″ MDF.
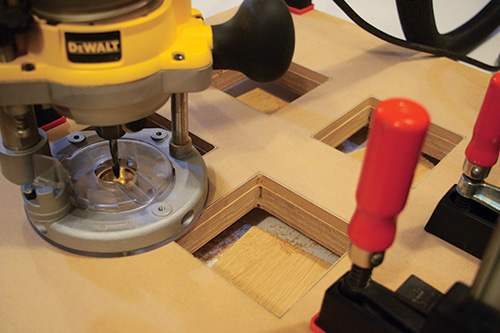
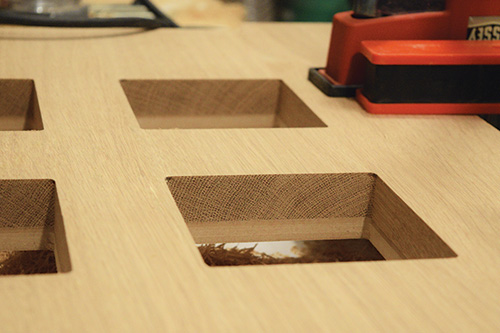
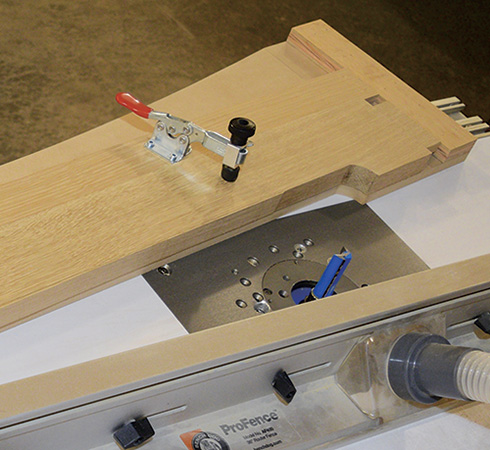
Clamp the template to a side panel and rough out the square cutouts with a 1/4″ spiral bit and a 3/8″-dia. guide bushing. The squares can be removed in four progressively deeper passes, which leaves a consistent amount of material to be cleaned up later with a flush-trim bit.
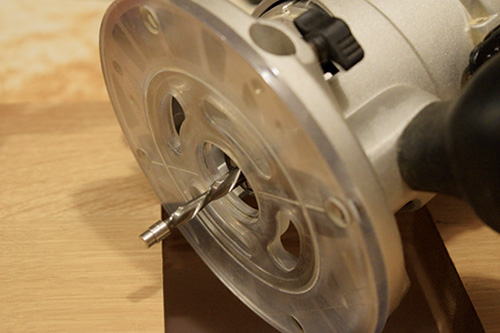
For the final trimming operation, a 1/4″-dia. spiral flush-trim bit is best: it cuts cleanly and creates tight inside corners. Flip the workpiece and template over, and complete the final trimming with the template side down.
Since the side panels are simply hardwood slabs (a classic Limbert detail), you’ll need to decide what type of joinery works best for you. The legs mate to the side panels with long-grain glue joints, so strength is not an issue. However, it’s helpful to have a mechanical connection to register the parts accurately. I opted for splines, but biscuits or loose-tenon joinery would’ve worked equally well.
Cut stopped grooves in both the side panels and legs to receive splines. Make the groove 1/4″ wide x 3/8″ deep and about 24″ long (an inch less than the panel height). Carefully center a 1/4″- wide dado blade on the thickness of the side panels and make the cut in one pass. Now adjust the rip fence to center the dado blade on the leg, and repeat the groove in each leg.
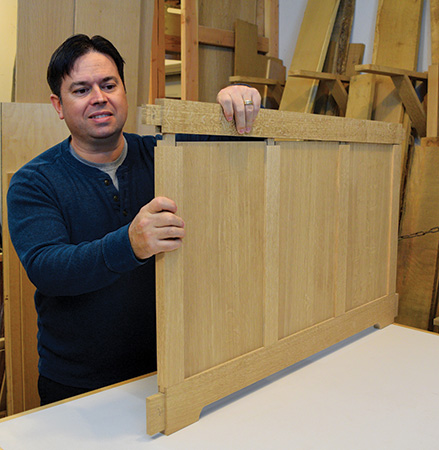
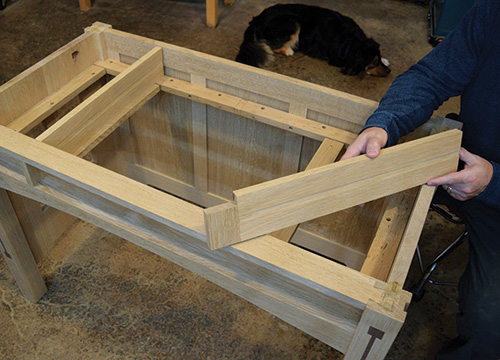
Frame-and-Panel Back is Next
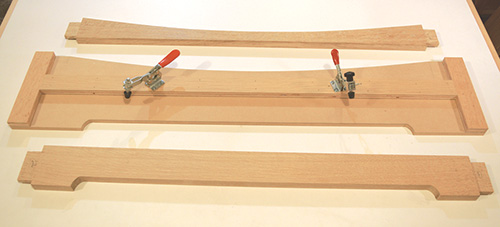
The frame-and-panel back assembly is formed with traditional mortise-and-tenon joinery, with three floating panels. Start by making the long top and bottom rails, as well as the desk’s front arched rail. These three parts are all 42″ long and should be milled at the same time. Make up four stile blanks, too.
Next, rout 1/2″-deep grooves in the rails and stiles so they just fit a 1/2″ hollow chisel. Then lay out and cut four mortises in each rail to a depth of 1/2″ for the stiles. Step to your table saw to raise 1/2″-thick x 1-1/2″-long tenons on the two rails as well as the front arched rail. If your shoulder-to shoulder length is 39″, you’re right on track. Then adjust your rip fence for a tenon length of 1″ and raise tenons on the back stiles. Finally, haunch the outer two stiles and test each joint for a proper fit.
There’s still the matter of shaping the bottom rail and the front arched rail. To accomplish this, I suggest building a double-sided template. Use your side panel template to recreate the shape for the lower rail. On the other side of the new template, sand and fair a long arch that thins to a width of 1-1/2″ at the apex. Add toggle clamps to hold the workpiece firmly to the jig and to act as easy-to-grip handles.
Next up, build the three solid oak floating panels. They will finish out at 1/2″ thick, so I start with thicker boards and plane the panels after the glue has dried. Remove material evenly from both faces until the panels slip easily into the frame.
Trim them a little undersized in width to allow for seasonal movement. Finish-sand the panels, as well as the inner edges of the frame, before proceeding. Gluing the panels in place is unnecessary, but I pack the panel grooves with foam weatherstripping to prevent rattling.
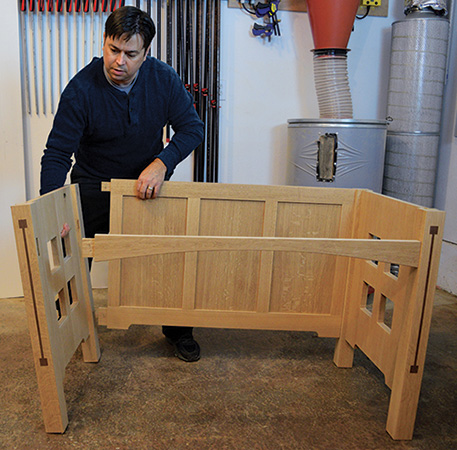
To ensure success when gluing up the back panel, break the assembly into phases. This way you can be certain the parts will fit, without gluing more joints than you can handle. Focus on a tight joint line between the outer stiles and the rear legs. Dry-fit the rear legs to the frame, to ensure the rail tenons fit them correctly.
When the frame comes out of the clamps, remove the rear legs. Sand the legs and side panels, and glue them together with splines. Let these subassemblies sit overnight and bring them together, along with the front arched rail and the back panel, the next day.
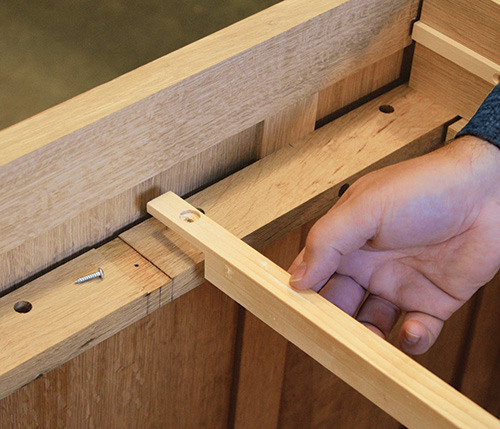
Building the Web Frame
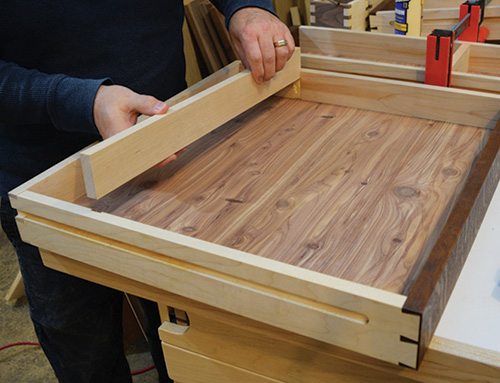
The three pencil drawers will be side-hung on wooden slides. Since the middle drawer is wider, it will also be center-guided to prevent racking. Make up parts for the web frame, which are 2″-wide strips, except for the front rail that is 2-1/4″ wide. Assemble them with mortise-and-tenon joints, leaving the rear joints unglued. Make the web frame 1/8″ short, front-to-back, to allow the desk’s side panels to move seasonally.
I drilled counterbored holes through the two inner stiles of the web frame from underneath to help me mount the drawer dividers, later. I also drilled several access holes to accommodate a screwdriver shaft, so I’d be able to extend it up through from below for mounting the desk top. Finally, I drilled two counterbored pilot holes for mounting screws through the width of the back rail that align with the middle stiles of the back panel.
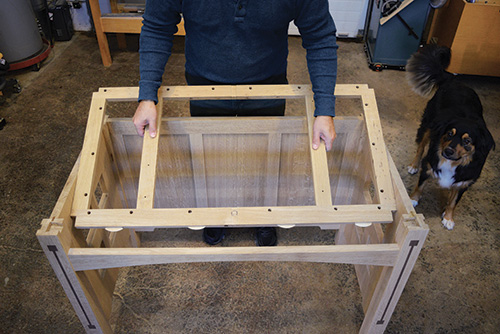
Notch the web frame to fit around the legs. Then rout a 1/8″ x 3/4″ x 1-3/8″ stopped dado across the width of the front long rail and a matching dado all the way across the back long rail. Center them on the frame’s length for the middle drawer’s center-guide.
Cut slots for four biscuits in the web frame and front arched rail, and glue the web frame into place along its front edge only. Hang the rear of the web frame with a pair of 2-1/2″-long screws, driven into the back panel stiles.
Adding a Dovetailed Top Rail
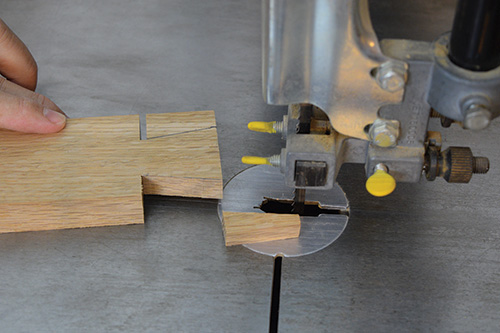
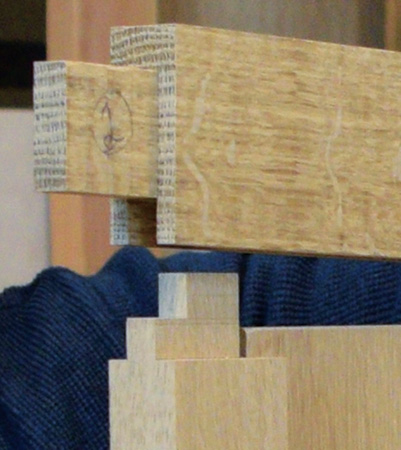
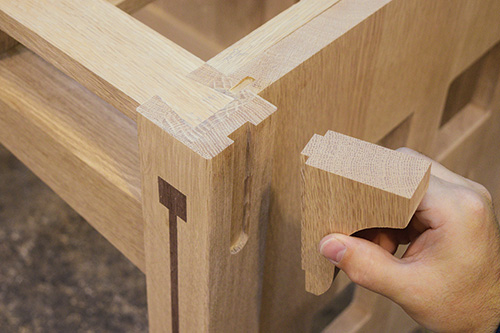
Now we’re getting somewhere! Next, it’s time to focus on the top rail that joins the front legs. It features lapped dovetails that nestle into sockets in the legs. At the table saw, use your miter gauge and a standard blade to nibble 1-1/2″-long cheeks on the underside of the rail workpiece at both ends. Then turn the rail on edge, and cut single kerfs to delineate the shoulders of the tails. I’ve come to really appreciate this technique for making lapped dovetails, because it can be done with a single table saw setup — no blade changes or fence adjustments are required. Lay out the dovetail shape on the ends of the rail, and make the angled cuts freehand at the band saw.
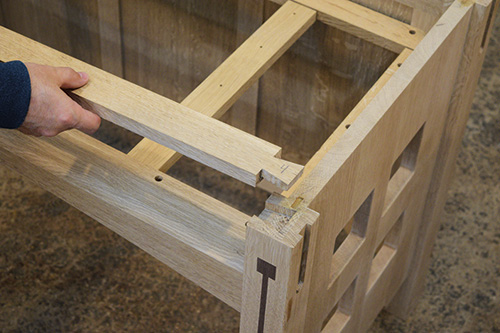
With the dovetails defined and a shoulder-to-shoulder distance of 39″, lay the rail on top of the front legs and so its back edge is flush with the back faces of the legs. Scribe the dovetails onto the tops of the legs with a marking knife. Now chuck a 1/4″ spiral bit into a compact plunge router, and carve the 1/2″-deep dovetail sockets in two successively deeper passes. Clean out the inside corners with a chisel, and test the fit of these joints. Adjust them as needed, then glue the rail to the legs.
Drawer Dividers, Filler Blocks
It’s time to build a pair of drawer dividers and long filler blocks. The dividers are two-piece assemblies, in order to show vertical grain along their front edges, and the components are glued together with a single #20 biscuit. Make sure to clamp these small pieces firmly to your workbench when cutting the biscuit slots. The two filler blocks straddle the outsides of the narrower drawers and fill the space between the legs. They also serve as mounting surfaces for the wooden drawer slides.

Before you glue the drawer divider parts together, set up the router table with a 1/2″ straight bit in order to cut grooves for the drawer slides. Locate these grooves 1-1/4″ up from the bottom edges of the dividers and filler blocks. Plow both sides of the drawer dividers, and one side of the filler blocks with 1/16″-deep grooves along their full length. Make sure to register their bottom edges against the router table fence when routing.
Cut the filler blocks 1/8″ short, to allow the desk’s side panels to move freely. Attach the filler blocks to the side panels through slotted screw holes. Carefully install the drawer dividers as well, making sure they are parallel with one another and the filler blocks as well as square to the web frame.
Now, make up six drawer slides from maple or other closed-grain hardwood, and shape their front ends round. Drill both slotted and standard holes in each, which will help adjust the drawer fit later. Notch the front ends of the drawer divider slides as needed, because they extend slightly beyond the grooves of the dividers in front. Attach the slides to the dividers and filler blocks through their slotted holes for the moment.
Constructing the Drawers
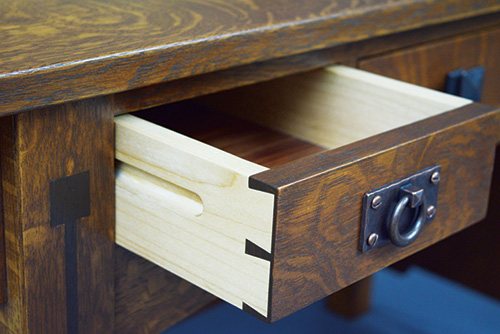
You’re ready to build components for the wide and narrow drawers. I chose slender half-blind dovetails at the front, and through dovetails at the rear, for a traditional look. Capture the 1/4″ plywood drawer bottoms in a groove located 1/2″ up from the bottoms of the drawers. I ran the drawer fronts, sides and backs through my planer to remove a little material from the top and bottom edges. This let me incrementally set the reveal for the drawers. After each pass through the planer, I checked their fit in the desk openings. Aim for a small, consistent reveal on each drawer.
All three drawers are side-hung, but only the wide drawer is center guided as well. Because of this, there are a few extra steps when constructing the wide drawer. While the drawer front is still an individual component, mortise its back face to receive the center slide. This requires a 1/4″ x 2-1/2″ centered mortise that’s about 1/4″ deep. Locate the mortise immediately below the drawer bottom groove.
On the inner face of all six drawer sides, mill a dado for the secret drawer compartment subdividers. Dry-assemble the drawers to check their fit, then finish-sand all of the pieces. Pre-finish the three drawer fronts through all the coloring steps (see finishing section for details). Once the glaze is dry, go ahead and glue up the three drawers.
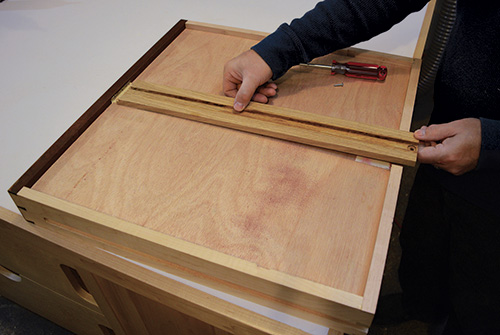
There are a couple more details to complete for the wide drawer. You need to notch out the back with a dado blade to accommodate the center slide. Cut the notch a little wider than the slide, to allow for some adjustment here. Now, prepare parts for a center guide (mounts to the web frame) and the slide (mounts to the drawer). Notch the drawer guide on both ends, until it seats in the shallow dadoes of the web frame. Since every component that is oriented front-to-back in the desk needs to account for side panel wood movement, leave extra room at the rear notch, and trim the part short by 1/8″ or so.
Cut a centered groove along the length of the slide, sized a bit wide to allow easy movement along the guide when the drawer is opened or closed. Attach the center slide through a slotted hole at the back of the drawer so side-to-side adjustments will be easy to make. Finally, make and install a subdivider in each drawer. I also added turn-stops (not shown) to my subdividers to prevent the drawers from being accidentally opened too far when in use.
Mounting the Desk Top, Corbels
Prepare some of your most attractive quartersawn oak stock for the desk top, as well as the backsplash and file racks. Glue up a panel that will yield the 24-1/2″ x 50″ top. Take the panel all the way through your finish-sanding routine. Temporarily mount the top to the desk with “figure 8” fasteners. Position these fasteners around the inner perimeter of the desk, one aligned with each clearance hole in the web frame.
Glue the corbels to the legs so they butt against the top panel, then remove the desk top.
Assembling the Backsplash
The backsplash features key elements of the desk’s overall style. A trio of walnut plugs complements the inlay on the front legs, and a cane webbing insert adds a unique touch. Cut the backsplash to size and, while it’s still rectangular, mill 3/8″-deep mortises for the three walnut plugs. The middle inlay is 1″ square; the other two are 3/4″ square.
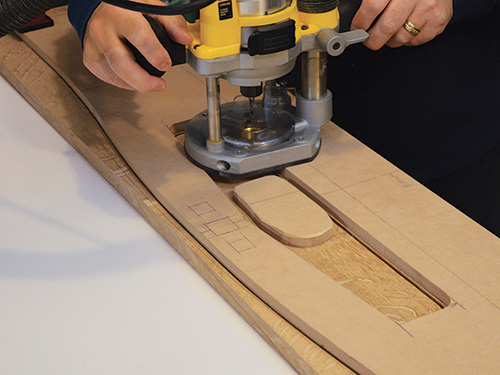
To shape the backsplash, I came up with — you’ll probably guess — a full-sized template. It also helps when creating a groove for reed spline and the shaped opening. (Reed spline is a natural material that’s traditionally used to attach rattan webbing for chair seats and sometimes chair backs.)
Clamp the template to the backsplash and outfit a plunge router with a 1/8″ spiral bit and a 5/16″ O.D. guide bushing (If you have an inlay bushing kit for your router, you may already own a 1/8″ spiral bit). Cut the reed spline groove in several passes, following the pattern tightly in a clockwise direction, until the groove is 1/4″ deep.
With the template still in place, switch to a 1/4″ spiral bit and a 1-1/4″ guide bushing to cut out the opening in the backsplash. This size guide bushing isn’t commonly available, so I improvised by adding a short length of 1″ PVC pipe to a 1″ O.D. guide bushing. A few layers of masking tape create a friction fit between the guide bushing and PVC ring. Elevate the workpiece so you don’t cut into your workbench.
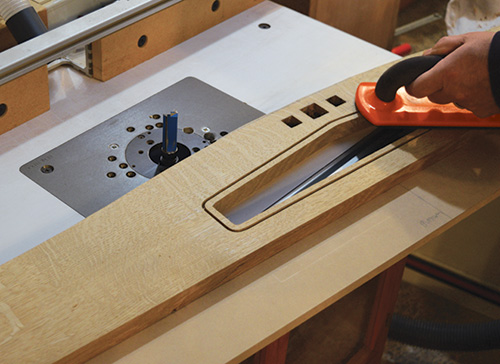
Next, rough out the backsplash’s top curve with a band saw. Affix the template to the workpiece with double-sided carpet tape, and template-rout the shape with a bearing-guided bit at your router table. I made my template slightly longer than the backsplash workpiece to safely guide this top profiling cut. Finish-sand the backsplash and attach it to the desk top with biscuits or dowels.
Adding the File Racks
A couple of file racks dress up the backsplash even further. Once you’ve made blanks for their vertical standards, mill shallow dadoes into the standards to accept the horizontal crosspieces. Cut and shape the curves on the standards, and glue them to the backsplash. Make up the crosspieces too, but don’t install them until after you’ve applied finish.
Multi-step Finish and Hardware
A dye finish highlights the medullary rays of the white oak, and glazing over the dye lends an aged, classic look to this project. Since I decided to use water-based dye, I wetted the desk and top with a spray bottle of distilled water to raise the grain, let them dry, and scuff-sanded with 320-grit sandpaper. That paved the way for the dye stain, which I applied with a terrycloth- wrapped sponge. I used Transtint Golden Brown dye, mixed one ounce per quart of distilled water.
Once the dye dries thoroughly, seal it in with a coat of dewaxed shellac. Scuffsand the seal coat and clean the project with a fresh cheesecloth and compressed air. Now glaze the desk with gel stain; I used General Finishes Antique Walnut. When that dried, I sprayed two coats of pre-catalyzed lacquer in a satin sheen. Here’s a trick I borrowed from the automotive finishing industry: wet-sand the final coat with a 1,200- or 1,500-grit soft sanding sponge instead of dry-sanding. It’s a great way to polish the topcoat silky smooth. I do this for most of my furniture finishing now.
It’s amazing how a cheap-looking set of drawer pulls distracts from an otherwise authentic piece, so choose carefully, and pay the extra money for premium pulls. Initially, I planned to use four bronze pyramid drawer pulls. However, when I sketched the project to scale, something didn’t look quite right. The square knobs visually fought the square inlay nearby, so I switched to ring pulls on the small drawers to achieve the look I was after. Complete the project by installing cane webbing.
Add an inkwell and a feather quill, and your desk is ready for use.


