Covering plywood edges with solid wood is a common method to hide the core material. A short tongue on the edging fits into a centered groove in the plywood to join the parts.
Video Transcript:
Chris Marshall: Hi folks, I’m Chris Marshall, with Woodworker’s Journal Magazine. Plywood with nice hardwood veneer on it, like this walnut ply, looks almost as good as solid wood — except for these edge plies. They don’t like the face veneer at all, and they don’t take stain well either. These edge plies are almost always better off hidden.
Now, you can hide the edges in a number of different ways. You can use iron-on veneer edge tape. You can cover the plies with a thin strip of solid wood and just glue it onto the edge. But for this nightstand project, I had to take a different approach. All four of these carcass panels are made of this walnut plywood, but the design called for a deep chamfer around the front edge, right here. So edge tape or a thin strip of wood just wouldn’t work.
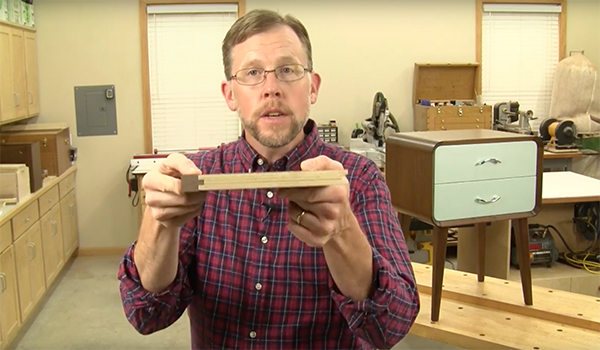
I needed to put a thick enough piece of edging on these panels so I could rout into it like solid wood. So here was my solution. I made up ¾ x ¾ strips of solid walnut, to match the thickness of the plywood. And I joined them to the plywood edge by putting a ¼ x ¼ tongue on the wood edging that fits into a ¼ x ¼ groove in the plywood.
This tongue and groove joint makes a solid, interlocking connection that can’t slip out of place when I glue the pieces together. And, the thick edging gave me plenty of material to rout those deep chamfers. Even better, I could make this whole joint with a ¼-wide slot-cutting router bit. Here’s how to do it.
We’ll start with the groove cut in the plywood first. Once you’ve got the slot bit installed, raise or lower it until it’s centered on the thickness of the plywood. I’ve got a scrap piece here, marked for about where the ¼-wide groove should go. So, I’ll adjust the bit height to hit my marks.
Now unlock and move the router table fence over the bit until just ¼” of the cutters extend past the fence face. When you’ve got the bit setting as close as you can get it, lock the fence down. And close up fences around the bit on either side to minimize the gaps.
Now test your groove setup on a plywood scrap by running it past the bit with one face down, and then the other, in two passes. If your test cut makes a ¼ x ¼ in. groove, you’re all set to cut grooves in the actual plywood pieces. But if the groove is a little bit too wide, the bit isn’t quite centered, so adjust the vertical setting. And if it’s too deep or shallow, move the fence in or out to fix it. Then, once things are dialed in, make your actual groove cuts in the plywood panels.
With the grooves cut, you’re ready to mill tongues in some edging to fit them. Here’s a piece of what that edging looks like. Now, you could mill sticks of edging to ¾ x 1 in. and rout a tongue into the edge, but that’s really narrow stock to work with. And it’s hard to guide inside of featherboards. Instead, start with wider stock so you can make two edging strips rather one, and then cut them apart last. I made my stock 2-1/2 in. wide.
Now to prepare for making these tongue cuts on the edging, you’re about halfway there already. Loosen the fence and tap it forward just a touch. I’m only talking about 1/32 in. or so here. That way, the tongue will be slightly shorter than the grooves are deep, so it will seat properly.
Now lower the bit until the top edge of the cutter just kisses the bottom of the groove cut you’ve made in the plywood. Since your groove in the plywood is centered, this bit setting will work for cutting both sides of the tongue in the edging.
Then make two passes on each face of a piece of scrap that’s the same thickness as your edging stock to see if your tongue setting is correct [B-roll]. Make sure to control these cuts with featherboards on top and in front, to keep the scrap piece held securely against the fence.
The tongue on my test piece fits pretty well. It’s a good friction fit that I don’t have to force together. But the test tongue may not fit this well on the first try. If it’s too thick for the groove, raise the router bit a little to cut a thinner tongue. If it’s too thin, lower the bit to make the tongue thicker.
Keep trying until you get the tongue fitting the groove just right. Then, rout the tongues on your actual edging workpieces, and rip the strips to final width at the table saw.
Then, all that’s left is to spread glue into the grooves and clamp the edging in place. Then, when the glue dries, trim off the excess. I’ve used interlocking edging like this on many, many projects over the years — from shelves and boxes to tabletops and more. It’s an easy technique to hide plywood edges that’s durable, won’t fall off over time and registers itself automatically. Give it a try on one of your projects, and thanks for watching!


