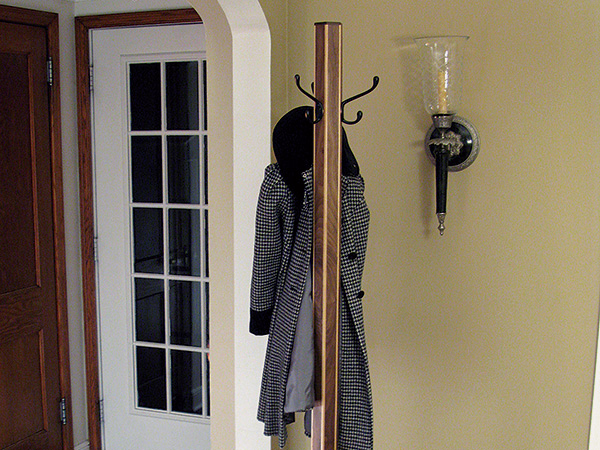
Whether you’re a party animal who needs a better place for your guests to pile their wraps than on top of the nearest bed, or an outdoors aficionado who owns outerwear galore, a coatrack can be a handy addition to your household.
This hall tree style option is a bit of a blast from the past: it originally appeared in the April 2005 edition of Woodworker’s Journal. Ten-plus years on, as we shiver our way through yet another Minnesota winter, we decided to reprise the warm memories of the “Hexagon Hall Tree” (and, that additional coat storage is always a bonus!).
Despite the “impress your guests” vibe of elegance and quality this coatrack gives off, in actuality it’s a pretty simple project to build. You should be able to get it built in the timespan of a long weekend, plus another day or two of drying time to allow your finish to completely cure.
Reverse Inlay
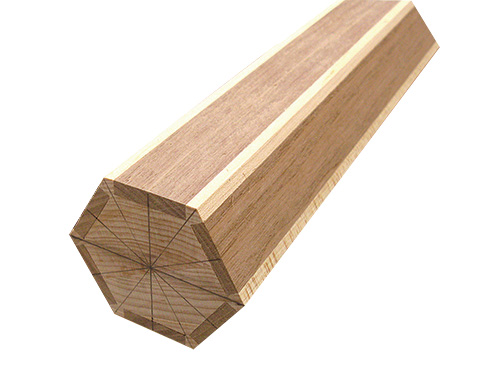
Much of the visual interest on this coatrack comes from its “reverse inlay.” It’s a bit of fancy trickery in which it looks like the lighter-colored wood (we used maple) is inlaid into the darker wood — in this case, walnut. In truth, though, we achieved this effect by gluing thin and comparatively wide strips of walnut into the center of each facet of the hexagon- shaped column — which, in reality, has a maple core.
The legs are glued up with two 1/2″ laminations of walnut. I added this simple lamination approach to help offset the weakness in the “short grain” area of the narrow ankles.
Start with the Column
You’ll want to start your construction of this coatrack with the column (piece 1). Our choice for light-colored lumber was hard maple, and back when I built the original coatrack, I had a sizable piece on hand that I could mill to the 3″ x 3″ x 66″ dimensions found in the Material List. This time out, I needed to laminate some thinner pieces of maple together. That meant that I needed to take an extra minute or two during the next step to keep the glue joints from bisecting one of the hexagon’s corners. (That just wouldn’t look classy at all.)
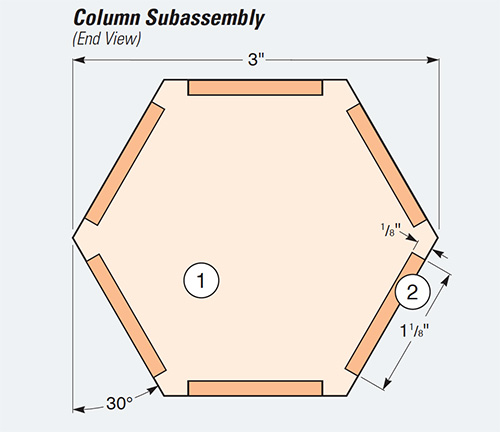
After you’ve milled your column to size, you’ll need to mark the ends of the column with pencil lines set at 30° from each face to form a hexagon. Take your time with this step. Each facet has to be of equal width for the reverse inlay technique to work properly. I recommend adding a few inches of extra column material so you can trim off the end of your stock, mark the cutoff and use it to get a perfectly setup saw. In fact, you might even make a short test blank if you don’t have some drop-stock to work with.
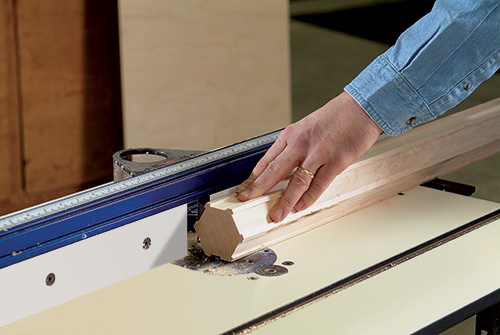
Once you have the end marked, step to your table saw, tilt the blade to exactly 30°, and set the height. If your table saw is a traditional right-tilt version, you will need to move your fence to the left of the saw blade. Carefully align the saw blade to the layout line on your test blank (or your actual column, if you are either brave or a confident gambler) by adjusting the fence.
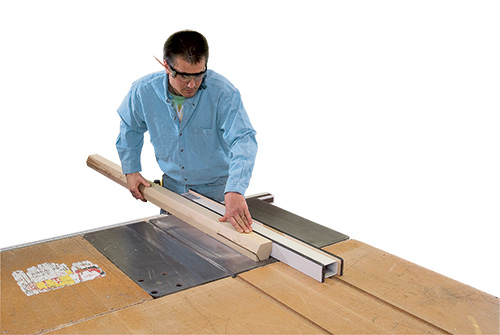
Make the first slice along the length of the piece, then flip the piece end-forend and position your stock so you are cutting the adjoining facet of the hexagon (you will create a point or corner). Measure the two facets to see if they are equal. Adjust the fence if they are not, and try the operation again. Once the setup is correct, bevel-rip all six facets. I highly recommend a featherboard (placed exactly in the center of the width of the column) to add an element of control and safety.
Plowing the Facet Grooves
With your hexagon in hand, move to your router table to plow the grooves in each facet. I’d grab that test blank you made as well, to once again assist in setting up a proper cut.
I used a two-step plowing technique to center the grooves in the column’s facets. I set a 5/8″ straight bit to a depth of 1/8″. The Drawings give you the grooves’ exact dimensions. Verify your setup by using the test blank, then go ahead and plow the facet grooves.
Moving back to the table saw, I ripped 1/8″-thick walnut strips (pieces 2) to fill the voids you’ve just created in the facets. Select the best-looking stock: it will add to your coatrack’s appearance.
Fit the walnut strips to the grooves and get ready for glue-up. I glued and clamped two facets per session and had the walnut in place in short order. You can start on the legs in your downtime. Because there are six sides to the coatrack, it is incredibly simple to attach three legs to the column. As you know, three-legged stools, tables or even coatracks have the advantage of never needing to be leveled.
Although there are only three legs, I used six pieces of wood to make them: it makes them much stronger. Cut the leg laminations (pieces 3) from 1/2″ walnut stock. For appearance’s sake, try to make each leg from stock that matches well. (I cut each pair of leg laminations from the same board.) Glue the blanks together, making 1″-thick leg stock. Use the gridded Drawing on the next page to make a pattern of the leg shape.
If you are not familiar with using gridded drawings, you have a few options. The first is to create a grid of 1/2″ squares on sturdy paper. Draw matching lines on your grid to the ones in the gridded drawing. This will provide a very close representation of the leg shape. Don’t be afraid to refine the shape as you see fit. The second option is to use a copier to enlarge the gridded drawing by 400%. Or, in one of those wonders of modern technology, you can go online to our website and print out a full-size copy of the leg pattern grid.
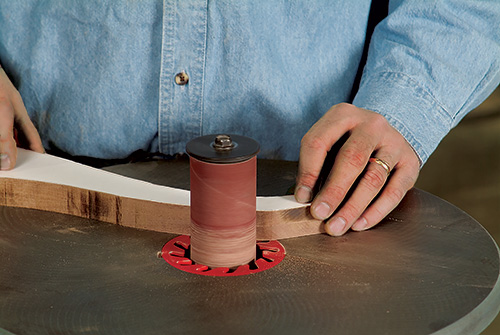
Once you have your pattern, transfer the shape to each leg blank and use a band saw to cut them out. (Keep these cutoffs: you’ll use them to set up your router table later.) I used a spindle sander to complete the shaping of the legs and smooth out any saw marks left behind.
Go back to the column that you’ve completed gluing the walnut strips into. Scrape off any glue squeeze-out and then use a belt- or random orbit sander to clean up the facets and sand them smooth. Be careful not to round over the flat aspect of each facet. Now you’re ready to do some dovetailing.
Sliding Home
The legs are attached to the column with sliding dovetails, which are easier to make than you may think. (You could, of course, use a more basic mortise-and-tenon joint, which would hold up fine, but where’s the fun in that?) Chuck a 1/2″-wide, 14° dovetail bit into your router table and set its depth to 5/16″ deep. You are going to plow the column dovetail grooves 35⁄8″ long, exactly in the center of the facets. Look to the Elevation Drawings for location details. Set up a stop on your fence to register each cut perfectly. Plow all three grooves and then grab the coatrack legs you’ve previously cut out.
This is where the cutoffs that you saved when band sawing the legs come in handy. You need to set the fence of your router table to cut the matching dovetails on the legs, and you can use the drop-stock to test the cut.

The first cut on each face of your legs should be a very light initial pass,with the bit barely protruding from the fence. This will precut the fibers (the same as scoring them with a knife) and help prevent tearout. Then, creep up on the cut by moving your fence back in about 1/16″ increments, as you first run one face of each leg through, then flip it around to do the other side. Do this until you reach the correct width of the dovetail, making sure to run both sides of each leg through a setting before moving the fence again. You’ll know you’ve got the width right when the joint slides into the groove in the leg with just a hint of resistance.
After forming the dovetails on the back of each leg, trim the dovetails (down from the top edge of the leg).to match the grooves you plowed in the column. I used my band saw and some chisels for this task, but you could just use a backsaw or similar handsaw. When they fit correctly, put some glue in the grooves and slide the legs home. Stand the column on its top end while the glue cures.
Capping it Off
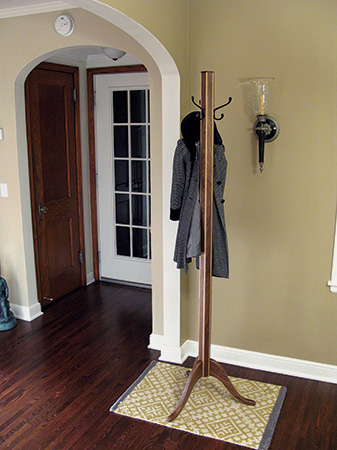
When I made the first version of this coatrack more than 10 years ago, I chose a two-piece cap style that created a type of “crown.” This time out, I just capped it off with a flat piece that follows the hexagon form of the column. Simple and stylish. I cut the cap (piece 4) from 1/4″ walnut into a hexagon shape. Mount the cap to the top of the column with a screw and a dab of glue.
You’re now at the point where you can go ahead and mount your hooks (pieces 5) — even though you’ll take them off again immediately for finishing. I mounted the hooks 8″ down from the top of the column. And, even though I’ve now built this coatrack twice, I had another thought to improve it even more. (Woodworkers are always tweaking.) What you could do — and I just may go back and add this element — is to mount a second row of hooks further down from the first. This would make it easier for your shorter friends to hang up their coats and could even help you get more storage out of the piece, since a group of bulky coats wouldn’t be bunched up on the same level. You could even jazz things up a bit by using a different style of hook for your lower layer. Some smaller ones, like 1-3/4″ robe hooks from Rockler (item 31710) could even, literally, provide you with a place to hang your hat. You’ll still want to make sure you mount any additional hooks on the same facets of the hexagon where the legs are installed, to ensure the coatrack’s stability.
As for finishing the piece, I recommend taking a good bit of time to do a thorough sanding job, right up through the grits. (I went all the way to 220 grit.) The smoother the wood to which you apply an oil finish, the better that finish will look. It’s as simple as that.
I do have another secret for making walnut look its very best. To combat areas where your walnut’s color may be shifting from brown to something else, I’ll suggest applying a coat of cherry- colored oil stain. It creates highlights and blends color shifts while enhancing the grain. After that coat dries, apply three coats of Sam Maloof® Poly/Oil Finish. Re-mount the hooks, and the coatrack’s ready for the many coats of a Minnesota winter — which tells you why we needed to build more than one.
Hard to Find Hardware
1/2″ D x 1/2″ H x 14° x 1/4″ Shank Rockler Dovetail Bit #91023
Coat and Hat Hook, Oil Rubbed Bronze #34826
Sam Maloof Poly/Oil Finish #32545
Click Here to Download the Materials List and Drawings.
– Brad Becker works as a woodworker in the Woodworker’s Journal and Rockler shops, as well as making picture frames for his wife’s art


