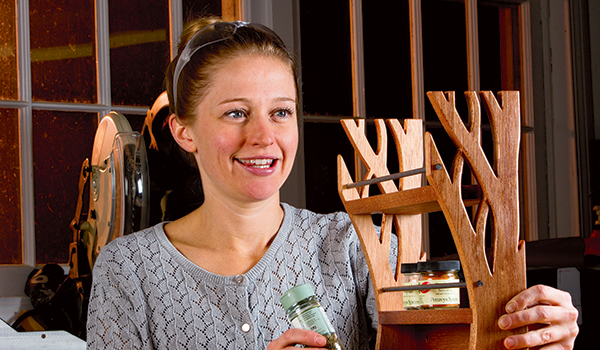
The multitude of forms a spice rack can take on is pretty much endless. (You can see me talk about the design aspect and coming up with your own options on the online video.) I decided on a tree silhouette as the inspiration for mine — it seemed like the obvious choice for someone who is a self-proclaimed tree-hugger. Also, the idea of taking part of a dead tree and making it back into a tree shape seems appropriately ironic.
Since my goal was merely to give the sense of a tree, I used only part of the tree form: the canopy is blatantly manipulated and cut off in a straight line. This design choice not only gave the spice rack a clean line across the top, it also gave a metaphorical nod to the harvesting and manicuring of trees. For the wood, I used mahogany salvaged from a door maker.
To get started building your spice rack, establish your template and create a cut list for your own design, or use the ones I came up with if you want to follow my lead. Next, mill your wood. (Remember to check that all your tools are set up square. “Squares” might be boring, but squares are a woodworker’s close friend.)
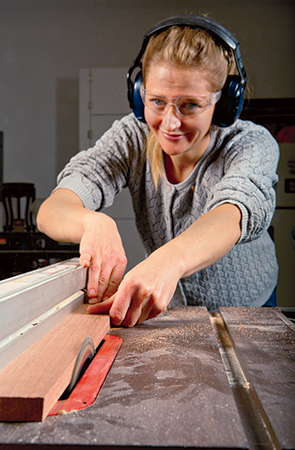
My side pieces are book-matched even though the grain is straight and only has slight variations. Per the usual milling rule for a smaller project like this, I left all of my pieces one to two inches longer than the final dimensions to make sure I had plenty of material. After milling all the wood, I lined up the two side pieces and traced my pattern directly onto the top piece in line with one of the long edges. Next, I crosscut both side pieces to final length at the same time.
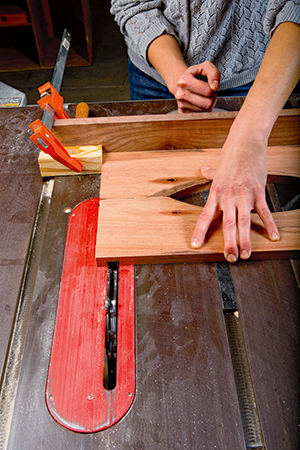
Using a dado stack, I set up to cut a 5/8″-wide dado to house my shelves. I laid the two side pieces against my miter gauge fence and together with the inside faces down, then set up a stop to ensure my pieces would stay aligned for cutting each of the grooves. You can see my setup in the photo above. Then I used double-stick tape to adhere the inside faces of the side pieces together for cutting and shaping. (You could also use masking tape or blue tape and tape them together.)
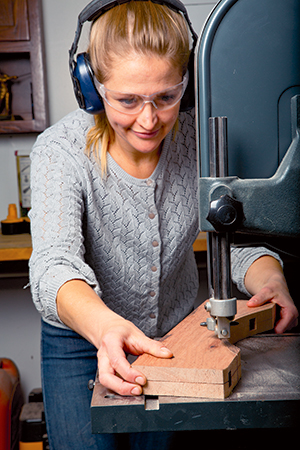
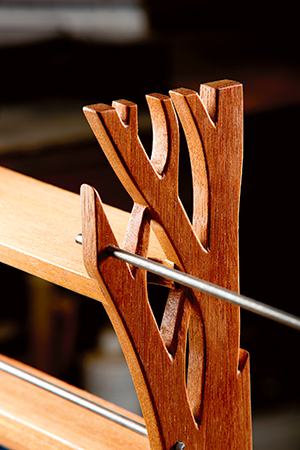
Since I had already drawn my shape on the outside of the side pieces, I went straight to the band saw to cut the organic shapes of the outline. While the pieces are still aligned and taped, drill the holes for your steel rods. I drilled through one side and only halfway into the other so that I could easily slide the bars in through one side after glue-up.
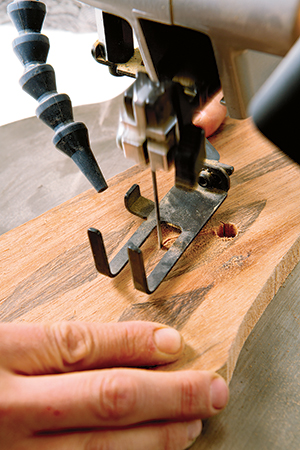
For creating the interior shapes of the branches, I drilled holes in the side pieces so I could use the scroll saw to cut those shapes according to my template. (If hadn’t had a scroll saw, careful cutting with the jigsaw or a coping saw would’ve worked, too.) I took the side pieces apart before using the scroll saw. The thickness of the two stacked together would be too much for that tool.
Next you will rip your shelves to width. The dimension provided for the shelf depth is a little bit deeper than it needs to be, so you can get the right angle on the shelf fronts to match the sides. At this point, assemble the shelves and side pieces. Then, using a pencil, mark the angle you need to cut in order to match it up. On the top shelf of my tree, I cut out two relief spots to ensure that the negative space of the branches wouldn’t get lost with the intersection of the shelf. The angle of the branches made this tricky. Make sure to mark the top and bottom intersection of the shelf and branches because it will be angled. Cut out the smaller shape on the band saw and use your hand tools to shape them flush.
Go ahead and rip and crosscut the wall mounting cleat, and drill two countersunk holes 1-1/2″ in from the ends for mounting the rack. I countersunk these holes 1/4″ deep so I could plug the screw heads.
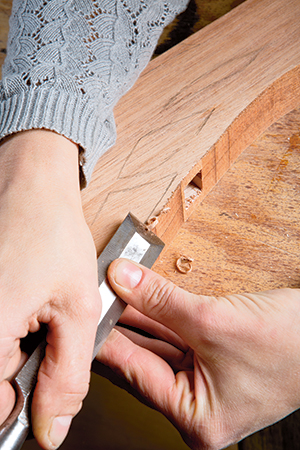
Now the fun really begins! Using a variety of hand tools (rasps, files, chisels, spokeshave, sandpaper with thin sanding blocks, etc.), I shaped the tree branches, got rid of the saw marks, and chamfered all the edges to varying degrees to accentuate the tree shape on the outside of the side faces. You can form the tree as much or as little as you like. Maybe you want to take the edges to a full roundover or carve it to be closer to a true tree. It’s up to you. Although, with hand-shaping, it is very important to be mindful of short grain, weak spots and grain direction in general. Use smart clamping to support your piece, too. Now sand the front and back faces of the sides, top and bottom of your shelves, and the mounting cleat, up to 220-grit either using a sanding block or by cupping your sandpaper. Don’t sand the front edges of the rack until you have glued it up.
My shelves fit into the dadoes almost perfectly, with a nice friction fit. Therefore, when I sanded the shelf faces before glue-up, I was careful not to hit the part that would go into the dado. I did not sand the front edges of the shelves before gluing: I left them a little big to make sure the edges of the shelves matched the organic shape of the sides.
At this point, it is time to glue things together! Use just enough glue in the dadoes so as to not have squeeze-out on the shelves. I used three bar clamps (one for each shelf). They clamp up nice and square, and they aren’t hefty to haul around the shop.
After ample drying time (overnight), shape and sand the front of the shelves to match your side pieces. Everything should be sanded to 220-grit now, and you are ready to finish!
For the clear coat (I rarely stain wood), I used Minwax® Aerosol Lacquer in semigloss. I needed something quick drying, so this was the right choice. I do hate using aerosol cans, but sometimes convenience wins over ecological sense. I did three spray-on coats. Start in the hard-to-reach spots in between the branches. Make sure you flip the rack over to get all the different angles, too. I recoated after about 20 to 30 minutes, and following the final coat I let it sit a couple of hours before I put the steel rods in. I didn’t glue the rods into their holes in order to make them easier to remove for occasional cleaning. If you choose to, use epoxy.
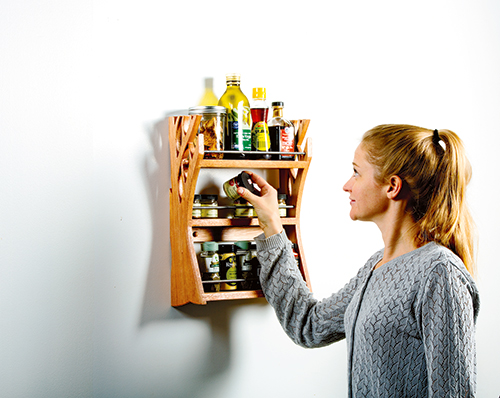
I’m pretty satisfied with the results of the spice rack. The mahogany is beautiful. There is enough room for about 30 average-diameter spice bottles. There are lots of beautiful specialty bottles available online that you could fill your rack with if you want to further customize the look. Happy cooking! And enjoy the ease of your spice organization.
Click Here to download a PDF of the related drawings and Materials List.


