Try these cutting tips when the edge of your board is too crooked or rough to run along a table saw fence.
In a perfect woodworking world, every board would have dead-flat edges. But, reality tells us otherwise. Whether you buy your lumber roughsawn from a mill or surfaced on all faces and edges from the home center, wood doesn’t always come to us with flat edges…or stay that way. Of course, all it takes is one flat edge to make a safe rip cut and flatten the other edge. If that first edge is only slightly warped, you can flatten it nicely on a jointer or with a hand plane. But, what do you do when both edges are twisting like a mountain road? Or, maybe one edge is warped and the other edge is waney. Jointing seems out of the question. In situations like these, here are some options to try.
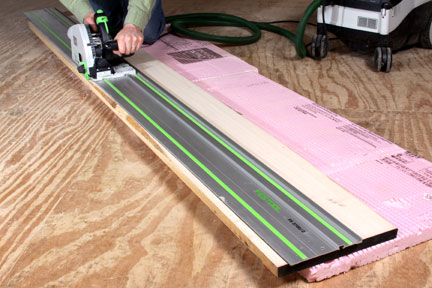
Bring the Tool to the Wood
Long, heavy boards are difficult to maneuver over a jointer, even in the best circumstances — never mind when the edges are bad to begin with. In these instances, make a smaller saw your go-to tool. A handheld circular saw or jigsaw are both excellent options. Instead of attempting to rip a straight line freehand, guide the base of the saw against a straightedge (Photo 1) to bring the board’s first edge into conformity. Generally, you’ll produce an edge that’s flat enough to take straight to the table saw.
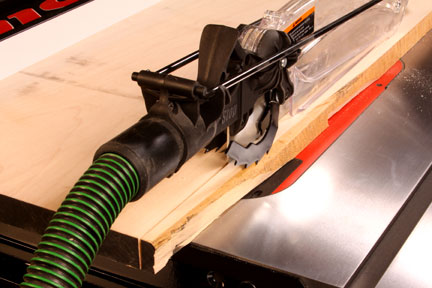
Use a Carrier Board
For shorter workpieces, here’s another trick to try. Mark your workpiece with a pair of lines that indicate the two rip cuts you want to make. Attach the wood to a second carrier board that already has a straight edge. In Photo 2, we’re using a piece of MDF shelving as the carrier. You can use short screws, a few brad nails or even a heavy bead of hot-melt glue to secure the workpiece to the carrier. Align the first edge you want to rip with the edge of the carrier board, driving the fasteners in the waste area opposite the first rip cut. Then run the carrier board’s flat edge against the rip fence to cut the first edge of your stock. Detach the two, and you’re all set to rip the workpiece’s second edge flat the conventional way.

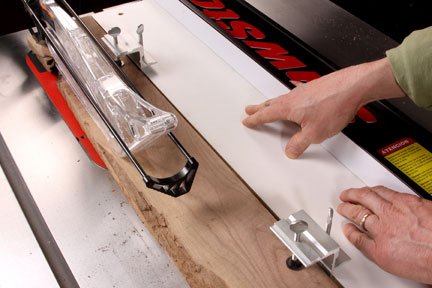
Consider Clamps
Some companies, such as General Tools & Instruments, offer edge clamps for the sole purpose of helping you rip those unrippable edges. The versions shown in Photo 3 have two thumb screws each: one secures the clamp to a flat-edged guide board and the other screw holds the workpiece. You can make these sorts of clamps work with any length of stock you need to rip, provided the guide board is long enough to accommodate the board you’re ripping. Clamp the stock to the guide board, and rip away!