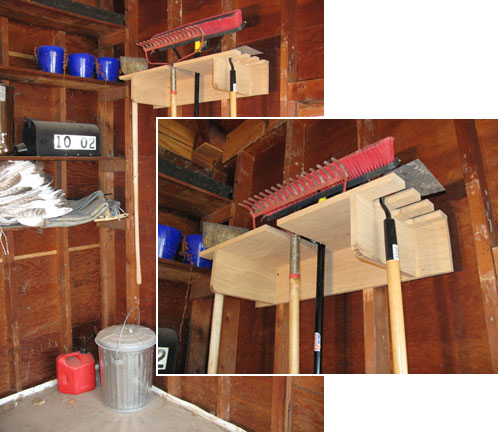
This fast and easy project gets your long-handled yard tools off the floor and helps organize your garage and keep it clean.
Start building the organizer by cutting the Top to size. The sizes for all the parts of this project are indicated in the Material List below. You can use solid lumber (as shown in the photos) or plywood for this project. Both will work perfectly well, so it is entirely up to you.
Nearly all of the cutting and shaping on this project is done to the Top, so your next step is to mark out the rabbet and all of the cutouts and dadoes onto the top as shown in Figure 1. You can find all the details and measurements that you need for this process on the Elevation Drawing below.

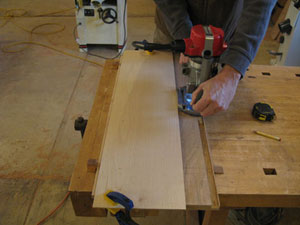
Once you have the layout lines marked with a pencil, chuck a 3/4″ straight bit into your handheld router. The rabbet and dadoes are all cut 3/4″ wide and 3/8″ deep. Use a straightedge to guide the router as you cut. It is best to cut down to the 3/8″ depth in a couple of passes — it makes the process a lot easier on you and the router. It also helps you to have a greater degree of control over the cut, and that leads to better accuracy. Plow each pass along the length of the cut, as shown in Figure 2, with a moderate speed.
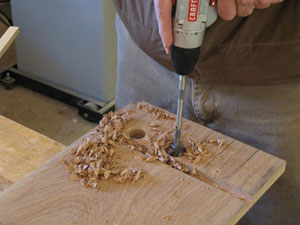
When you’ve completed the rabbet and dadoes, grab a cordless drill and a large diameter drill bit to start forming the tool cutouts. Either a Forstner bit or a paddle bit will work to complete this task. Be sure to have a backer board (hidden in Figure 3) of some sort under the top to minimize tearout as the drill bit exits the Top. This is especially true if you choose to use plywood as your material. Bore all the holes, one after another, until you have completed the task (Figure 3). While it would be ideal to have a drill bit that matches the diameter of the radius shown on the Drawings, it is not required: you can adjust the radius in the next step.
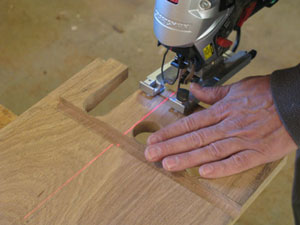
Now, grab a handheld jig saw to complete the cutouts on the Top. As mentioned before, if you need to enlarge the radius of your drilled opening, you can use the saw to do that. Once again, complete all of the cutouts before moving on to the next few steps.
Now, grab a handheld jig saw to complete the cutouts on the Top. As mentioned before, if you need to enlarge the radius of your drilled opening, you can use the saw to do that. Once again, complete all of the cutouts before moving on to the next few steps.
Now you can go ahead and cut the Back and the Braces to the sizes shown in the Material List. Test fit them into the dadoes to be certain that they fit correctly. Use the handheld jigsaw to cut the front lower corners of the Braces round, as shown in the lead photo.
Grab the drill again, and bore pilot holes for the screws through the Top. The Braces are also secured through the Back with screws so, with the pieces temporarily dry assembled, mark out where those screws will penetrate the Back. Two screws per Brace are sufficient. Go ahead and bore the holes through the Back. Take a moment now to countersink the holes that you have just bored.
Once again, temporarily dry clamp the pieces together, making sure that all the pieces are sitting square and true. Then drill holes slightly smaller than the diameter of your screws into the Braces through the countersunk hole you just made — this will insure that your screws grab tightly, but do not break as you drive them in later.
Now it is time to assemble the organizer with glue and screws. Screw the Braces to the Top, and then the Back to the Braces. Allow the glue sufficient time to cure.
When the glue has cured, take some sandpaper and soften the edges of the organizer. You can paint or finish the unit if you’d like, but in truth, it is not necessary. Just mount it to the wall of your garage or shop, and get those tools off the floor and out of the way.
Garage Tool Organizer Material List
| T | W | L | |||
| Top (1) | 3/4″ | x | 11-1/2″ | x | 31-3/4″ |
| Back (1) | 3/4″ | x | 6″ | x | 31-3/4″ |
| Braces (2) | 3/4″ | x | 6″ | x | 10-3/4″ |


