Hand cutting mortises and tenons is not difficult, but you must pay special attention to cutting each part in the right order.
Mortise Chisel
The mortise chisel is robustly made to withstand mallet blows and lever out waste without breaking. Manufacturers’ design details vary, but the one essential characteristic is that the flat back face must be at right angles to the sides. These square corners cut the wood as the waste is scooped out. A non-square chisel will twist as you drive it. You cannot stop the twist! Levering out waste with a twisted chisel will make a mortise wider than the chisel.

In addition to a mortise chisel and marking tools shown above, you need a mallet, a tenon saw, a bench hook, and 3/4″ bevel-edge chisel. Obviously, hand tools cost much less than a mortising machine. As for speed — that depends on how skilled you become — but after making a few, it’s not slow. For a one-off project, handmade can be quicker than machine-made. As for the pleasure derived from a well-executed handmade joint, well, you won’t know until you’ve tried it.
Before You Start Cutting
Begin by marking face sides and face edges on all the pieces. Face sides go inside, face edges go down.
Knife the horn. The horn helps prevent the mortise from splitting once glue is applied to an already tight joint. You cut the horn off after the glue is cured.
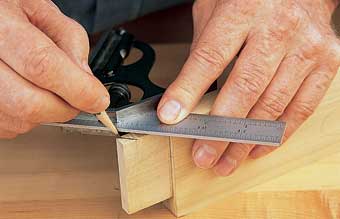
Knife all round the shoulders of the tenon. Then, using the marking gauge, mark the top and bottom edges of the tenon. You can now transfer these distances to the leg to mark the top and bottom edges of the mortise.
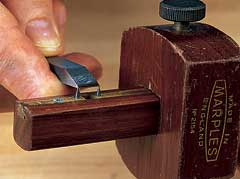
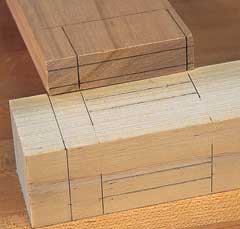
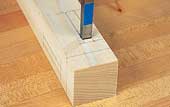
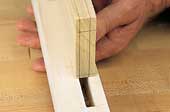
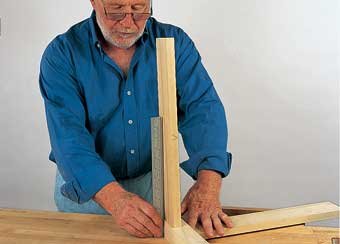
Set the tips of the mortise gauge spurs to the width of the mortise chisel. The importance of this setting will be discussed later. Two fence settings are needed: one for the mortise in the leg and one to scribe the tenon width onto the rail. Mark both parts and your joints should look like those in the photo at top right. After you chop the mortise, you’ll have to saw the tenon: how close you saw to the gauge line will be decided later.
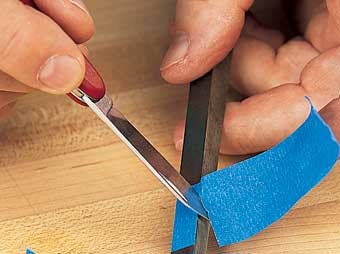
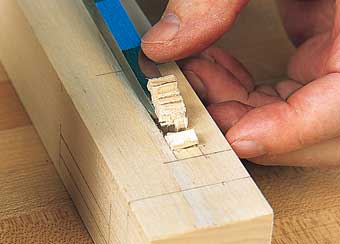
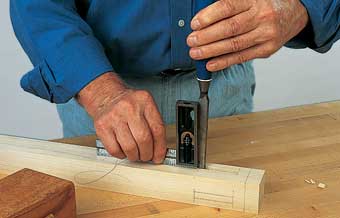
To know how deeply you are driving the chisel into the mortise, make a simple depth gauge using a piece of blue masking tape stuck to the back of the chisel and trimmed flush with the edges. Don’t wrap the tape around the chisel because it will crush and tear as you get to the final depth of the mortise and lever out the waste. For our purposes here, the tape also tells you which way the chisel is facing as you look at the photos of chopping the mortise.
Do your chopping at the end of the bench, away from the vise. Place the workpiece over the legs because that’s where the benchtop is most solid. Brush the bench clean of mortise chips as you work. If chips get trapped under the work, you will have to steam out the dents. The chips can also tilt the workpiece, making it difficult to drive the chisel straight.
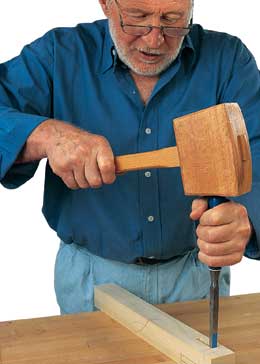
Joiner’s Mallet
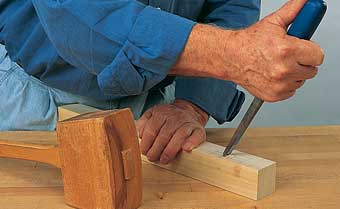
Chop with a joiner’s mallet. A cylindrical carver’s mallet is not designed to deliver the heavy blows required for chopping mortises. Plus, a glancing blow off the chisel handle could hurt your wrist. Also avoid a dead blow hammer. Because it deadens the chisel’s response to the hammer blow, you won’t know when the chisel has been driven solid and can’t be driven further.
Chopping is a three-stage cycle, repeated over and over. First you position and set the chisel, then you drive the chisel, and then you lever out the waste.
Use two hands to position the chisel exactly between the gauge lines that mark the side walls and parallel to the knife lines that mark the end walls. It’s difficult to locate the chisel accurately with a mallet in one hand. Next tap the chisel to set the edge into the workpiece. The importance of how the chisel width is measured should now be apparent. By using a top-of-the-spurs setting, the gauge line reflects the actual chisel width and makes it easier to position the chisel. A bottom-of-the-spurs setting makes the gauge lines wider than the chisel, making it difficult to repeatedly position the chisel in the right place.
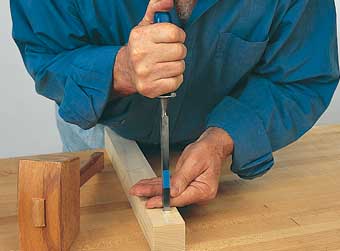

Drive the chisel with a full arm swing blow. It may twist if not hit squarely. If so, hold the workpiece to the bench with one hand and twist it back into alignment. If you can’t correct the twist, lift the chisel out and re-position it to take a new, small bite.
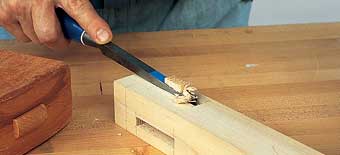
Remove the waste by levering the chisel towards you. Remember to always keep both hands behind the sharp edge.
To hold the chisel vertically, stand at a comfortable arm’s length directly behind it. You determine the chisel is vertical by simply sighting it — there are no effective assists.
There are two ways to chop out the mortise. I call them the layered method and the full-depth method (see sidebar, below). Using the layered method, you remove the waste in layers by cutting the mortise end-to-end at half the depth, then removing a second layer to the full depth.
When using the full-depth method, you remove a portion of the center of the mortise to the full depth, then advance incrementally to each end, going to full depth with each bite.
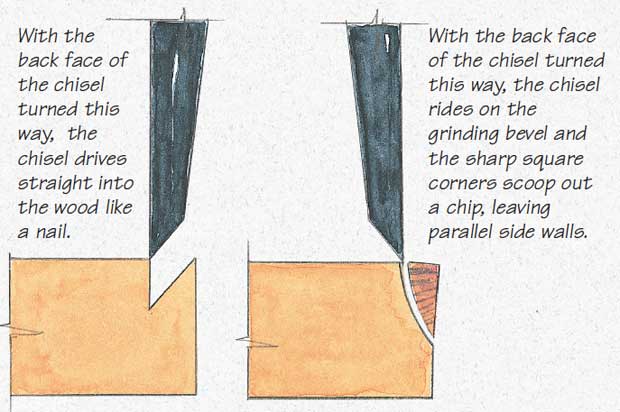
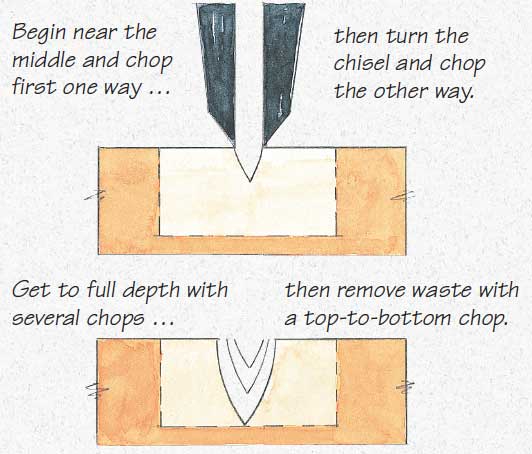
Both methods rely on the fact that the mortise chisel cuts the wood with the square corners of the back face and scoops out the waste by riding on the grinding bevel. To see how it works, get a block of wood — a 2 x 4 will do. Stand facing the end grain and position the chisel 1/4″ from the near end, with the back face away from you. Drive the chisel into the wood with a hard blow, like driving a nail. Now turn the chisel around and repeat the procedure. This time the chisel scoops out a chip as it rides on the grinding bevel. You just completed the essential steps for chopping a controlled square hole with a mortise chisel: you first made a space and then you scooped out the waste. I’ll now describe how to make that space for each of the chopping out methods.
Chopping the Mortise — Layered Method
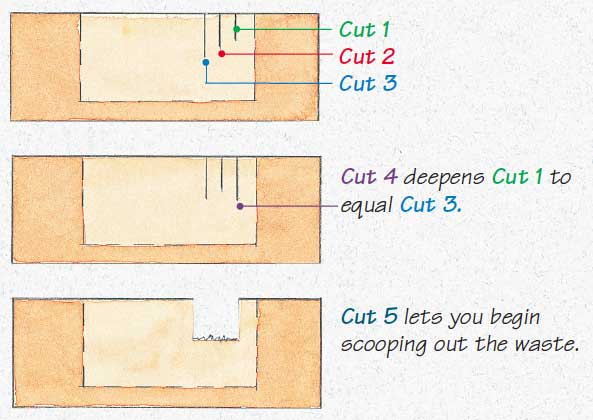
The layered method takes five chisel cuts to get the first waste out.
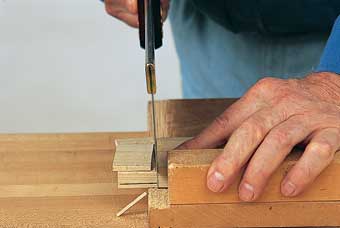
Cut 1 — Start by standing behind the work. Position the chisel, flat side away from you, about 3/16″ from the far end of the mortise. Tap lightly to set the chisel, then hit it hard. If you hit as hard as I do, three blows will usually drive it as far as it will go. A dull clunk is the tell-tale sound of a chisel driven solid. Put the mallet down. To remove the chisel, lever the handle away from you; it’s easier to withdraw that way. What remains is a space the same shape as the end of the chisel.
Cut 2 — Position the chisel about 3/16″ towards you. Tap lightly to set it, followed by three hard blows. The difference between Cut 1 and Cut 2 is that the second went a bit deeper because of the space created
by the first.
Cut 3 — Remove the chisel and position it another 3/16″ towards you for Cut 3, which will go deeper yet.
Cut 4 — Position the chisel in Cut 1 and hit it hard to drive it to the same depth as Cut 3.
Cut 5 — Finally, position the chisel, back face away from you, another 3/16″ behind Cut 4. You are now over half an inch from the start. Drive the chisel, place the mallet down, and lever the chisel handle toward you — keeping it carefully aligned with the mortise sides — and scoop out the first waste. Repeat Cut 5 until you have removed the first layer. To remove the second layer, repeat Cuts 1 – 5 and then finish the job with Cut 5.
Chopping the Mortise — Full-Depth Method
Begin by chopping in the center of the mortise with the flat side of the chisel towards you. Drive it solid, remove it, turn the back face away from you, and position it about 3/8″ nearer to you between the gauge lines. You should be able to remove a chip on the second cut. Take 1/8″ bites, and repeatedly alternate the chisel direction, driving down as hard as you can. The chisel will resist coming out easily. Take care to keep both hands behind the cutting edge.
With the layered method, the chisel is levered past the sidewalls twice, compared to once for the full-depth method. That doubles the possibility of the chisel twisting and removing extra tissue from the side walls. I use the full-depth method, but beginners may find the layered method easier to learn. Try both and go with the one that suits you best.
Squaring the End Walls
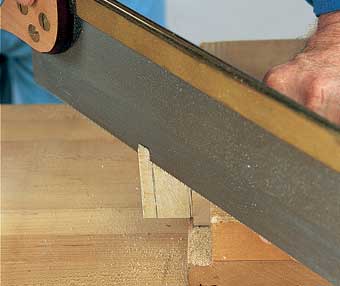
Once the bulk of the mortise is chopped, you square the end walls. Set the chisel in the knife line, back face to the end you’re cutting, and drive it to the bottom of the mortise. Hard blows are unnecessary. It’s more important to keep the chisel aligned with the mortise and at a right angle to make the end square. Check the ends and depth of the mortise with a try square.
Don’t expect to get a flat bottom on a hand-chopped mortise, but you shouldn’t be more than 1/16″ – 1/8″ deeper than necessary. On a leg where two mortises intersect, the last remaining corner material may be removed with a wide bevel-edge chisel. Note: this is not an invitation to pare the side walls.
Tenon Saw
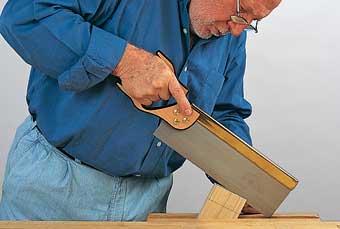
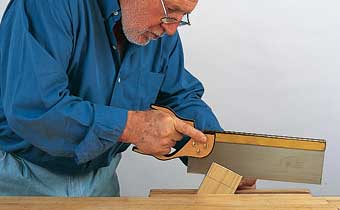
A tenon saw, also called a bench saw, is a robust tool designed for general cutting. Don’t cut tenons with a dovetail saw: The blade is too thin and the saw will wander. Four keys to accurate sawing are grip; alignment of wrist, arm and shoulder; motion; and stance. Note that four fingers wrap around the handle, but the extended index finger presses against the side of the handle, and points down the saw. This grip provides more steering control. Align the wrist, lower and upper arm, and shoulder in one plane so that you can saw back and forth in a straight line, like a piston. Stand balanced on two feet and far enough from the workpiece so that you can maintain the piston-like alignment and motion. Put your spare hand lightly on the work — don’t lean on it for balance.
One Line at a Time
To saw a tenon accurately, you make four separate sawcuts, one line at a time. If you attempt two lines at a time and things go wrong on one line, then any adjustments to get back on track will inevitably take you off track on the other line. The first sawcut makes a shallow kerf in the end grain. Each of the remaining three sawcuts cuts a triangle of tissue on the tenon face.
Clamp the workpiece low in the vise at an angle of about 45°. Before making your first cut, you must decide where to saw the kerf relative to the gauge line. Remember, you determined the gauge lines when you set the spurs on the mortise gauge to the width of the chisel. However, the width of gauge lines will vary if you measured from the top or the bottom of the tapered spurs. I want to emphasize that the mortise gauge has little to do with the mortise, which can only be as wide as the chisel, but it has everything to do with the tenon and where you make the sawcuts. To determine how close to the line to saw, put the tenon on the mortise and decide.
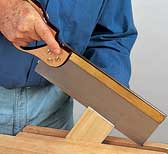
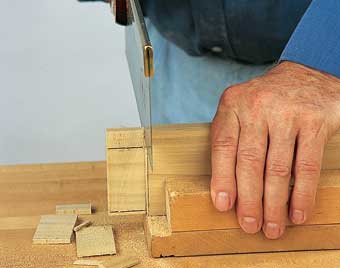
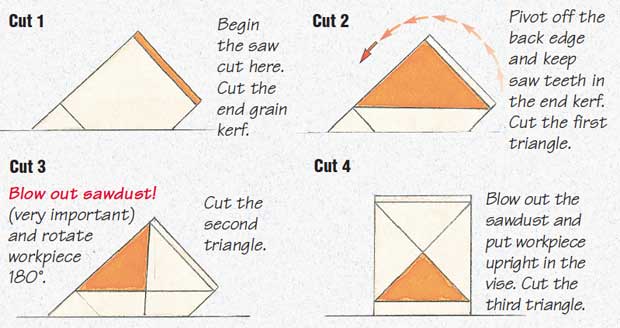
Cut 1 – Begin by cutting the workpiece at the far corner of the end. What may seem awkward at first becomes easier with practice. Extend the sawcut to the near side, making a kerf that’s parallel to the end and about 1/8″ deep. This kerf will guide the next cut.
Cut 2 – Saw down the gauge line on the near edge toward the shoulder, all the while keeping the saw teeth buried in the end grain kerf. Don’t extend the sawcut on the back edge; rather use it as a pivot. If you let the teeth escape the first cut, they will rag out the end and reduce the guiding effect of the kerf.
Do both left and right cuts while the workpiece is in the vise. Stay on the waste side of the shoulder line. You will later pare precisely to the shoulder line with a bevel-edge chisel.
Note that at the end of each cut, the tooth edge is roughly parallel to the benchtop. That was the purpose of angling the workpiece in the vise at the outset. You have now cut the first triangle.
Cut 3 – Remove the workpiece, blow sawdust from the two kerfs, rotate the workpiece 180° in the vise and angle it as for Cut 1.
Blowing out the sawdust is a critical step. A hand saw, unlike a table saw or band saw, does a poor job of removing its own waste. Sawdust buildup in the kerf is the major reason why a hand saw wanders from the line.
Saw down the two gauge lines on the near edge to the waste side of the shoulder line, keeping the saw fully in the end grain kerf. You have now cut the second triangle.
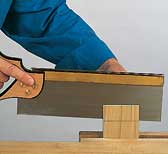
Cut 4 – Remove the workpiece, blow sawdust from the two kerfs, and clamp upright in the vise. Keep the tooth edge parallel to the benchtop as you saw down to the shoulder lines. You have now cut the third triangle.
Leave the workpiece in place and saw down to the waste side of the edge shoulders to create the tenon edges.
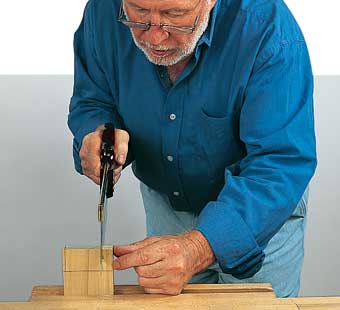
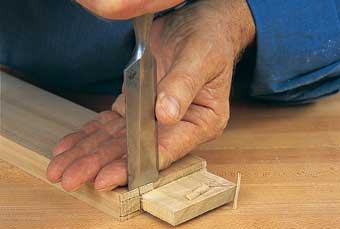
You need a bench hook to rest the work in while you saw the shoulders. Saw about 1/16″ from the shoulder line. Clean up the shoulder and cut it square by vertical paring with a wide bevel-edge chisel. Check the shoulders with a try square.
Undercutting the shoulder is bad practice, so avoid it. The paring stage is where you reap the benefit of a clean, deep knife line cut during the marking out stage because the chisel will seat firmly in the knife line.
Since you are are dealing with a leg and two rails, mark and cut the tenons at 45°, leaving a gap of about 1/16″.
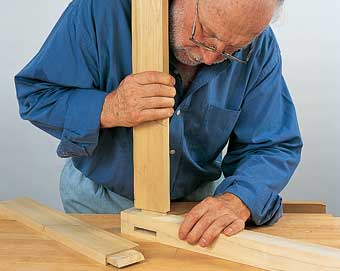
Now is the time to test the fit of the joint. It should be a tight push fit. If it’s too loose, try again. If it’s too tight, determine exactly why before you make adjustments. Look for crushed tissue or shiny areas that would reveal themselves if you closed the joint with clamps. If the tenon is too thick, make it thinner by clamping the workpiece in the vise and paring across the grain, never down it.
The key to accurate mortise and tenon joints is paying special attention to the sequence of your cuts.
How the mortise chisel cuts
Layered method for chopping mortises
Layered method for chopping mortises
Four-cut sequence for sawing tenons
Ian Kirby is a master of the British Arts & Crafts tradition as well as a designer, wood scientist and master woodworker. Look for his continuing articles in upcoming issues of Woodworker’s Journal.


