A shop-made jig easily solves your perfect dado problems.
I typically make dadoes on the table saw using a stackable dado head, but sometimes you’ve got to make them at the bench with a handheld router — when plowing dadoes in large pieces, for example, or making stopped dadoes. Router bits provide a great quality of cut, even in veneered materials, but don’t offer the adjustability that dadoes do. This can make it tricky to get perfectly sized dadoes. A shop-made jig easily solves your perfect dado problems so you won’t pitch a fit over getting a perfect fit.
The Jig
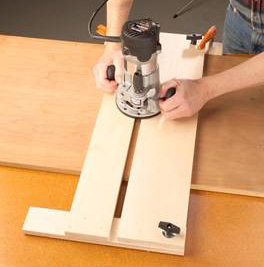
This jig is made out of 3/4-in. (19 mm) Baltic birch plywood, Photo 1. Since Baltic birch is slightly thinner than cabinet grade plywood, the jig can rest on the cabinet material without touching the bench below.
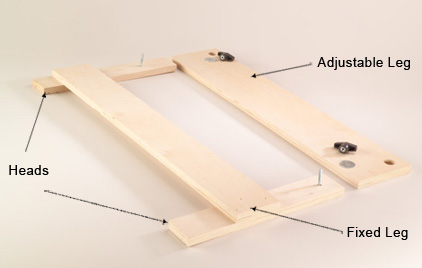
The head-to-head distance should be at least 24-in. so you have enough space to fit a typical kitchen base cabinet side in the jig. The most critical aspect of building the jig is making sure that the fixed leg is perfectly perpendicular to the heads before you screw and glue it in place. If this alignment is off your dadoes won’t be square to the edge of the cabinet side.
The adjustable leg has two 1-in. holes that fit over 1/4-in. carriage bolts coming out of the head. The 1-in. hole allows room to position the adjustable leg to allow for variations in plywood thickness. Drill the carriage bolt holes 5-1/4-in. from the edge of the fixed leg. Drill the 1-in. holes so the center is 4-1/2-in. from the edge that will go against the fixed leg.
Slip the carriage bolts through the head, use fender washers to bridge the large holes, and use a knob or wing nut to lock the adjustable leg in place.
A Bit Of Tooling
The dado jig relies on a pattern style router bit to cut the dadoes, Photo 2. The diameter of the bit has to be less than the thickness of the material you’re cutting the dado for, so you can cut the dado in two passes.
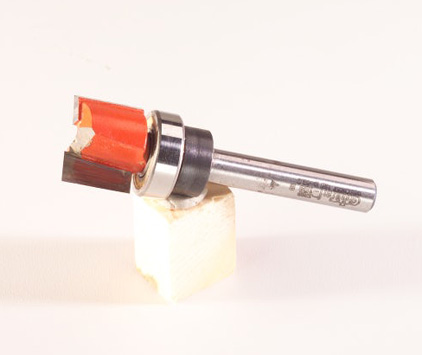
The bearing on the bit will ride on the legs of the jig, “tracing” them in order to cut the dado.
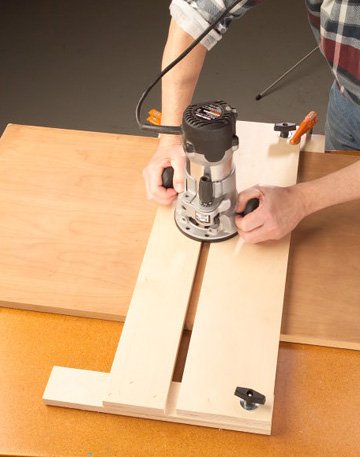
Using The Jig
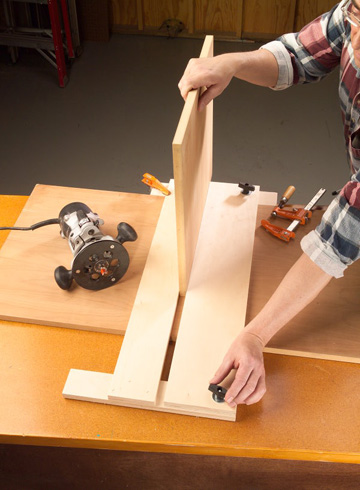
Use the jig by first marking the joint location on the case side. Hold the head of the jig against the edge of the cabinet side, position the fixed leg on the mark, and clamp the jig in place. Sandwich a piece of shelf material in the dado, Photo 3. Squeeze the adjustable leg against the shelf and fixed leg and lock the wing nuts. Now the space between the legs is exactly the thickness of your material. Lock the jig to the cabinet side with additional clamps.
Set the depth of cut on the router bit, and you’re ready to go. The first time you use the jig you’ll cut into the heads. If you’re cutting standard 1/4-in. or 3/8-in. deep dadoes it’s no big deal, as there’s plenty of wood left in the heads to hold the jig together. The bit will ride against one leg on the outbound pass and the other leg on the inbound pass.
You can rout all the way across for a full width dado or part way across for a stopped dado. Use a plunge router and you can cut a dado that’s stopped on both ends. (Be careful that you don’t plunge into the jig.) Get a little creative and you can use the jig to rout dadoes at funky angles. Pretty versatile!


