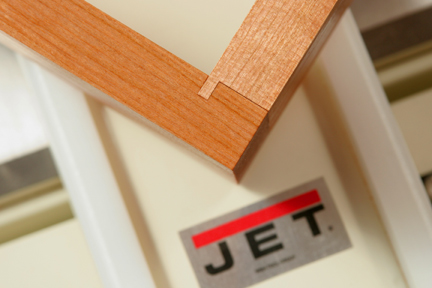
Even the thinnest of tongues offers plenty of strength to this refined rabbet-and-dado joint variation.
Generally, the tongue portion of most rabbets is one third to as much as one half the thickness of the workpiece. While a thick tongue can add strength to some joints, it’s actually overkill in other circumstances. Take this joint, for instance: it’s an elegant choice for building light-duty drawers, small casework or boxes. The tongue of the rabbet is only 1/8 in. thick, but it’s still sufficiently strong to lock the parts together securely, and it provides an extra-wide shoulder that resists racking. If you use this joint on solid-wood parts, the thin tongue also ensures that the short grain area between the dado and the end of the dadoed board – a potential weak spot – is as strong as possible.
Here’s how to make this sturdy corner joint on your table saw with a standard blade and a stacked dado set.
Step 1: Select a saw blade for cutting the dado side of the joint that will cut a full 1/8 in.-wide kerf. That way, you can cut the dado in a single pass. If these joints will show in the finished project, choose a blade with flat-topped teeth so the bottom of the dado will be crisp and square. A sharp ripping blade or a combination blade with raker teeth are both good choices.
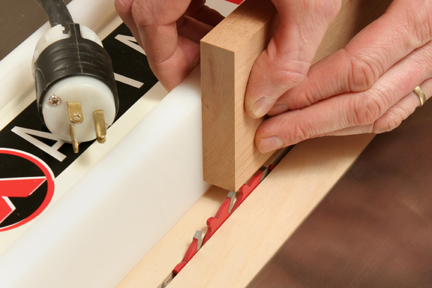
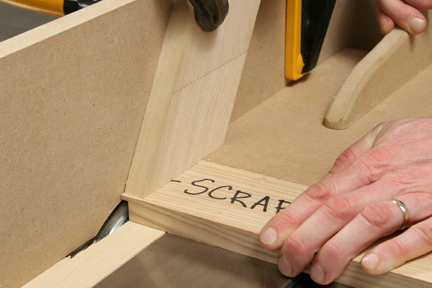
Step 2: Install the blade and a zero-clearance throatplate, if you have one. A “tight” throatplate will help reduce tearout when you cut the thin dado. Raise the blade about one-half inch, and hold the workpiece you’ll use for rabbeting against the rip fence. Adjust the rip fence until the outside face of the workpiece is flush with the outside edges of the blade teeth (see Photo 1). Lock the fence.
Step 3: Lower the blade to a cutting height of 1/4 in. Cut the dado side of the joint, backing up the workpiece with your miter gauge. Note: Since this is a dado-style cut that will not produce a loose offcut, it’s safe to use your miter gauge in tandem with the rip fence. Fasten a sacrificial fence to the miter gauge first to prevent tearout on the back side of the cut (see Photo 2).
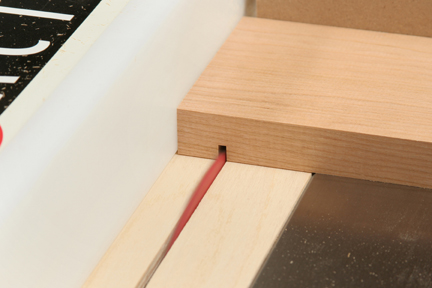
Step 4: Switch to a 3/8-in.-wide or wider stacked dado blade, and raise the blade until the tips of the teeth are about 1/32 in. below the bottom edge of the “kerf” dado you cut in Step 3 (see Photo 3). This setup will help you zero in on the thickness of the rabbet tongue and give you a bit of room to refine the fit after you cut the rabbet.

Step 5: Clamp a sacrificial facing to your rip fence so you can partially bury the dado blade inside it. Adjust the fence until the blade projects 1/4 in. (see Photo 4). Now, tap the fence lightly toward the blade once or twice to reduce the projection by about 1/32 in. (This little adjustment will prevent the end of the rabbet’s tongue from bottoming out in the dado and preventing the joint from closing).
Step 6: Install a featherboard over the dado, and test your rabbeting set-up on a piece of scrap that matches the thickness of the final rabbet workpiece. Back up the test workpiece with a larger piece of scrap pressed against the rip fence. Use a push stick to feed both parts through the blade (see Photo 5).
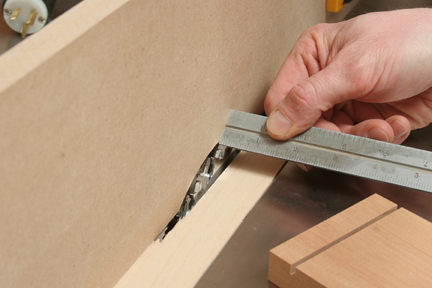
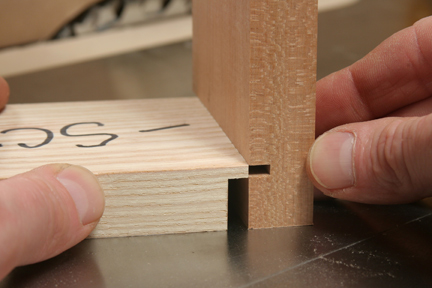
Step 7: Check the fit of the test rabbet in the dadoed workpiece (see Photo 6). Chances are, the rabbet’s tongue is slightly thicker than the dado. Raise the blade a tad, and run the workpiece over the blade a second time to pare more material off the tongue. Do not change the position of the rip fence.
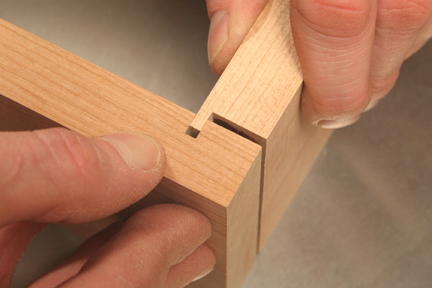
Step 8: When the test rabbet fits into the dado with a bit of friction – but not forcefully – go ahead and cut the final rabbet workpiece. The joint parts should slip together like a hand in a glove, with the tongue seating nicely in the dado and the rabbet’s shoulder resting flush against the dadoed workpiece (see Photo 7).
A well-fitting and carefully made joint, no matter how straightforward, is one of woodworking’s simple pleasures!


