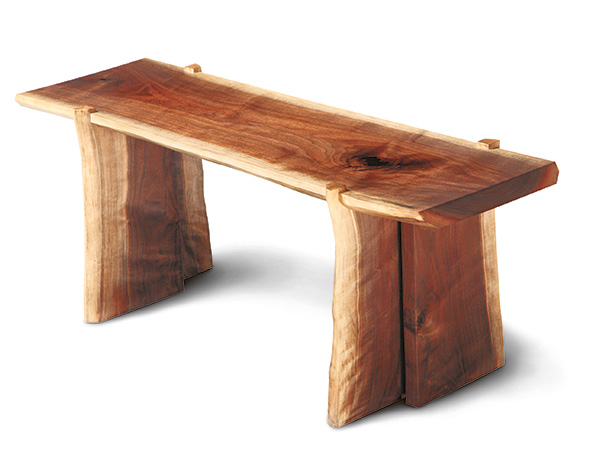
I really hate to waste wood, so these thick leftover cutoffs from a walnut flitch I had were just begging to be put to good use. There was no way they were headed to the burn pile, that’s for sure! I’ve admired George Nakashima’s natural edged furniture, and these chunks of walnut had some beautiful sinewy shapes hiding behind their bark that reminded me of stock he might have chosen for his work. Plus, there’s that wonderful contrast between the light sapwood and the darker heartwood. Some might cut the sapwood off, but not me. Well, the time seemed right to finally brush off the dust, give that walnut a closer look and come up with a fitting project for these special pieces of wood.
My solution for putting nature’s artistry to best effect is the little foyer bench you see here. It’s actually the fifth adaptation of a bench I’ve made before, and I think it accomplishes my goals quite well. For one, you aren’t bombarded with a lot of straight edges on this piece. The back edge of the top is, for the most part, flat, so the bench can be pushed up against a wall. And, while the inner edges of the leg pairs that support the top are flat, the shadow line they form is what really catches the eye. Their outer natural edges and creamy-colored sapwood flow nicely into the sapwood on top to continue those wonderful meandering lines all around the front. I like the fact that the leg pairs, when viewed as a whole, still look like the much wider, waney-edged boards from which they came with sapwood on both edges. I also tried to harmonize the intersection of the legs and top by incorporating some open-ended through tenons into the piece; they rest against square notches in the seat board, but their outer edges retain that natural shape — almost like stubs of branches coming up through. As you can see, these tenons stand proud of the seat — 5/16″ to be exact — to really bring home a sense of visual strength and substance.
Other Design Considerations
Despite my goal of making this little bench as “green” as possible and capitalizing on its natural beauty, form still has to follow function for me. A bench doesn’t have much purpose if you can’t sit on it. So, I had to keep ergonomics in mind as well as aesthetics when laying out the parts. The top is 42″ long to fit one person well, and the four leg components are 16″ tall to raise that top to a comfortable seating height. I decided I would set the final position of the legs and the overhang of the top later, but I did chalk their positions out preliminarily before commencing with building to make sure the top would be long enough to suit its purpose — as well as to avoid defects like open knotholes.
The top of my bench ranges in width from about 12 to 13-1/2″ because, of course, both edges aren’t flat. You may need to make modifications to your bench dimensions if you build one like this, based on the waney stock you have on hand. That’s how it goes when you let nature participate in the design process.
Preparing Stock from the Rough
Well, enough said about visualizing my bench; it was time to get down to work. The first order of business was to strip the bark — I knew I should remove what would probably just fall off later anyway. It also made the boards narrow enough to pass through my 15″ planer. I knew already that this tree was felled in the spring, so the bark was easy to peel away with a mallet and chisel. That would have been more difficult with lumber harvested in the fall when the tree was going dormant and the bark was set.
As the bark fell to the floor, I could see there was some discoloration on the underlying edges that would need to go in order to reveal that pretty sapwood, so out came the rasp and finally a curved scraper to clean things up. You never know what you’ll find under a bark-covered edge.
Next up, I flattened one face of each wide board by hand, then brought the stock down to final thickness at the planer — I left the top a full 5/4 but continued planing the leg material down to 1″.
You can’t rip a flat edge at the table saw when both edges are “live.” So, in order to flatten the back edge of the benchtop, I drew a straight reference line along the sapwood’s edge, then made the cut with my jigsaw. That gave me enough flat bearing surface to clean away the saw’s evidence at the jointer — but remember that portions of that edge are still natural … I was going for “generally flat” and not arrow straight. I split the leg stock in similar fashion by ripping four pieces from wider boards. I settled on an average width of about 8-1/2″ for these, based on a gut reaction. I wanted each leg to appear to support about two-thirds of the seat width so they would look stable and sure.
After creating these reference edges, I could head to the table saw to crosscut the parts to length. Those were square cuts for the four legs, but I treated the ends of the top a little differently. Here, I tilted my saw blade to about 30° and positioned the top facedown on the saw table before making the cuts. This was my reasoning: I wanted these end bevels to mimic the natural line where the sapwood was wrapping around the heartwood. Call me a sucker for nuance and aesthetics, I guess. The bevels would face up toward the seating surface and not hide underneath it, to keep that hefty appearance of the seat board’s thickness.
Positioning the Parts
With the five principal parts of this bench now ready, it was time to bring them together with some sturdy joinery. I’m a real stickler when it comes to assembly, so I wanted a dead-flat reference surface at floor level to help arrange the parts. A thick piece of corrugated board serves me well for tasks like this; it acts like a torsion box and cancels out any inaccuracies in my concrete shop floor. After setting up the parts on it and adjusting the spread between the leg sets until they looked right, that left a 5-3/4″ overhang on both ends of the top. I drew four pairs of short reference lines from the legs up around the front and back edges of the top to mark their positions. An engineer’s square made this easy.
Preparing Open-ended Tenons
If you study the Drawings, you’ll see that each leg’s tenon has a flat back cheek and then what really amounts to a long shoulder extending all the way across the top of the leg to the back edge. These shoulders rest in four shallow dadoes (call them stopped mortises if you like) in the underside of the seat, and the tenon cheeks set into notches I cut into the front and back seat edges.
I don’t typically integrate a horizontal stretcher between bench legs unless I have to, and I didn’t want to do it here. So, that meant this joinery system would have to fit together as tight as a drum in order to keep the legs from potentially racking. I decided that I’d start by milling the tenons, fit the seat notches to those and then complete the joinery work by cutting the long dadoes.
You can see the process I followed for creating those tenon shoulders at the table saw. The first step was taken mainly to prevent tearout: I used a cutting gauge to score layout lines 1-5/16″ in from the top edges of the legs; this ensured that the saw blade would cut cleanly through as it exited the legs with each pass. I set the tenon width to 1″ and marked this as well. A crosscut sled provided the backup support I wanted for milling the leg blanks on-end, and a sharp combo blade gave me the “reach” I needed to hit the shoulder knife lines.
While you might think that removing all of that waste in a bunch of side-by-side passes would take all day without a dado set, it really wasn’t bad, but notice that I left a tab of waste remaining at the edge opposite the tenon — you can’t remove the whole works or the leg would tip down on the sled and ruin the cut. Once I machined the four tenons and shoulders, all it took was a few strokes with a Japanese saw to clip off these thin support tabs.
A Fitting Set of Notches
It was time to pull out my corrugated “floor” again and bring my bench parts one step closer to rock-solid connections by cutting the tenon notches in the seat.
At this stage, I sandwiched a piece of 1/2″-thick MDF between the leg pairs and held that assembly together with spring clamps (tenons facing outward as they do in the final bench).
Sliding the legs into place under the seat and squaring them up to both the seat and the corrugated board, I could verify the exact positions of the legs as well as the depth of the notches I’d cut for the tenons.
When it came to those notches, I decided I’d recess the tenons up to the point where their natural curved edges began. I also wanted to make sure the tenon sapwood wouldn’t extend past the seat board’s sapwood.
This meant the tenons would need notches about 1/2″ deep. I transferred their depth dimensions from each tenon with a fine-lead mechanical pencil for accuracy — the interface of every contact surface of these joints needs to be tight, for strength.
Cutting those notches is a job for sharp hand tools, not machines. I first sawed the sides of each notch with a Japanese saw, keeping my kerf just inside the layout lines.
The waste in between was chopped out “dovetail” style — working down and in from both top and bottom faces of the board.
The goal is to remove that waste a little at a time until you meet in the middle; that approach prevents chipping the top and bottom edges so they stay crisp. Don’t rush the process.
Dadoes and Dowels
Finally, it was time to give the tenon shoulders a home in some shallow dadoes under the seat. Sliding each tenon into its notch, I could mark the dado positions and lengths accurately to suit each leg. Milling those started with a router and ended with some more handwork. About that: I could have clamped a straightedge jig across the seat and run my router against it to hog out the 1/4″-deep waste, but that was more bother than needed. I just routed it freehand, stopping my straight bit shy of my layout lines, then chiseled away the rest of it. Easily done; the legs and tenons seated perfectly.
But, that’s not quite it … these joints won’t benefit from much glue strength since the connections are mostly crossgrain, so I reinforced them with 2-1/4″-long dowel pegs. To zero-in their locations — 1-3/8″ in from the stopped ends of the dadoes — I shot a short brad into the center of each dado with a nail gun, then clipped all but a little stub off with a wire cutter to create a chiseled point. Dropping the legs back into place pricked a neat centerpoint to mark exactly where I’d need to drill those dowel locations. After pulling the brads out carefully, a 7/8″-diameter Forstner bit at the drill press took care of the dowel holes. Lowering my drill press table way down the column enabled me to bore 1-1/2″-deep holes right into the end grain of the legs — but be sure to brace them against a squared-up support for accuracy if you do it like I did.
Hey, you might be wondering … where did he get 7/8″-diameter dowels? Well, good question, and here’s the answer: I took a 1″ oak dowel rod and shaved it down at my table saw by spinning it slowly against the miter gauge. It’s not difficult and, working carefully, I reached a snug fit for those loose-tenon joints. Once I cut four dowels to length, I gave the seat board and legs a final scraping and sanding while the surfaces were still easy to reach. I could see the homestretch of this project coming into view!
Final Assembly and Finishing
I’ve already mentioned that there’s not much glue holding these joints together, so what little adhesive there is has to do the job well. I used my two-part epoxy and a bottle of PVA (polyvinyl acetate) “yellow” wood glue. I like epoxy because it buys me some more open time to get things assembled without a panic. It’s also a good gap filler and plenty strong. I spread epoxy on the dowels, into their holes and onto about an inch or so of the tenon shoulder area next to them. The rest of the shoulder stays dry so the board can expand and contract across the grain.
I brushed some PVA on the back flat long-grain surface of the tenon cheeks as well as the long-grain surface of the notches. I chose yellow glue instead of epoxy here because it seems to interact better with long-grain fibers.
A short assembly table in my shop brought the foyer bench components up to a comfortable working height for me to bring the joints together. I used a pair of long cauls with cambered edges to distribute clamping pressure evenly across the seat board, and four long bar clamps pulled the assembly down tightly to my table top. It was a good solution.
Once the glue cured, I applied a coat of Natural Watco Oil first, to let the warmth and color of this two-tone walnut really shine through. After a rubdown with steel wool, I followed with wipe-on poly and several more rubdowns in between. Wax topped it all off. I think this little bench is a fitting end to show off what nature already started so well.
Click Here to Download the Drawings.
– Greg Wood