This article, “Skew Chisel Primer,” by Keith Tompkins, is from the pages of American Woodturner and is brought to you by the America Association of Woodturners (AAW) in partnership with Woodworker’s Journal.
The skew chisel, one of the most versatile spindle-turning tools, has a bad reputation. It is sometimes the butt of woodturning jokes: “I brought along my skew chisel,” says a demonstrator, “for opening this can of paste wax.” Many otherwise expert turners refuse to use the skew. Yet others, having mastered its use, swear by it.
The skew is ideally suited for efficient, high-production spindle turning and continues to be a favorite among production turners. With this one tool, a variety of spindle-turning functions are possible: peeling, planing, V-grooves, beads, fillets, facing off endgrain, and even coves. But the skew’s versatility comes at a price: In order for the tool to cut both to the right and to the left, a bevel must be ground on both sides of the cutting edge. This design is the primary reason the skew has a tendency to catch.
The difficulties of mastering the skew have not gone unnoticed among manufacturers. Several companies market alternatives to the traditional design, with the main selling point being that their tool can help you overcome the skew chisel’s propensity to catch. But if you take the time to master this tool, you will be able to make cuts other tools cannot— and leave a finer surface on the wood. Learning to use a skew chisel is well worth your time and energy. Here is how to make the most common skew cuts.
Peeling Cut
Let’s start with the peeling cut, which does not usually leave a clean surface but is perhaps the best way to remove a great deal of wood quickly. Use it to rough a cylinder to size and for forming tenons.
To start the cut, place the tool high up on the turning with its cutting edge parallel to the axis of the turning. Since this cut is rather aggressive, you can lessen how heavy a cut you take by using only a small part of the cutting edge at one time. As the wood rotates, allow the bevel of the skew to rub without the cutting edge engaged. Pull the tool back toward you until the edge begins to cut, then raise the handle and feed the edge in and upward to complete the cut. As you raise the handle, imagine moving the cutting edge in a slight arcing motion as it cuts the wood—up slightly and then toward the axis of the workpiece.
Slide the tool over to begin another cut.
Planing Cut
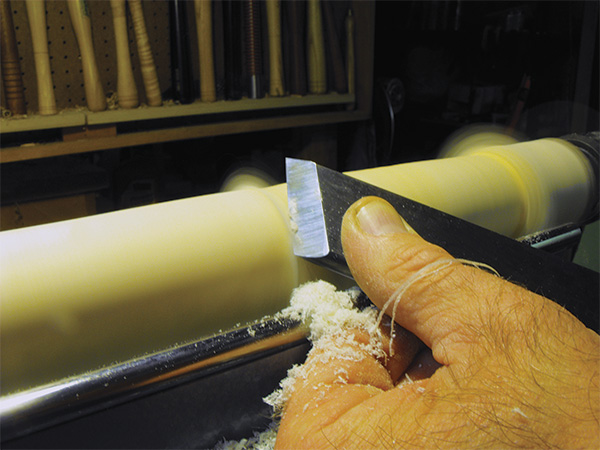
The planing cut is one of the most frequently used skew cuts because it can leave a highly polished surface off the tool. This cut involves riding the bevel of the tool. To begin the cut, lay the tool flat on the wood and gradually rotate it until the bevel is contacting the wood and the edge begins to cut. If you are cutting from right to left, rotate the tool counterclockwise; from left to right, clockwise. When you have engaged the cutting edge, simply slide the skew along the toolrest, taking a light cut.
Turners have their own preferences as to exactly how to hold the skew chisel during the planing cut. Note in the lead photo that my left index finger is riding against the straightedge of the toolrest, while light pressure from my thumb maintains bevel contact with the wood. I find this grip gives me better control of the depth of cut and allows me to feed the tool smoothly along the toolrest. There is no need to muscle the cut with brute force; a light touch is all that is required. Also notice that the cutting edge is skewed, or positioned at an angle in relation to the rotation of the wood. This allows the tool to cleanly peel away, or pare the wood, rather than scrape directly into the surface.
V-groove
The V-groove may be the simplest cut to make with a skew chisel, but no other tool can do the job as well, leaving clean, sharp sides of the V-grooves all the way to the bottom. The traditional method involves positioning the toolrest fairly high in relation to the turning. The long point of the skew is used to define the centerline of the V-groove, arched downward until it contacts the workpiece, and then the handle is raised to deepen the groove. To widen the groove, the same cutting action is made alternately from the right and left until the V-groove is to the desired width and depth. The bevel is rolled slightly away from the cut for minimal bevel contact. This is called “floating the bevel” and helps with tool control when cutting into the narrow bottom of a V shape.
An alternate cut I use successfully involves lowering the toolrest until the point of the skew is aimed directly at the centerline of the turning. Rubbing only the portion of the bevel near the long point, I complete the cut by pushing the tool straight in. Admittedly, this method will cause consternation with some proponents of the skew, but it works. Since the tool is situated lower in the cut, there is no need to arc the tool down into the wood. As the tool is fed straight in, the revolving wood meets the edge and is peeled away. With this cut, I control the amount of wood being removed by regulating the amount of side pressure I apply to the bevel as it cuts. The result is a clean cut, and catches are rare.
Beads
A major advantage of using a skew chisel to turn beads is that it can reach into the narrow area between the beads, leaving a clean, crisp line at the bottom—no sanding needed. Here are three ways the skew can be used for rolling beads.
Cutting with the Short Point
The traditional method of turning beads involves holding the skew high up on the turning, presented on its side as you would for a planing cut, then using just the short point (heel) to roll the bead. This cut requires a few different but simultaneous movements of the tool: its shaft must be rotated to keep the cutting edge in contact with the wood; the handle must be swung (right to left for cutting the left side of a bead); and the handle must be raised as you cut the side of the bead deeper. During this cut, if any part of the cutting edge other than the short point comes into contact with the wood, a spiral catch can occur.
Ride the Bevel
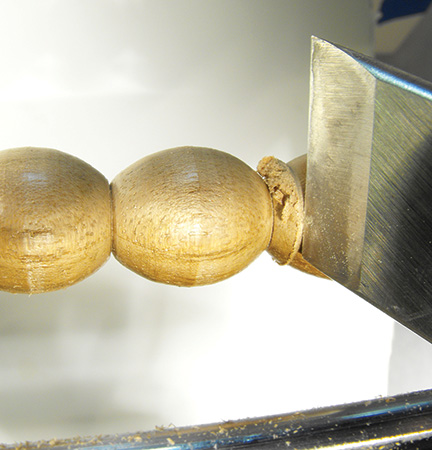
Another technique is to cut with a portion of the actual cutting edge, as opposed to using just the point at the heel. The bevel “rides” the wood as you cut the bead (Photo 3). The key is to gently ride the bevel all the way to the base of the bead. The tool’s bevel supports a portion of the cutting edge, which helps to avoid a catch.
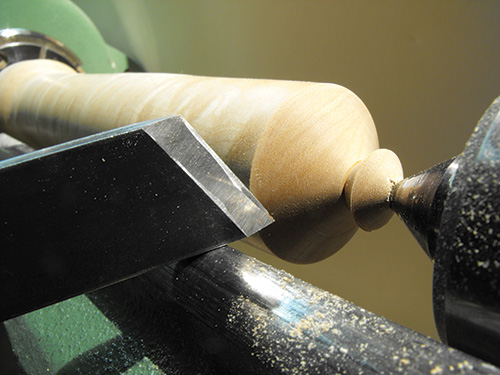
Long Point Down
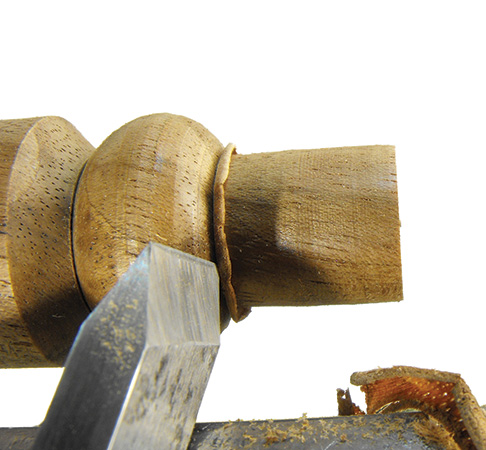
Yet another method is to cut the bead using the toe (long point) of the skew, similar to making a V-groove. Rather than using just the point, however, ride the bevel at an area just above the long point when cutting with the long point down. It helps to use your body movement to swing the tool smoothly to form the curve of the bead. Control the depth of the cut by modulating the pressure applied. This cut works equally well cutting either to the right or left, and gives an unobstructed view of the cutting action. The result is a clean cut with little tendency for a catch.
Fillets
A fillet is a flat, horizontal area of a turning useful for visually separating various spindle elements. For example, a fillet can be used as a transition between a cove and a bead. Fillets must be cut clean and crisp, without the need for sanding, and the skew chisel accomplishes this task better than any other tool. Many turners cut fillets with a parting tool because of its ease of operation, but the parting tool leaves a surface of torn fibers, which requires sanding. Sanding is useful in some cases but can dull, or round over the clean, crisp details of a well-turned spindle. A parting tool can be used to rough-size a fillet, but it should be followed up with the fine finishing cut of a skew.
Cutting a fillet involves making the initial cut without the benefit of bevel support. To begin, position the skew chisel with one of the bevels (depending on the direction of the cut) parallel to the turning, as you would perform a planing cut. Raise the handle gently until the short point contacts the wood. Just the slightest pressure will cause the tip to form a slight groove in the turning.

Once the groove is formed, rotate the toe of the skew away from the wood slightly to create clearance and avoid having the entire bevel making contact with the surface of the wood. Then, advance the tool as in a normal planing cut. With experience, you can eliminate the step of shifting the toe away from the cut. This cut is also useful for sizing tenons.
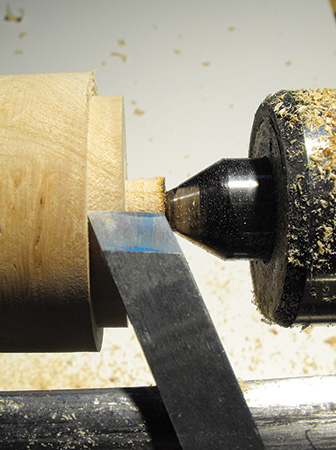
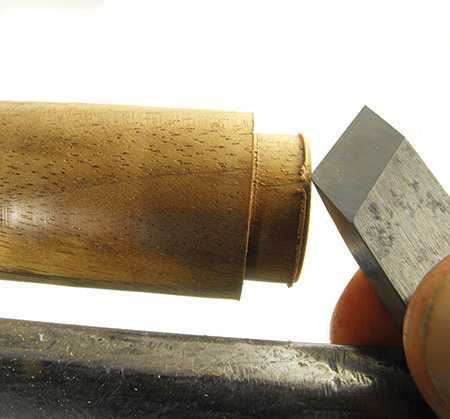
Cutting Endgrain

The skew chisel works well for cutting across endgrain, whether on steps, shoulders, or the absolute end of a spindle- oriented blank. This can be useful for truing the face of an endgrain blank prior to hollowing for a box or goblet. The endgrain cut is performed with the toe, or long point. Present the tool with the long point down so the toe is just touching the surface to be cut. The key to avoiding a catch is to keep the bevel nearest the wood tipped slightly away from the endgrain. If the long cutting edge touches the endgrain, a dig-in will happen. To finish the cut, simply raise the handle and advance the tool across the endgrain. This cut leaves an exceptionally smooth finish on endgrain surfaces.
After years of using the skew chisel, I have learned the secret to its misbehavior. Simply put, the cutting edge of a skew chisel will catch when the correct portion of the bevel is not supporting the cut. Even a slight twist of the tool handle can allow the wrong portion of the bevel (or the wrong bevel) to contact the wood; a spiral catch is the result. Keep the cutting edge supported by the bevel when beginning a cut whenever possible.
Although there are new tools constantly being brought to market, the skew’s versatility and quality of cut will ensure its continued presence in nearly every turner’s tool assortment. You, too, can learn to use the skew chisel with patience and practice.
Keith Tompkins is an accomplished lifelong woodworker and turner. For contact information and examples of his work, visit keithptompkins.com.


