
A flow chart is a handy map that prompts you to ask the right questions, then directs you, depending on the answer, to the next step in a process, all while guaranteeing you don’t miss any steps. Because they are so concise, flow charts tend to be a bit cryptic. In the next six issues, I’ll expand on the finishing flow chart first published in the July 2005 issue of Woodworker’s Journal by adding full descriptions of each step in the process. The end result, if you keep them all, will be a complete finishing primer.
Steaming Dents
By the time your piece of furniture is ready for finishing, odds are good that it will have picked up some dents and gouges along the way. A dent is a depression in which the wood fibers were crushed, but not torn or cut, while a gouge has fibers cut or wood missing. We will deal with gouges later. You can usually steam dents out, and now is the time to remove them.
Start with a wet cotton cloth and a hot iron, preferably one no longer being used for clothing. Using an eyedropper, a small artist’s brush or even a toothpick, fill the dent with a drop or two of water. Add more water if it soaks in immediately to ensure that the depression is filled with water. Place the wet rag over the water-filled dent and press the iron onto it. The wet cloth will prevent the iron from scorching the surrounding wood. Leave the iron on only a few seconds until the cloth is dry beneath it. You may have to repeat the whole process, but usually one or two pressings with the iron should bring the dent up to level.
Glue Spots
Now that the dents are out, there is still one more simple step to do before you start sanding, and it is one that can save you tons of aggravation later. Look for and remove any glue spots. If you miss them, they will show up after staining or after the first coat of finish, and at that point they will be a bear to remove.
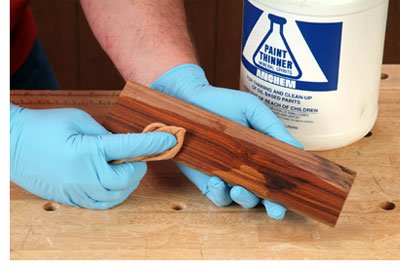
Glue spots are not easy to see in raw wood. The easiest way to spot them is to wet the wood. Because wet wood looks different, usually darker, and because glue forms a liquid barrier preventing the wood beneath it from wetting, the glue spots should show up a lighter color. I like to use naphtha or mineral spirits for this step.
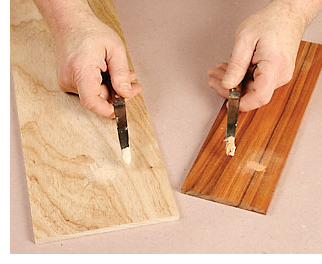
Remove the glue by scraping, cutting, sanding or in the case of some glues, with its solvent. Hide glue residue, for example, can be removed with warm water. Since you have not yet sanded the rest of the wood, you can use whatever grit of paper works, if you choose to sand them off. I usually reach for 80 grit, since that is likely to be my first sanding grit following this step. Rewet the surface afterward to make sure you removed all the glue, then let the wood dry completely.
First Sanding
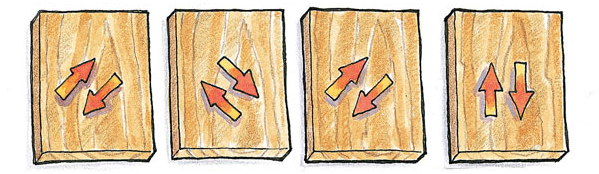
Before we talk about grit sizes, let’s look at how to sand. If you sand by hand, use a block and sand diagonally to the grain. Sanding wood, especially softwood, with the grain can erode early wood bands faster than late wood bands causing a ‘washboard’ effect. Sanding diagonally prevents that. With each new grit size, reverse direction and sand in the opposite diagonal from before. By switching direction, the wood will tell you when it is time to stop; as soon as scratches in the former direction are all gone, you are ready to move to the next grit.
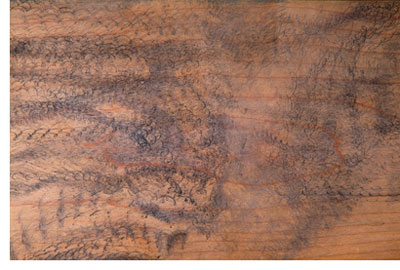
Most people, though, sand with a machine, typically a random orbit or vibrating sander. These sand in a tiny round pattern, so the direction you move the sander is irrelevant. What does matter is the speed you move the tool. Sanders are usually designed to be moved only about one inch per second, which is quite slow. Almost everyone moves their sander much faster than that. Moving the sander too fast can result in pigtails; small spirals that show up during staining.
Try this: Run your finger along a twelve inch ruler, making sure you take twelve seconds to get from one end to the other. You may be surprised, but that is how slowly you should be moving the sander.
Each step in the sanding process has a specific goal. If you don’t know the goal, you won’t know when to stop sanding and you will either sand too much or too little. The goal of the first sanding is to remove machine or tool marks, and in some cases to flatten boards. I find 80 grit aluminum oxide paper is best for that step. It cuts fast but does not leave egregious scratches.
Dings and Gouges
Once you remove the tool marks it will be easy to see any dings or gouges that will have to be puttied. Do that now. Use a putty that is slightly lighter than or equal to the very lightest color in the background of the wood. You’ll have to trust me on this, but you will see why we chose that color in article number three of this series.
If you plan to stain the wood, test the dried, sanded putty first on scrap of the same wood to see if the putty absorbs more or less stain than the surrounding wood. Adjust the putty color accordingly, either by switching to a different color or by tinting the putty you are using. When the putty is dry, sand it flush with 80 grit paper.
Now that the tool marks are gone and putty spots are level, move to the next grit, which for me is 120 aluminum oxide. There is only one goal for this sanding step; remove the 80 grit scratches. That will happen very quickly. The next step is similar; use 180 grit paper to remove the 120 grit scratches.
If you sand by hand you know when to move to the next grit by looking for wrong direction scratches. It’s a bit tougher with a machine, but if you move the machine only one inch per second and cover the entire surface once, you will most likely have removed the previous scratches. It’s another good reason to use your sander that way. While moving that slowly may seem time consuming, you will not have to go back over areas two or three times, so in the long run, it is quick and efficient.
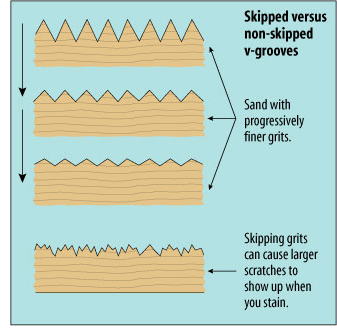
It goes without saying that these grit steps are general suggestions. You might decide to start with 100 grit, then 150, and finally 180 or 220, instead of the sequence I set out. That is also fine. In some instances you might get away with starting at 120 grit. What is important is that you don’t skip steps and that each grit does its intended job. Starting too fine, or jumping from 80 to 180, for example, might leave hard to notice tool marks or 80 grit scratches amid the larger base of 180 grit ones. They may be invisible in sanded wood, but they will show up during staining and finishing.
Hand Sand
The final sanding is to remove the 180 orbital or diagonal scratches without adding new ones. For that I sand by hand, with the grain, once again using 180 paper, since nothing removes 180 scratches faster than 180 grit paper. However, instead of aluminum oxide, I use garnet paper for this step.
While aluminum oxide grit leaves a crisp V-shaped sc ratch, garnet leaves a softer U-shaped one, and that translates into less aggressive stain absorption and more even coloration. If you can’t find garnet paper, sand by hand with the grain using 220 grit instead. With inlaid wood or parquet, you can’t sand with the grain. In those cases sand the direction of the longest side, and use finer paper. For most woods 220 will be adequate even against the grain, but if scratches show, which they might on very hard woods like ebony or boxwood, don’t be afraid to move up to 320 or even 400 grit.
When your garnet paper starts to dull, use it to sand any end grain. The dull garnet paper will burnish the end grain to help prevent it from absorbing excessive amounts of stain. It won’t be the same as flat grain, but every little bit helps.
When the sanding is done, brush or vacuum off the bulk of the dust, then remove the rest with a damp cloth. For a variety of reasons, I find a soft cloth lightly dampened with water works better than commercial tack cloths. It is cheaper, reusable after washing, and reduces static charge. Some tack cloths, via friction, can create a static charge on the surface of the wood, which in turn draws charged dust particles from the air back onto the wood. Dampness eliminates static. Additionally, with a damp cloth you never need worry that your tack rag will leave residue that is incompatible with your chosen finish.
You now have a clean, well sanded, dust free surface with all dents raised and all gouges puttied. You are ready to stain the wood.
Pre-Finishing
One of my favorite approaches is what is generally called “pre-finishing,” shorthand for pre-assembly finishing. That means you finish the parts of your project before they are glued together. There are a lot of advantages to this.
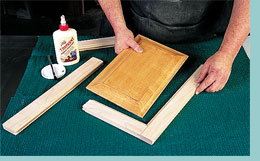
Finish a raised panel before it goes into the frame and it will never show a white line at the stiles when the panel shrinks. Applying finish to flat parts is far easier than to assembled pieces. Inside corners, the bane of finishing, become a thing of the past. Stain won’t hide in seams only to seep out later when you stopped looking for it, and glue spots can’t show up beneath the finish if gluing takes place after finishing. Another bonus is that glue squeeze out is easily removed from a finished surface.
Obviously, not all woodworking lends itself to this. Those joints that must be cleaned up or shaped after assembly can not be pre-finished, which is why I explained about removing glue spots. However, you would be surprised at the things that can be done. One box maker gleefully admitted to me that while he can’t pre-finish the outsides of his dovetail boxes, he does finish the faces of the boards that will form the inside of the box before applying glue to his dovetail joints. The result is a finished interior that is perfectly clean right up to the inside joint, with no drips, runs, cross grain sanding marks or finish puddles in the corners.
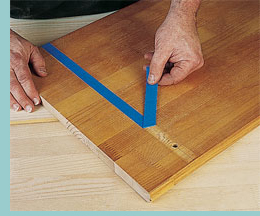
If you do finish prior to assembly, you must make sure you prevent stain or finish from getting on the active glue surfaces, since either will prevent glue from making a good bond. Mask the glue surfaces just shy of the edge of the joint so that when the piece is assembled, the finish will appear to continue under the joint. Mask just before you finish using blue painters tape, which is designed to stay on a long time and come off cleanly leaving no glue residue. I also like to clean the glue joint surface with some naphtha after removing the tape, just in case, then sand the glue surface lightly just before glue up.
Choosing Sandpaper
The three common grits we use are aluminum oxide, garnet, and silicone carbide. All three are sharp and cut well. Garnet is used primarily for hand sanding on raw wood and is almost never offered in sanding machine disks. The other two are appropriate for both raw wood and finish sanding.
Paper designed for sanding finish is often lubricated with a soap-like additive, usually zinc stearate, interlaced with the grit. Sanding is easier with these self-lubricating papers, and they don’t clog up as readily. You don’t need stearated paper for sanding raw wood, but it will not hurt either, so if you prefer to buy only lubricated paper, there is no harm in that. Stearated papers are sometimes color coded to distinguish them from regular sandpaper.
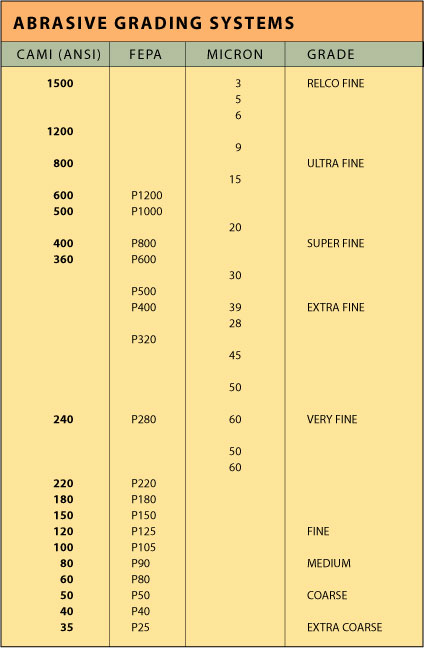
The grit size will be indicated by a number base on one of three common scales. The CAMI or ANSI system uses plain numbers; the FEPA system uses the same numbers but with a letter P in front of the number. In both, higher numbers mean finer grit. Paper that is coarser than 220 grit is the same in both scales, but as you go finer, the two systems diverge. Thus, P1200 paper in the FEPA system is roughly equivalent to 600 in the CAMI/ANSI system; P600 is equal to 360, and P400 equals 320. Looking for that P can be important with very fine grits.
The third scale is used only for very fine papers. Called micron grading, it goes the other way around; smaller numbers mean smaller grits and larger numbers mean coarser paper. Before the number is the lowercase Greek letter ‘mu.’ These papers are typically used for sanding finish, and are rarely sold in grits coarse enough for sanding raw wood.
Raising Grain
If you plan to apply waterbased finish or stain to the raw wood, consider raising the grain first. Once it is raised and leveled it will not raise again. After sanding to the last grit, wet the raw wood thoroughly with clean water, then wipe off all the water. The wood surface will be saturated but there should be no standing water or puddles left. Let it dry overnight.
When the wood is completely dry, it will feel furry. That’s because sanding leaves the ends of wood fibers shredded, and water makes them stand up. Cut back the raised grain fibers by sanding lightly with fine 400 grit paper. The object is the same as when you shave; you want to remove the raised hairs but you do not want to cut into the wood below. Sand only enough to smooth the raised fibers, and believe me, that will be very little sanding. If you sand too aggressively or use too coarse a paper you will simply shred the wood anew, and the newly shredded wood will then raise when it comes in contact with water. Raise the grain and smooth it right the first time and you won’t have to do it again.


