
I used to teach router table classes and the most popular part was, hands down, making cabinet doors. Virtually every bit manufacturer offers door making bits in several profiles. These come in a set, where the mating profiles are two separate bits, and a single bit form, where both cuts are contained in one bit. The bit I’m using is the single cutter type. I prefer this, since you only need to adjust the height to switch between cuts.
A bit of vocabulary before we begin: On a frame and panel, the horizontal top and bottom pieces are the Rails (like a rail fence). The left and right vertical parts are Stiles. The profile cut on the long edges of the parts is known as “Sticking”, and the reverse profile that fits into the sticking cut is known as the “Cope.”
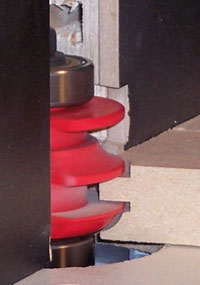
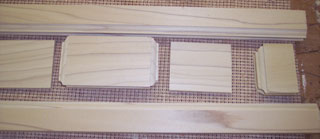
Begin by cutting a couple of test pieces. These will familiarize you with the orientations of the cuts and visualize the profile. On this bit, Freud’s #99-293, the cope cut is the lower section of the bit, and the stick section is on top. This bit provides two bearings, one to guide each of the profiles.

Raise the bit up so that the bottom bearing is slightly exposed, and set the fence flush with the bearing face. For cope cuts, I use a wide backer board. It not only prevents tearout of the end grain, but also steadies and keeps the rail square to the fence. If your stock is to be narrow, rip it wide, and it can be re-ripped after milling. Examine the test cut. Check the height of the step on the face of the sample and the thickness of the back. You can adjust the bit height to balance these out to where desired.
With the sample cope cut, the stick cut can be set to match. Lower the bit in the table until the tongue on the sample lines up with the slot cutter on the bit. The fence position should remain unchanged throughout this entire process.
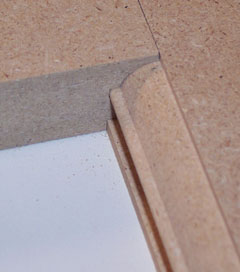
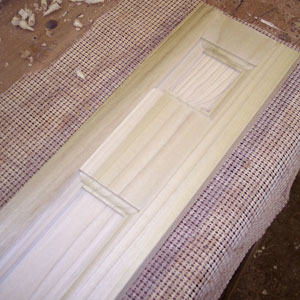
Now complete a test of the stick cut, and dry fit the two samples. The faces and the back should be even, with no step across the joint. Adjust the height of the stick cut as needed to flush the faces.
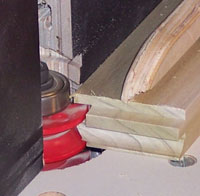
A setup block can be made with both cope and stick cuts on it. This will allow you to very quickly set the bit up and change between cuts.
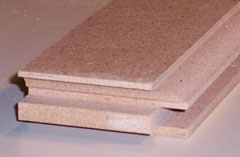
With samples in hand, a parts list can be made, and stock cut. Note on the samples the depth of the groove in the stick cut. This represents the overlap between the two profiles and must be accounted for in the rail lengths. On this bit, the overlap is 3/8″. Some bits will be as little as 1/4″ and others may be as much as 1/2″.
The stock should all be processed together to insure uniform thickness. It can then be ripped to width. Now the cutlist comes into play. The door here is 14-3/8″ tall and 11-7/16″ wide with 2″ wide stiles and rails. The stiles are cut to the full height of the door. The rails should be cross cut to 8-3/16″ This is the width of the door (11-7/16″) minus the width of the two rails (4″ total) plus the length of the overlap on each end (3/4″ total).
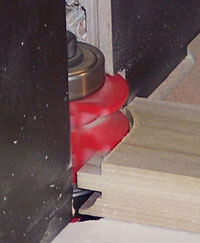
The first step is to cope the ends of all the rails. This eliminates most of the end grain tearout issues since a backer is used to support the edge. Be sure to minimize the fence opening and use the backer to keep the rail square. If you plan to do a lot of door making, buying or building a crosscut sled is a good investment.
Now reset the bit height for the stick cut. Test the setup against your rails, then run one long edge of all the parts. Be aware of the orientation of the parts and the cuts. Both cope and stick cuts are face down with this particular bit, so the good face should be down on the table.
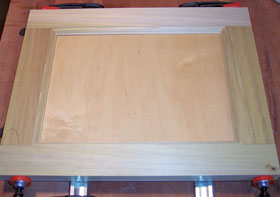
With all the parts cut, add the panel and glue the cope joints. Do not apply glue to the panel, it needs to “float” to allow for seasonal movement.
This bit makes a frame and panel joint. The door is just one of the forms of frame and panel. When I was a millwright at a stair company, I used this type of setup to make paneled newel posts. They are simply tall narrow doors, joined to form a hollow box. This makes posts of all types. Wainscoting is a series of frame and panel sections mounted together along a wall, and many fine furniture pieces are made up of frame and panel components.
A door making bit, or set of bits, should be a part of any shop inventory. It allows for quickly making elegant frame and panel components, one of the building blocks of woodworking.


