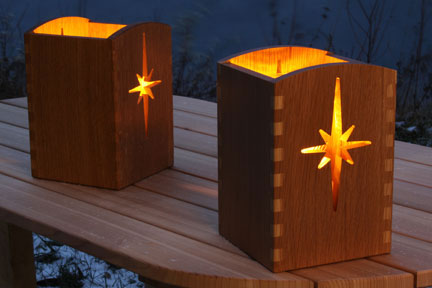
Light up your winter holidays with custom luminarias.
A luminaria (often called luminary) is a traditional Mexican lantern made from a paper bag with sand and a candle inside. We’ll add some woodworking panache to these outdoor accents and build our luminarias from wood, with box joints and a star-shaped cutout. They’re beautiful — and reusable — ways to brighten patios, steps and walkways this holiday season. Here’s how to build them for your home.
Step 1: Download the luminaria PDF template. Print two copies of the template and use it to make star cutouts in both the front and back faces of your project. (Note: While we show only one luminaria being made here, they’re often used to line the length of a walkway. This project lends itself well to “production style” woodworking if you want to make multiple lanterns. Print out as many patterns as you need.)
Step 2: Joint and plane 1/2-in.-thick stock for your lantern. If you plan to display it outdoors for an extended period of time, select wood that’s suitable for exterior projects. White oak, cedar, redwood, mahogany and cypress are all good choices. Make your front and back panels 5 1/2 in. wide and 8 1/2 in. long; you’ll also need two 5 1/2 x 7 1/2 in. side panels, plus a 1/4-in.-thick bottom panel measuring 4 1/2 x 5 in.
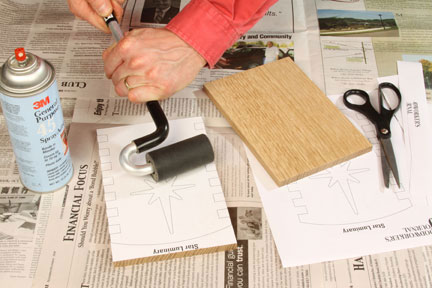
Step 3: Trim the paper patterns to shape, and apply them to your front and back panels with spray-mount adhesive (see Photo 1).
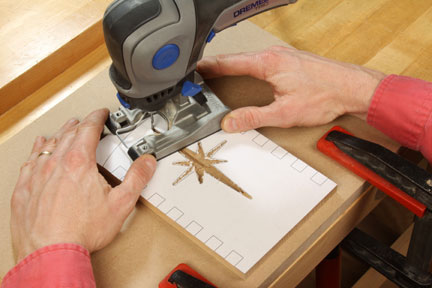
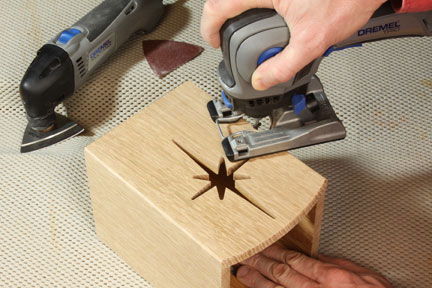
Step 4: Cut out the star shapes. We’ll use Dremel’s Trio tool outfitted with a 1/8-in. spiral bit (see Photo 2), but you could also use a trim router or a scroll saw and a fine-tooth blade. If you choose to rout the cutout, remove the waste in several shallow passes, resetting the bit for a deeper cut each time. Mount your workpieces to a backup board with double-sided tape to protect your bench, and clamp the assembly down before routing.
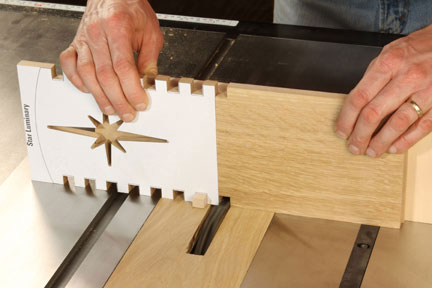
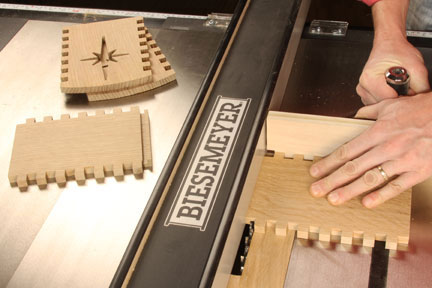
Step 5: Box joints are an attractive and sturdy way to join the four panels of this project. Typically, box joints are cut at the table saw with a dado blade and a simple pin-style jig attached to a miter gauge. The pin on the jig registers the spacing of the slot cuts, which also form the interlocking pins. You can find instructions for making box joints in many woodworking books. The pattern for this luminaria calls for 1/2 in. x 1/2 in. joints. Mill the pin-and-slot pattern in the front and back faces first, then use these workpieces to register the first slot cuts for the side panels, as shown in Photo 3. (Note: If you’d prefer not to make box joints, you can attach the four corners with butt joints and nails instead. Reduce the width of the side panels by 1 in. so they’ll fit between the front and back panels when assembled without altering the overall project size.)
Step 6: When your box joints are completed, cut the curved top edge of the front and back panels to shape, and remove the paper patterns. To do this, soak the paper with mineral spirits or denatured alcohol, let it sit for a few minutes and then peel the pattern off. Use more solvent and a scrub pad to remove any residual adhesive.
Step 7: Your luminaria’s bottom panel will fit into two 1/4 x 1/4 in. dadoes in the side panels. Cut them now with a dado blade in your table saw, positioning the dadoes 1/4 in. up from the bottom edges of the sides (see Photo 4). Do not cut these dadoes into the front and back panels.
Step 8: Sand the “inside” faces of all five workpieces up through the grits to 180. Now, tape over the box joints to protect them, and apply finish to the sanded faces of your project parts. If you plan to display your luminaria outside, spar varnish is an excellent finish for outdoor durability. When the finish cures, peel off the tape.
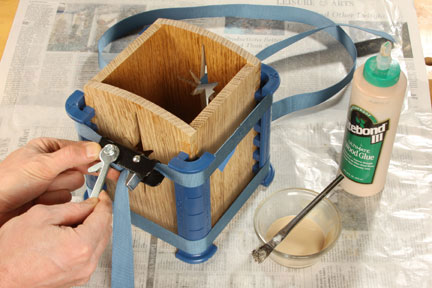
Step 9: Carry out a full dry assembly of your lantern to double-check the joint fit. Then glue the project together with an exterior-rated adhesive, and apply band clamps to close the joints. In Photo 5, we’re using plastic cauls from Rockler (item #34974) to help distribute clamping pressure evenly at the corners. Note: Remember to fit the bottom panel in place during the glue-up, but keep its dadoes free of glue so it can expand and contract as needed.
Step 10: Remove the clamps when the glue dries, and sand the outside surfaces of your project to 180-grit to remove any glue squeeze-out and to smooth them. We eased the outer edges of our lantern with a 1/8-in. diameter roundover bit in the Trio (see Photo 6).
Step 11: Apply finish to the outer surfaces of your luminaria. To prepare it for use, fill the bottom inch or two of a wide-mouth canning jar with sand, and insert a 2-in.-diameter pillar or votive candle (see Photo 7).

Light your new lantern and set it outside to spread some festive cheer!


