
Turkey Tales
We asked you to talk turkey and tell us the worst woodworking advice you’d ever received – and you gobbled up the invitation. We’ll start out with the winners. – Editor
First Place:
“My dad told me, ‘Eric, you need a hobby. Something to relax you. Something that isn’t too expensive, or too obsessing. Why don’t you try woodworking?’ I realize now, 10 years later, as a frustrated woodworker, hundreds of books and magazines later, thousands of dollars in tools and wood and only a couple of high school grade projects later, that clearly, my Dad hates me.” – Eric Collins
Second place incorporated both bad advice – and some good.
“When I was in high school, I was told by the woodshop teacher that I couldn’t take the shop class and would be better off in the sewing class. I’m a girl. After 20 years of marriage, I started woodworking. I still can’t sew, but I am having fun learning woodworking. Which leads to the best advice I have ever received: my husband said, ‘Just try it.’ He is not a woodworker and had no idea how to help me. I went to the library and tried it.” – Roberta Moreton
And third place, um, rounds out the winners.
“Advice: It was set up at the factory, sir, so it must be square.” – Ray Lawrence
We’re thankful for his safety that this reader recognized bad advice when he received it. – Editor
“I was once told by a gentleman that the anti-kickback device on a table was relatively useless if you knew what you were doing. Mind you, he told me this while standing there with 17 stitches from a board that kicked back out of his table saw.” – Larry M.
Some Other Turkeys of Advice Focused on Tools
“A guy I knew when I was just starting on woodworking ‘taught’ me to buy the cheaper tools, ’cause they all wear out or break, and you can replace the cheap ones three or more times for the price you pay for an expensive one – so they last three times as long. Needless to say, struggling with cheap tools and getting shoddy, ill-fitting pieces almost made me quit in disgust, until I dug out an old Japanese chisel my uncle had given me so long ago.” – Jim Higashi
And finishing:
“A good coat of paint will hide anything.” – Greg Heppeard
Tiny Bubbles….
Speaking of finishing, a reader suggested a possible reason for the “hundreds of tiny bubbles” one of our Q&A questioners was dealing with in his polyurethane. – Editor
“If the can was shaken a lot in transport, dropped from a high place or shaken to mix the contents one can count on jillions of bubbles. I believe instructions on the can label will urge you not to shake the contents to mix it.” – Gene A. Sperry
Zero Clearance Throat Plate: A Number of Answers
Our Q&A section also got readers responding to the query from a woodworker who was trying to figure out a zero clearance throat plate solution for his Craftsman contractor’s saw. – Editor
“An idea that might not work for him, but since I do much smaller stuff, it’s something that’s worked for me: 1/4″ hardboard, wooden runners glued to the back to fit in the miter slots.” – Kenneth D. Weinert
“I solved the problem by reducing the thickness of the throatplate along the edge. It took some fussing, but I was able to end up with a finished throatplate that is flush with my saw’s table top. Usually where there’s a will, there’s a way.” – Rod Schmidt
“I have owned a Craftsman Table Saw for many years, and since the throatplate is a thin piece of metal (about 1/8 inch thick) and not the 1/2 inch or so that can be found on many other table saws, I’ve successfully used 1/8 inch hardboard to make Zero-Clearance Throatplates for my Craftsman Table Saw. The throatplate that comes with the Craftsman saw can be used as a template to make the blank, drilling holes in it for the two attachments screws (on my saw). Then, starting with the blade below table height, raise the blade up to the highest height you think you will be using the throatplate for and presto, a new inexpensive zero-clearance throatplate.” – Joe Schrader
This reader had an interesting source for his homemade throat plate materials. – Editor
“The old Craftsman table saws have a throat plate the same thickness as a traffic sign. Im not advocating the taking of public signs: I also work in a sign shop and when the old signs come in for the scrap heap, I use them for plates for zero clearance to 1 inch dado plates.” – Thomas “Tucker” Laskey
Benchtop Tool Lift
And our third Q&A from last time out elicited even more responses with suggestions for a lift for a benchtop planer. – Editor
“I had an old wooden desk in my shop that had a typewriter lift in the side of it. I took it out and attached it to my workbench for my miter saw. It had a heavy spring mechanism and worked beautiful till it finally broke after about 15 years and I could not find parts to fix it. I am still looking for an old desk with one of those in it to do it again.” -Larry Mathis
“Try a conventional TV lift. They are beefy, but pricey.” – Stephen Metsc
“I’ve become very fond of old rolling metal typewriter tables that I source from the dump. They take serious weight, and have mechanisms to retract the casters for stability.” -Richard Stein
“I face this problem, and I have two solutions. The first is quite obvious: use it on the floor. I use a hand truck to move the planer to the middle of the shop floor, dimension wood, then move it back against the wall when I’m finished. I also purchased a used small electric 1/8 ton (250 lbs) hoist on Ebay for about $50. I picked up some heavy-duty lifting straps at one of the industrial tool supply houses for about $10 a piece. I put several heavy-duty hooks into the ceiling beams in various places. I can hoist the planer up right next to the work bench and push it over while lowering back down so it lands on the bench. But frankly, I find it’s just easier to work on the floor.” – Vince Brytus
“What I came up with to solve the same problem was a rollaround cabinet. I added a 1-1/4 “ MDF top to it and put threaded inserts (5/16”) into it. Then I cut a piece of plywood with holes to match the inserts. Onto the plywood I mounted the planer. Then I built a storage shelf that has office chair casters mounted upside down. They are at the same height as the planer plywood base. I unbolt the planer from the rollaround and push it onto the storage shelf. Casters came from broken chairs, and the rollaround top came from a junked office desk.” – Dennis Fitch
“One solution is a flip top stand. I built a stand that holds my 13″ lunchbox planer (90+ pounds) on one side, and my 1″ by 4-2″/8″ sander and a bench grinder on the other. By carefully placing the tools on the tabletop so that they are balanced, I can flip the top witha bare minimum of effort. This also saves space in my single car garage.” – Pete Leyden
“My solution is based on an automotive scissor jack. These have a lift of as much as 24″, and the weight is no problem. I want my planer to sit on a counter top while working and under the counter at other times. The planer is mounted on a plywood base which is bolted to the top of the scissor jack and is under the center of gravity of the planer. The counter top above the planer is removable and supported by a ledge on all four sides. To raise the planer, I remove the counter top cover and use a cordless drill to raise the scissor jack till the planer and its base are just above the level of the counter. I then slide in a board into each side of the hole in the counter and lower the planer down onto these boards so it is on a solid base. Reverse the process to lower. It’s important to have the jack under the center of gravity of the planer. I have a 3″ high block under each corner of the planer base. These blocks prevent any movement of the planer base while it is above the level of the counter and allow me to safely slide the support boards in place. The plywood planer base must be a snug fit with the cabinet sides so it is stabilized during the raising and lowering process.” – Gordon Stewart
Check out this issue’s Reader’s Project Gallery to see another reader’s solution utilizing a car jack – with photos. And speaking of photos, here’s another reader who illustrated his solution to this problem. – Editor
“The planer is mounted on a swivel: lets me flip it upside down when not in use. Best part is that when it is upside down, the cabinet it sits in is very versatile. It is exactly the same height as everything else in the shop- so I can use it as another cut-off table for handling large pieces on the table saw. One other thing that may help save your back muscles: I have a mortiser that is also very heavy and hard to move, so I built a frame that sits just a little higher that the planer cabinet. The planer cabinet actually ‘nests’ inside this frame. So, for the footprint of the planer, I have stored two tools, and also created another mobile ‘workbench’ that I can quickly move around the shop when extra help is needed handling a project. These were very simple, and incredibly useful, and have saved my back numerous times over.” – Dave Hunter
More Shop Memories
In some feedback to last issue’s Feedback, a reader shared a special moment in his shop. – Editor
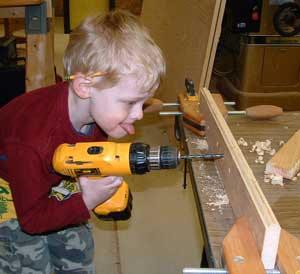
“I enjoyed Bob Miller’s comment about making memories with grandchildren in his shop. I have attached a photo of my grandson in my shop. It is a favorite memory that John (my grandson) and I share. He is four, and one rule I failed to enforce: he is not wearing saftey glasses.” – Dan Humphrey
Ch-Ch-Changes
And we conclude this time out with a reader’s thoughts both on Rob’s musical taste in citing Bob Dylan lyrics in last issue’s editorial, and whether there are changes afoot in woodworking. – Editor
“Good on ya, Rob. ‘Changin’ had to be (in my not so humble opinion) the best he ever composed. Yes, there are new horizons to be seen, and I hope I get a glimpse. Seems as if we are due a few new “heroes” in our part of the trade/craft/art.” – Bill White


