This article, “Shopmade Texturing Tool,” is from the pages of American Woodturner and is brought to you by the America Association of Woodturners (AAW) in partnership with Woodworker’s Journal.
I do a lot of texturing on my turned pieces and own several of the commercially available tools made for this purpose. The idea of these tools is that a non-powered but free-rotating cutter presented to the spinning wood will produce a consistently patterned texture. Essentially, any cutter that rotates can produce texture on wood, so I decided to make my own shopmade version. You can make one, too, with a bit of simple metal working that can be done on the wood lathe.
I already owned several 1/8″- (3mm-) shank cutters made for use in powered rotary tools (such as a Dremel). I also had a good assortment of 1/4″- (6mm-) shank carving burrs. So I figured I would make a texturing tool that could accommodate both size cutters by way of bronze adapter sleeves.
Anatomy of a Texturing Tool
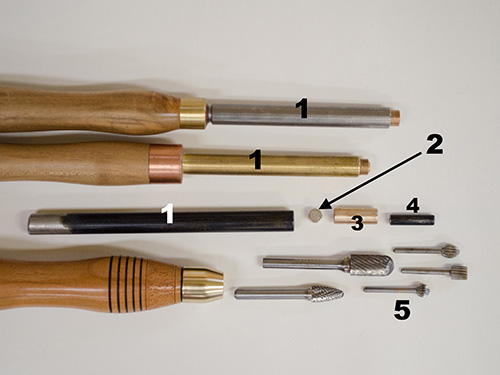
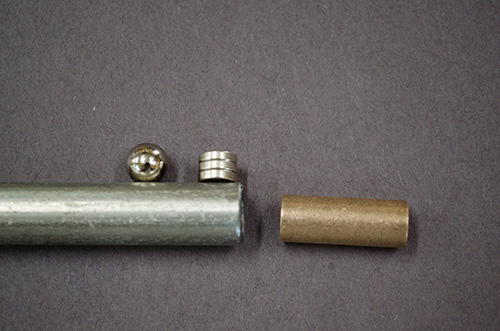
1= tool shank (steel or brass)
2= magnet(s);
3= 1/4″ adapter sleeve
4= 1/8″ adapter sleeve
5= assortment of cutters.
The essential parts of this tool are:
A tool shank of steel or brass: 1/2″ (13mm) diameter, 8″ (20cm) long. I made one shank in brass and one in steel. Brass is better because it is not magnetic, but more about that later. The shank will be drilled to accept the adapter sleeves.
Magnets: Magnets are inserted in the shank ahead of the adapter sleeve and help to hold the cutter in the tool while allowing it to rotate freely. I tried two styles of neodymium magnets—an 8mm sphere and a stack of three 5⁄16″ × 1⁄16″ (8mm × 2mm) disk-shaped magnets. The sphere magnet seems to be slightly stronger, but I suppose that could vary depending on the manufacturer. You could stack more small magnets if necessary for more holding power. A magnet is not absolutely necessary, but it does keep the cutter from falling out and getting lost in the shavings.
A bronze sleeve: 1/4″ inside diameter (ID) and 3/8″ (10mm) outside diameter (OD). This sleeve is used to accept 1/4″-shank cutters and the 1/8″ adapter sleeve.
A short length of brass or steel rod: 1/4″ diameter. This rod will be used to make an adapter sleeve to accept 1/8″-shank cutters. In use, this adapter is inserted into the larger adapter sleeve.
Drill the Shank
The first step is to drill a 3/8″-diameter hole in the end of the tool shank. The depth of this hole is determined by the length of the bronze adapter sleeve plus the thickness of the magnets, all of which will be inserted into the hole. I recommend drilling to the length of the bronze sleeve, so that when you insert the magnets, the sleeve will protrude just a bit.
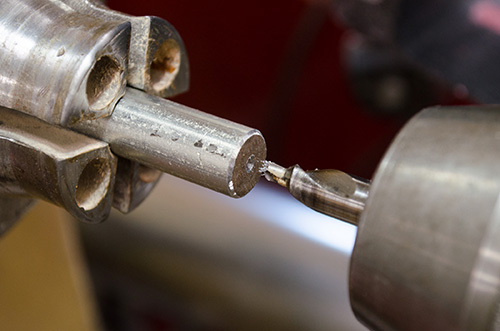
Mount the metal rod in a chuck outfitted with small pin jaws. The 1″ (25mm) jaws on my chuck can grip down to 1/4″, so they worked for all tasks in this project. Start by drilling a center mark using a centering drill.
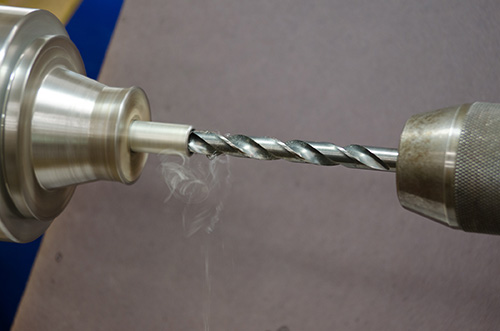
Then drill with a 1/4″-diameter bit, followed by a 3/8″-diameter bit. Make sure to apply a little oil when drilling into metal and back the drill out frequently to prevent jamming and overheating.
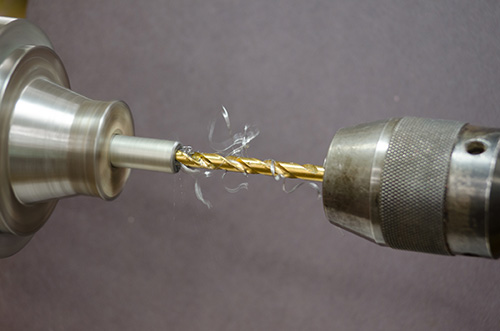
Drill Small Sleeve
After you have drilled the main tool shank, drill a 1/8″ hole in the ¼”-diameter bronze rod. Mount the rod in the chuck jaws, begin with the center drill, and then drill with the 1/8″ bit. I found that when drilling this hole, I had to extract the bit very frequently to avoid getting it stuck. I can’t stress enough how important it is to use oil and clear the metal shavings often.
A helpful tip is to cut the adapter sleeve rod to length before drilling. This way, you can drill from both ends and then make a final pass all the way through. This makes the drilling easier, since you won’t have to drill as deep.
Tool Assembly and Use
You can make or adapt a wood tool handle to accept the 1/2″-diameter shank, but the wood handle is not covered in this article.
To assemble the tool parts, simply drop the magnets into the 3/8″ hole in the shank, followed by the larger bronze adapter sleeve. This is where the brass vs. steel choice in shank material comes into play. If you use steel, you’d better make sure all of your measurements are correct before dropping the magnet in; once you let go, there will be no getting that magnet back out of the hole. You won’t have this issue with a brass shank, which is not magnetic. Also, brass is much easier to drill than steel.
With the larger bronze sleeve inserted, you are ready to use 1/4″-shank cutters. If you prefer a 1/8″-shank
cutter, you’ll need to insert the smaller adapter sleeve into the larger one. I made my 1/8″ adapter slightly longer than the 1/4″ adapter, so I could remove it easily using needle-nose pliers.
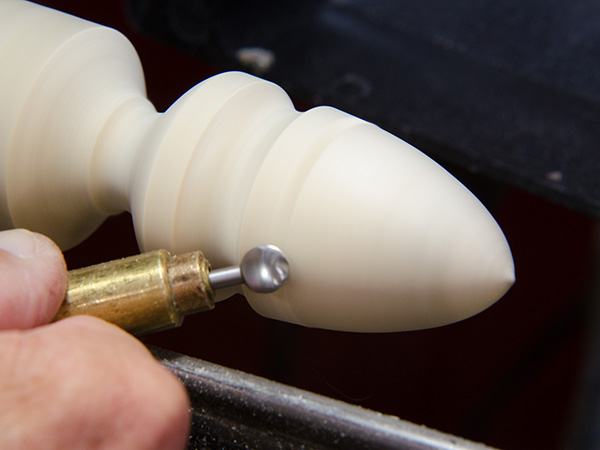
Before using the texturing tool, I put a drop of oil on the cutter shank and then wipe it off with my fingers. I prefer the smaller-shanked cutters because I find them easier to use and far less expensive. Of all the Dremel cutters I own, the two that stand out are the round-ball-shaped cutter and the parallel-sided cutter.
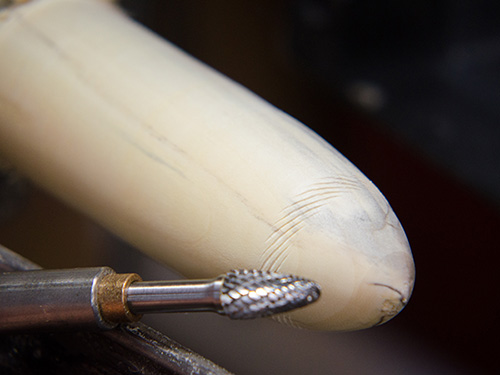
Present the texturing tool with the handle low and the cutter touching the wood a little above center. The cutter has to rotate to create the textured patterns, and you will have to push quite hard on hardwoods. By changing the angle of the tool as you approach the wood, you can change the orientation of the cuts. Holding the cutter horizontal produces flat lines, whereas if you angle the cutter, you’ll get angled lines.
The textured appearance will also depend on whether the cutter diameter divides evenly (or unevenly) into the diameter of the workpiece. I have found that this tool works especially well on the inside of coves, where my other texturing tools don’t work very well. Also, you can achieve crisp textured lines in hardwood, while softwoods tend to tear out, especially when using the cutter at an angle.
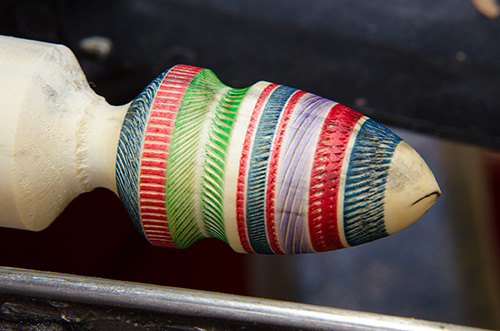
I like to add a little color using markers to accentuate the textured patterns. Tombow brand markers, available at craft stores, work well. I hope you’ll make one of these texturing tools and enjoy exploring the effects you can achieve with it.
John Lucas, a retired photographer, has been working in wood for more than thirtyfive years and also dabbles in metalworking. He enjoys modifying machines, making tools, and sharing his knowledge through articles and videos. He has taught classes at John C. Campbell Folk School, Arrowmont, and The Appalachian Center for Crafts.


