To make a simple square or rectangular frame, cabinet, box or drawer, using butt joints is very easy.
Butt joints can be used in a lot of different ways to join two boards or panels: edge to edge, end to side, end to edge, etc. For example, to make a simple picture frame, cut four parts, each with a square end. One opposing pair of sides is cut the same length as the length of the frame. The other pair of sides is cut to the width of the assembly, minus twice the width of the other pair of sides. Because stock is often not exactly the width that’s specified in plans, I like to actually measure the width of my pair of long sides, then subtract the measurement from the length of the other pair of sides.
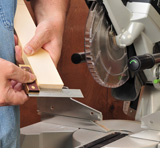
But before cutting any parts, it’s wise to make sure the saw you’re using for cuts (compound miter saw, table saw and miter gauge, etc.) is cutting smoothly and precisely. I like to take a test cut or two and check the cut ends and edges for squareness with an accurate try square (photo above). For a perfectly square assembly, it’s crucial that each opposing pair of sides be cut to identical length. Use a fence and stop with your miter saw (or table saw and miter gauge) to assure consistent lengths.
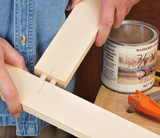
After parts are cut, the easiest joint assembly is to simply glue the parts together. This works just fine when joining solid-wood boards edge to edge, to make a wider panel or shelf, or when gluing parts up edge-to-face, with long grain glued to long grain. You can also get away with gluing butt-joined plywood carcasses, as some side-grain-to-side-grain gluing takes place.
Reinforcing Butt Joints
Reinforcement of some kind is necessary for strong, long-lasting butt joints. Not only does reinforcing the joint add strength and durability to your assembly, but also helps keep parts aligned during glue-up. Fortunately, there are many different possible ways of reinforcing a butt, from easy-to-add nails and screws, to glue blocks and braces, pocket screws, dowels, biscuits, splines and butterfly keys.
Nails and Screws
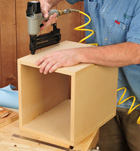
An easy way to strengthen carcass assemblies is to add nails (photo below) or screws, to hold the joints together while the glue dries. This is fine for utility drawers, boxes and cabinets that aren’t subject to much stress and strain during use. However, such assemblies have very little resistance to racking-the tendency of the frame or box to flex diagonally. Never use glue and nails to assemble an end-to-edge butt-joined solid-wood frame: The wood’s porous end grain doesn’t provide any strength when glued, and any flexing or stress easily breaks the weak glue joint and pulls the nails out, which have very little withdrawal resistance.
Glue Blocks and Braces
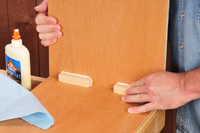
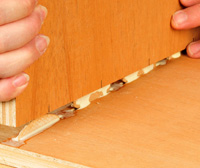
For butt joint assemblies with interior surfaces that won’t be seen, the very easiest way to add reinforcement is to apply glue blocks. A glue block is just what it sounds like: a small block or strip of wood that’s glued into place. Glue blocks are commonly used inside plywood and MDF assemblies, like cabinets, dressers, armoires, etc. They can also be used on solid wood projects, as long as the glue block’s grain runs parallel to the grain of the assembly. No need to clamp the blocks in place: Just spread glue on the block and press it in place, using a back-and-forth rubbing motion. You’ll feel the block “suck” into place, as it gets harder to move. For greater strength, add drill and drive screws through the glue block into both halves of the butt joint. Alternatively, you can screw a brace across the inside corner of a butt joint, for example, a table apron. The brace can be a metal L bracket or corner gusset (available at hardware stores), or a wood brace made from a scrap of hardwood with 45 degree mitered ends, cut as you would cut a picture frame member.
Pocket Screws
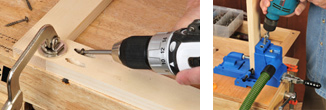
A popular way to create reasonably strong butt joints is with pocket screws. This system uses steeply angled, counterbored holes drilled into one butt joint member – a frame rail, cabinet side, carcass bulkhead, etc. Screws driven into the holes pull the parts together and secure them firmly (left photo above). Pocket screwed butt joints are quick to assemble and require no glue, so there’s no squeeze-out or messy drips to clean up afterwards. Also, pocket screwed joints can be disassembled, in case you make a mistake or want to take your project apart in the future.While it’s possible to drill the angled holes necessary for this joint using a regular electric drill or drill press, you’ll get cleaner, more precise holes by using a special jig. The Kreg pocket hole system (right photo above) uses a special jigs with drill bushings, clamps and a stepped drill bit to bore clean, perfectly angled and spaced holes in your workpieces.
Dowel Joints
A tried-and-true (if a bit old-fashioned) method of adding strength to basic butt joints is doweling using cylindrical dowels fitted into holes drilled in both joint parts. Made of hardwood, dowels are ribbed or spirally fluted along their length, to allow glue to spread around them during assembly, resulting in a strong bond. The trick to getting good dowel joints is to drill the holes in exactly the same location both parts; any discrepancies in location and the dowels won’t fit into both parts or the joint will be misaligned.
Biscuits
Invented in Europe more than five decades ago, biscuit joinery (aka plate joinery) uses small, football-shaped wood biscuits glued into slots to form strong, quick-to-make joints between butt-joined wood parts.
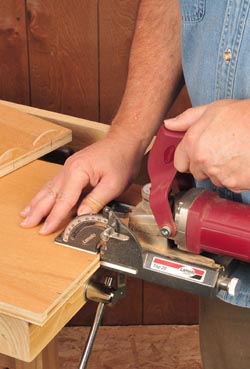
A plate joiner (above) is used to cut the slots. Carpenter’s glue swells the compressed wood biscuits, hence making a very tight, strong joint. The biscuits are a great reinforcement for butt joints used to join cabinet carcases, chests and boxes, drawers and trays or end-to-edge joined frame members 2 inches and wider.
Splines
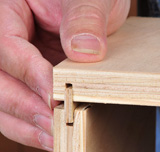
An alternative to biscuits, splines are narrow strips of wood inserted into slots cut in the surface of a butt joined assembly. These slots can be cut using a table saw and dado blade or a router fitted with a kerf-cutting bit. You can either rip splines from thin plywood (1/4 in. Baltic birch ply works well), or cut solid-wood splines with their grain running in the short direction. Splines can be used to strengthen butted frame joints, but are more often employed on butted carcass joints, such as used to build a chest or cabinet. To be most effective, the spline should run the full length of the joint.
Butterfly Keys
A decorative way to reinforce edge-joined butted parts is with butterfly keys. The hour-glass-shaped key, cut from thin wood, is inlaid into a recess cut into the face of the joint, with the narrowest part of the key centered on the seam between the two parts. When glued into place, the key adds mechanical strength to the joint and keeps it from pulling apart.
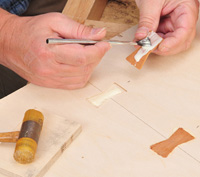
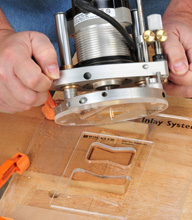
Although you could create a butterfly-key joint using a chisel to chop out the recess and a fret saw to cut out the key, it’s much easier to use the router and template.