There was no doubt that Rob’s inquiry last week about the types of workbenches you use would get lively response — and you did not disappoint! Many love the workbenches they currently have. – Editor
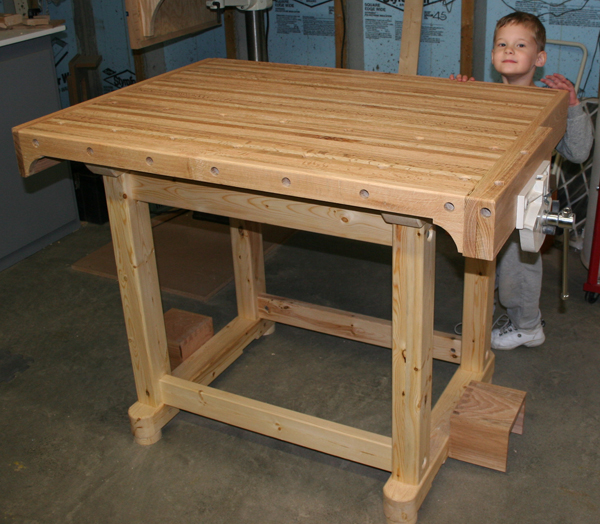
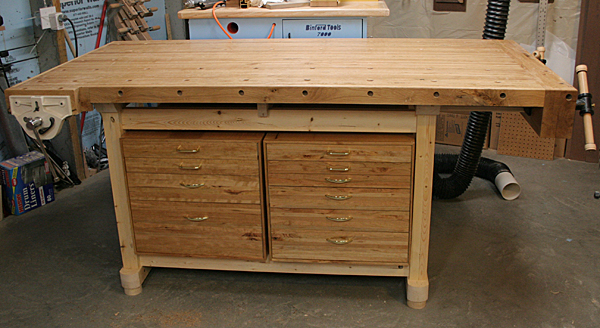
“When my oldest grandson was born, I decided to build the workbench I always wanted and he could someday inherit (see below). It is made from hard maple and cherry for the drawer fronts. The half lap joints for the frame that supports the top are dovetail half laps. The pulls are curly maple. A foot-operated cam on both ends lifts this very heavy bench up on the wheels so I can easily roll it around. The top is 2-5/8-in. thick and rock solid.” – Jerry Carpenter
“(My bench is) 2×8 pine, edge glued into a top measuring 27 in. wide by 72 in. long. That wasn’t enough so I made a second one, leaving a slot toward the back. I attached the second on top of the first, so the slot became a tool well. I attached that to two sawhorses as legs, then drilled dog holes and mounted a steel tail vise with a dog (one metal lift and one dog hole in the face board.) My dead men are attached vertically inside the edges of the sawhorses for multiple dowel “supports” which also accept holdfasts.” – Peter Fabri
“I’m with you, Rob: benches should be stout and solid. But, my budget was weak and subdued. My answer: standard 2x4s laminated side by side, planed and sanded, supported by a 4×4 framed and tray shelf. Twenty-five years later it still serves me well. I sanded it down once and finished with a good urethane. It may not be maple, but I’m not royalty either.” – Arlan Quandahl
“I made the classical workbench. Like you, Rob, I mostly work with power tools. However, just having this bench encourages me to use my plane and chisels when appropriate. I am moving and decided to sell all my equipment rather than move it. Others have bought good equipment at a reasonable price and I saved the cost of moving everything. I hope to build a larger shop and upgrade the machinery at the other end. In the mean time, I have hand tools and a good bench.” – Robert Fuller
“My first workbench was particleboard and 2x4s. I used dowels as bench dogs and a vise with a quick-release nut. It actually worked quite well. Then I made a workbench using plans from an article by Frank Klausz. The wood was scraps from a cabinet shop. It took a while to make, but I’m glad I made it.” – Bill Bukovec
“My workbench (see below) is 50+ years old; it’s been moved twice, after removing the top — they each need two men too lift them — and is constructed of glued up 2x4s and 2x6s. The leg assemblies are made from three 2x4s and the center pieces are in sections to allow for full through-tenon joints for the top and bottom stretchers. The inside 2x4s are notched out for stopped dado joints to accommodate the front and back 2x6s, and a single lengthwise stretcher is screwed and glued to the center of the bottom stretchers of the leg assemblies. There is also a front-to-back stretcher to support the center of the bench top. The top of the bench is made of glued-up 2x6s that are covered with 3/4-in. MDF and a sheet of hardboard. The edges of the top are covered with pine strips and the top is fastened to the base with metal “S” cleats. Openings were cut in the front for my vise and a drawer. This bench has pads cut from outdoor carpet under each leg, and it STILL does not move. There are 5/16-in. screw holes on one corner to accommodate a heavy machinist’s vise when needed. The bench is only 30 in. high to make it easy to work on larger projects, and it also serves as an outfeed table for my movable jointer or planer when needed. The work surface is 3 x 5 ft. but obviously it could be any size. The main thing is that it is literally rock solid! I suspect it would hold a least one large elephant without the slightest hint of caving in.” – C. Baker, Simpsonville, South Carolina
“I mostly work with power tools, but I find my hard maple home-built workbench with shoulder vise, twin tail vises and double rows of square bench dogs indispensable in holding work being machined or sanded as well as jigs, templates and power tools.” – Bruce Vincent
“I made a cheap compromise years ago: I purchased a $165 Harbor Freight workbench. It has bench dogs, good height, an end vise and some drawers. It’s not great but has gotten me by.” – Anonymous
“I’m finding myself using hand tools more and more these days. Having retired recently, I NOW have time to do some of the woodworking that I never seemed to have time for with a full-time-plus job. And I finally decided to build myself a serious woodworker’s workbench. I decided to go deluxe – and went with a Benchcrafted Split Roubo, using their front and tail vise hardware. Part of the appeal of their design was the “split” Roubo style, with the bench being built such that it could be broken down into manageable pieces for moving. I did just recently move it to my new retirement home, and knocking it down and setting it back up again was very easy. The separate sections of this bench each weighed significantly less than the “beast” worktops from my other benches! Still heavy, but manageable. Not so with the old bench tops — son swears he’ll NEVER help me move those old ones again. I think I spent a bit shy of three months building my Roubo bench. I absolutely love this bench. As well as the Benchcrafted vise hardware. I used their ‘criss-cross’ mechanism with the floor vise (to prevent racking when clamping), and it is a marvelous thing. And I’m getting a LOT of use out of the tail vise – finding that I use it much more than I ever thought I would. This bench – though built to allow it to be disassembled – is rock solid for me when set up. I can plane on it very hard with no bench movement. Doing woodworking on this bench is an extremely satisfying endeavor. It is now front and center in my workshop.” – Kevin Stodola
But some of you are still wishing for that perfect bench. – Editor
“As much as I admire the thought of a thousand-pound bench, my workshop has to be mobile to allow me to switch from table saw to band saw to Woodrat. The bench has to be push-able to clear space. Substantial is important though, and I figure mine to be about 200 lbs. including two vises and hardware. I’d rate it as ‘adequate’ when using hand planes on gnarly grain. There are days where I wish it was heavier. I’ve considered sandbags in the framework, so there are options. I went with a softwood top though. Cost was an issue at the time, but today I would go back to the softwood immediately. It is easier on the workpieces and tools, easily re-smoothed, easily re-finished. I use a hard wax finish, so glue clean-up and the like is painless.” – Doug Walkey
“I am currently using a real-ish workbench: 2-in.-thick maple top, 3-in. maple legs, front vise (one that racks like you can’t imagine) and an end vise. But, like you, I want a REAL workbench. One that is massive in weight. I plan to build myself a Roubo workbench, and I have already purchased the hardware. Now I just need the wood. Oh, and the time.” – Doug Manter
“I have a cheap Harbor Freight workbench. It isn’t very sturdy, but it does fit between the rails of my Jet cabinet saw. I wish I had a larger, more sturdy bench, but it just won’t fit in my 12×14-ft. shop. Since I live in southern Nevada, an outdoor bench made out of hardwood might be the answer.” – Al Phelps
“Like you, Rob, I function by way of a work table as opposed to a bona fide bench. My ultimate goal is to build a real brute of a workbench that will last the remainder of my allotted time on this earth. But I don’t want to assemble a kit version. I want the bench to reflect my woodworking skills and to be built by my own hands so afterward I can say ‘I did it.’ And I want this workbench to be built so well that my next of kin will want to argue over it after I take the big sleep. A really good plan from Woodworkers Journal would be outstanding!” – Bob Wollard
Others are planning to build a bench soon, or are working on one right now. – Editor
“Unfortunately, my shop is so crowded that I cannot access my primary bench. It consists of a 2×6 frame under a 1-in plywood slab (old laboratory shelving) and 2×6 legs and stretchers. It has what I consider to be a metal-working vise and is (barely) sturdy enough for most of what I do. But like you I hunger for a traditional woodworking bench. I actually have some oak air dried and ready to make into a bench. The oak came from a tree my mother-in-law cut down. I have three 3 x 10-in., 10-ft. slabs and three 5 x 3-in. by 10-ft. pieces, plus a few smaller dimension (4/4 to 5/5) pieces. My plan has been to make the top out of two 10-in. pieces and one 5-in. piece. Then build the legs with the other two 5 x 3-in. pieces. I had planned to make the third 10-in. piece into a mantel but I no longer have that house so I may resaw it into 4/4 pieces to use as part of a cabinet under the bench. Granted, the fresh-cut log had a lot of water in it when it must have weighed over a 1,500 lbs. I would guess that my pile weighs in in the 800 to 1,000 lb. range now. And with pieces that thick I figure I can build almost entirely with dovetail joinery and no mechanical fasteners.” – Chris Tully, M.S.
“For the better part of my woodworking ‘life’ I worked out of a tiny shed in the backyard of my parents’ house and had no workbench at all. I literally used the table top of my radial arm saw as my ‘bench’ (which I had to drag out of the shed to work on anything longer than 3-1/2 ft. in length). When I finally bought my own home and I got married, my wife agreed that she got the entire house and I got the two-car garage — a deal that I still think was in my favor. At that time I built a rugged but cheap bench out of 2×4 materials and plywood. No woodworking vise, just a machinist’s vise inherited from my father. Later I bought the DVD/plan set for built-in cabinets/bench from the ‘The New Yankee Workshop’ and completed the project in a week. Finally covering an entire wall of that garage I had a place for all of my tools and a work surface to boot. But still no true ‘work bench.’ Like you Rob, I usually use power tools for convenience, but I long to finally truly build something with my hands. Several years ago my sister had a maple in her yard die and had it taken down. She donated the logs to me and I had them milled into thick lumber. It has been air drying ever since. It is stickered and stacked in my garage, and the plans for a classic workbench sit on top of it. I have now officially moved the idea of a new workbench from the ‘one-day’ dream stage to ‘this Fall’ plan stage. With a little luck, and a lot of work, I will be giving myself a workbench for Christmas this year.” – Joe Johnson, Colorado
“Right now my workbench is double-layer 3/4-in. ply on top of two sawhorses. The next generation will be a split-top Roubo. I already have the plans and hardware; now to get some soft maple and get a-going!” – Dale Smith
“I am currently building a new home and workshop and am building my bench from scrap materials from our building site. I’m beefing up the bench with 2x material and topping it off with MDF, which I find tough and cheap enough that if damaged I just replace the top. Underneath, 2x material makes it tough enough for mounting my bench tools and handling assembly, etc. Lots of projects to do and trying to stay in budget; it may change later but it’s adequate for now.” – John van Veen
Finally, bench suggestions abound from fellow readers, if you need inspiration. – Editor
“I helped a good friend build a nice workbench a few years ago. Interestingly, we went to a local mill that made flooring. While we were looking at their available hardwoods appropriate for a workbench, they showed us some lane material removed from a local bowling alley. It was perfect and simple to use. Just something to consider if available.” – Rick Corbitt
“My bench is an ancient Craftsman workbench with sheet metal structure and a thick composite-board surface. One drawer is filled with the original instructions and paperwork for most of the power tools in my workshop. Another drawer is filled with micrometers, measuring tools, layout tools and assorted precision devices. The other two drawers are filled with drafting, design, compasses, French curves and similar. The cabinet compartment with the door is filled with frequently used hand power tools — cordless drills, circular saws, soldering equipment and similar. I added a 1/2-in.-thick, multi thin-layer birch plywood top piece. I carefully drilled two parallel strips of bench dog sized holes: one set of holes parallel with the front face of the bench and the other set parallel with the end face. To the underside of the bench top, I mounted two woodworking vises — one on the front face at one end of the workbench and the other at the other end (side perpendicular to the front face). I put down a 3/8-in.-thick plywood floor made of two 4×8 sheets. Centered in that floor I drilled holes where the six “feet” of the bench had leveling screws located. I put captive nuts through the underside of the auxiliary floor and ran bolts with three nuts. The bottom nuts tie into the captive nuts and fasten the bolts to the floor. The next nuts, above the first ones, pinch the sheet metal of the bench feet to the flooring and hold the feet of the bench as though they were the original leveling screws and serve the same purpose. With a 4-ft.-long strip of electrical power outlets attached to the underside of the back of the bench top, I’m all set. The bench, though not weighing a thousand pounds, is pretty nearly an unmovable object. The top of the bench works just like an expensive Scandinavian woodworker’s bench.” – Gary Domke
“Do plastic storage crates count? I live in a mobile home community, and our external storage is limited to a 6 x 8-ft. shed. If I want to work on any project, I have to do so in the small open area between homes, so no permanent set-up is available to me. I use the crates I store my tools in as my workbench.” – Robert Waldbauer
“I too wanted a more substantial workbench so I went with laminated veneer lumber (LVL) beams. If you cut it down to size, there will be some minor voids to fill and I found that it was necessary to run it through my planer to get a real flat surface. The bottom line is that it does not bounce like my makeshift bench did so often, and it kept the cost under control.” – Kermit Huttar
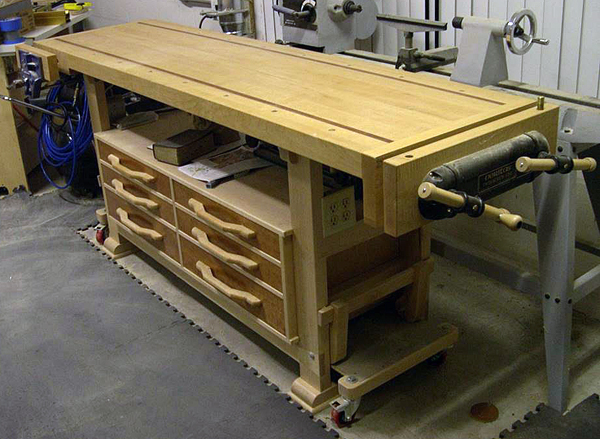
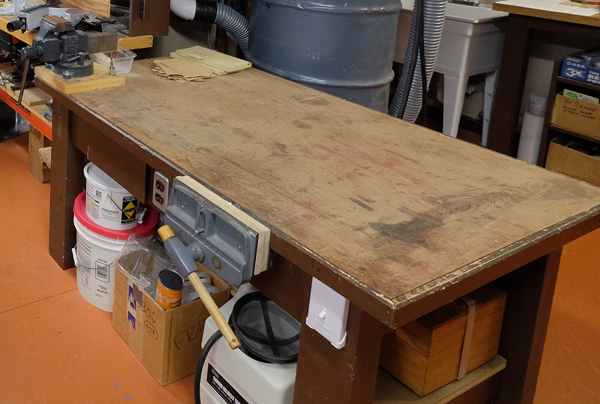
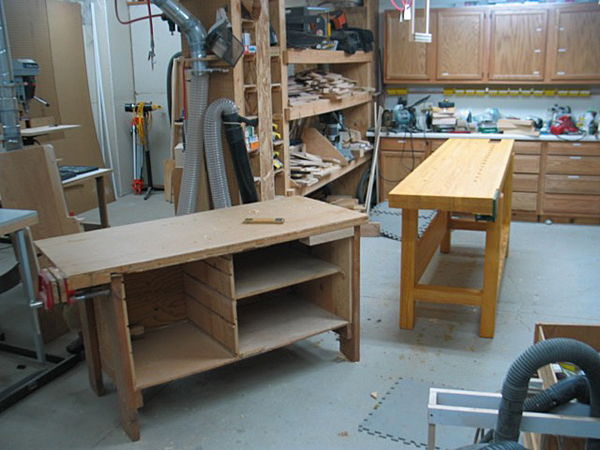
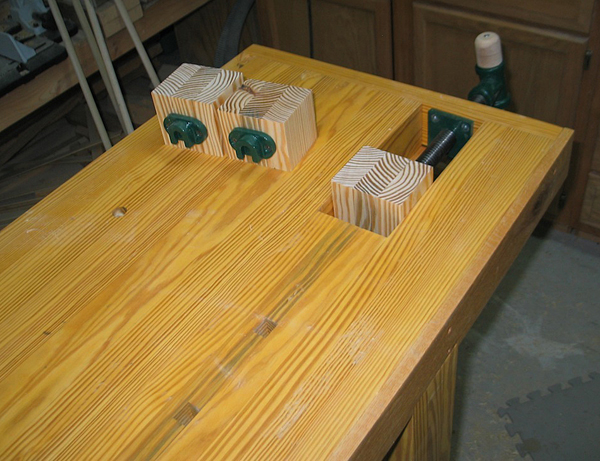
“I’m an occasional woodworker, having dabbled off and on for 40 years. Ergo, I’m not a good source for ‘wise’ ideas. Nevertheless, here are some pictures of a workbench I made a few years ago (see below). I am a power tool user, but I’ve always said I am going to switch to hand tools. I haven’t yet. The bench was made with Christopher Swartz’s ‘Workbenches’ book as my main guide. I made it much taller than he would suggest because of my power tool use. The one thing that is not obvious is the wagon vise. It was easy to build into the bench and I was able to get several mounting pieces so I have several interchangeable blocks of different heights. One of them (not shown) is flush and has the conventional dog hole. My picture of two benches shows the old one (sans drawers and door) on its way out and the new one in its new home. The old one was very crude but served me well for 35 years of occasional woodworking forays.” – Geoff
“I just built a new workbench out of ash: it has a 3-in.-thick top that’s 24 in. wide by 8 ft. long, with a bottom shelf and a sliding dead man. I want to add a tool box to it yet but not the entire length. It has a quick-release front vise and a twin screw end vise. I made this bench more for hand work so it’s only 32 in. high. I have another bench I built another bench five years ago that’s 4 ft. x 8 ft. with a 2-1/4-in. hard maple top. I bought two pre-made maple benchtops and put them together. It has face, end and and shoulder vises. This bench is 35 in. high and is better suited to power tools. It also comes in handy when assembling big projects.” – Tom Hinaman
“As a retired shop teacher and a scrounger from birth, I have collected many things in my lifetime. My workbench is made from a solid-core door that was removed from the dressing room at the local school gym many years ago. It is plastic-laminate covered and heavy for anything but a cast-iron door. I built an undercarriage from 4×4 and 2×4 material and bolted it together with 1/2-in. carriage bolts. I wax the top to prevent glue and stain from bothering it. I am not into large projects, so this workbench is quite adequate for my work. I will bolt a large sanding block to the table to use for sanding bandsaw boxes and the like, and the table does not ‘walk’ around the shop at all. I have another half-door size table built in the same fashion for my glue up table. With a good coat of wax on the top, all the squeeze-out dries and pops off with a little encouragement from an old chisel.” – Charles Buster, New Albany, Massachusetts
“I built two (workbenches) about 15 years ago for my shop (see below). The first was really a smaller one built partially as a prototype for the second. They have sufficient mass and storage and were reasonably inexpensive. The legs are glued-up 2x4s, with 2×4 stretchers in between them, joined with bench bolts so they can be easily disassembled and removed from my basement shop when the time comes. Houses are built with 2x4s so I figured they should be strong enough for my workbench. The tops are two layers of 3/4-in. MDF laminated together, followed by about a 5/8-in.-thick veneer of oak. Multiple oak planks were laminated together to the thickness of a few inches, then the stack was “resawn” (if that can be applied here) to about a 5/8-in. thick and those sent through the planer to get them all to a consistent thickness. The planks were laminated to the top of the MDF. MDF is pretty flat and heavy to begin with, so the resulting approximately 2-in.-thick top looks nice, wears nice and is pretty flat immediately. (Although I did spend some time with a couple of planes to get it as absolutely flat as possible.) Additional oak boards wrap the top so you can’t tell that the core is MDF unless you examine the dog holes fairly closely. It’s a lot cheaper than buying enough lumber to make a 3- to 4-in.-thick top. The tops sit on top of the legs with a 3/4-in. dowel peg and hole arrangement but are not fastened down — their weight has proven more than sufficient to keep them in place. The feet are adjustable to account for the sometimes uneven basement floor. Shop-made tool cabinets sit on the stretchers beneath the benches, adding storage and mass. One thing I would probably change next time is to put more bench dog holes a bit closer together. Having the spacing consistent has allowed me to make shop fixtures that drop into the dog holes anywhere along either bench. My pocket hole jig is mounted to such a fixture. There is a gap between the top stretcher and the bottom of the top. I later built a small tool tray and a paper towel holder that hooks over the top stretcher. They’re easily movable to wherever they’re needed at the moment. My benches were one of my favorite projects.” – Scott Chapman