In the editorial in the last issue of the eZine, Rob wondered what was the most creative project our eZine readers had ever built. Some of you shared some examples – with photos! – Editor
“I got stuck building two of these for our grandchild and great-grandchild. Shipping one to New York from Florida cost me more than the materials. LOL.” – Lee Lincoln
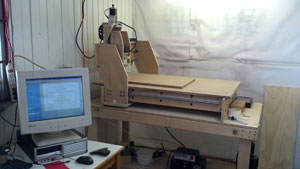
“I designed and built my CNC Router just because work was getting rid of a set of stepper motors. I made it from one sheet of birch plywood and Chinese linear barring, 22 x 34 x 8 length of cut. It’s great for signs and cabinet doors.” – David LaMontage
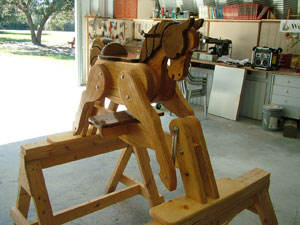
“My daughter was expecting twins, and I asked her if she would like a cradle. Since she was expecting twins, her concern would be able to have both babies asleep, one in each arm, and then be able to get them over the edge and put them into a cradle without dropping them. Then her concern was the weight of the babies and having to bend over. Both arms are full and you can’t extend your arms and place the babies gently. So we discussed the height of the mattress.
“I had my requirements, so I started the design. I proposed to her to make a glider. That way all of the swinging apparatus would be under the cradle. I have also liked the gentle swing you get from a glider (more back and forth) than a rolling motion from a cradle. I was able to get some ball cup bearings that are used sometimes in garage doors and definitely in the end of tubes for conveyer belts. I also got some shoulder bolts, used in lawnmower wheels, and I purchased some 3/8” T-nuts. My intention was to make something that didn’t require any tools to put together or take apart.
“Since I had a glider design, I thought that a completely removable front meant that it could be used as a glider for the children after they left the cradle stage. It now became a furniture piece that had a longer life than just the four to six months as a cradle. So I also wanted to make something that would hold up to some weight. It’s now not just 30 lbs. of babies, it’s a couple of rambunctious children.

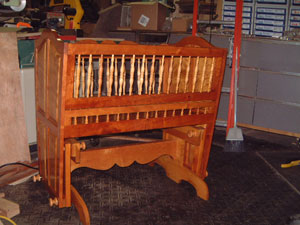
“The mattress bottom was made out of Baltic birch with curly cherry veneer and with solid cherry glued with an edge bit that allowed the cherry to go into the plywood about 5/8″. A modified sliding dovetail was designed that would lock the bottom into the back and the front support. The bottom is fit into dadoes cut into the center stile of the end panels. The back is attached to the ends with biscuit joints. All of the stile and rail cuts were made with cabinet router bits and I then put loose tenons into each of the joints for additional holding strength. The support for the base has two legs with a brace between them. The brace has bed hardware to lock the support into the legs. The wood was curly cherry. The end panels were made with what I call satin maple. The finish is two coats of Danish Oil, followed with three coats of amber shellac, followed with five coats of clear shellac. It was then wet sanded with mineral oil and 600-grit sandpaper. I then French polished the surface with additional shellac. It was then waxed and polished after allowing 30 days for the finish to cure.” – Karson Morrison
Tips on Avoiding Barn Siding Bugs
Also in the last issue, one of our readers queried us about how to avoid bringing in bugs (of the insect variety) along with barn siding wood she planned to use for candle holders. Other readers shared what works for them. – Editor
“Your experts all seem to share the opinion that nothing can be done either to treat an existing, or prevent a future, insect infestation of old wood. This is not at all true. There is a product on the market that not only kills all wood-boring and wood-eating insects and larvae that are currently present, but will also prevent them from ever coming back. The product is called BoraCare (also Bora-Care), a solution of boric acid dissolved in gelled alcohol which, when applied either by spray or brush, penetrates deep into wood leaving the boric acid behind after the alcohol evaporates. I used it myself to rid my antique cabinetmaker’s workbench of a truly nasty infestation of powderpost beetles. Although the top and legs of my workbench were made from solid, four-inch thick hard maple planks, I haven’t seen a trace of bugs since I applied BoraCare over two years ago. At a cost of $72 to $78 per gallon it’s not cheap, but it’s very easy to use (simply mix it with an equal amount of hot water and apply), a little goes a long way, and it works great. Even after giving my workbench two full treatments and giving about a cup of it to my neighbor, I still have roughly half a gallon left.” – Mikal Aasved, Ph.D.
“If the worry is mostly about bugs, why not bake the boards at about 250-300 degrees for an hour or two? That will be sufficient to heat the center of most boards (assuming 4/4 or 5/4 material) well above the temp that will kill any bugs and their eggs. No need for chemicals or encapsulating finish. I would recommend doing it on the boards before cutting them to final size, gluing, finishing, etc. This will dramatically lower the moisture content of the board so it is probably best to let it rest for a few days afterwards. Of course, my technique won’t work well if the board /project is too big or if other household members object to potentially buggy wood being put in the oven.” – Oelke
“Microwave the wood since the person is making a small project. Make sure there aren’t any nails or other metal items in it. I turn bowls and other items out of found wood. While it’s often green, other stock is full of bugs and water. In both cases, I use the microwave to dry it out. It also makes sure no bugs, fungus, or mold survives. I generally dry the finished piece, which does deform it, a plus for most bowls, but not good for candlestick holders. Those I rough out, microwave, then bore holes and finish up. I’ve made quite a few, including some with captive rings on them.
“Some care needs to be taken not to microwave the work for too long at one time. I’ve set a fire in wood when I first started and tried to dry it out all at once. The fire usually starts on the bottom about 1/4” inside the wood and will squirt smoke out. It’s kind of neat and never been a real danger, although that’s why my wife gave me our old microwave for my shop and then made me buy her a new one. I usually microwave small bowls for a minute or two on high the first time, then check them to see how hot they are. I allow them to air out for while, then put them back in for another round. Green bowls usually take a couple of rounds every day for a week until they’re done.
“I use a cheap, digital scale to weigh the green piece before and about 10 minutes after microwaving. The piece will be lighter afterward while it is drying. Once it has dried enough, it will get a hair heavier afterward. I don’t usually bother weighing seasoned wood. I always let the project acclimate for a day or two, preferably a week, after this drying process. It’s not instant, but it’s a heck of a lot faster than plain air drying.” – Jim MacLachlan
Tips Against Tool Theft
Finally, for this section of Feedback, last issue’s WebSurfer’s Review section contained a discussion of how to mark your tools to protect them against theft. Here’s another suggestion from a reader with special insight – he happens to be a retired peace officer. – Editor
“Mark the tools with your province/state driver’s license number, such as TexasDL1234567 (easy for any police in North America to trace the owner), preferably using a metal stamped letters and numbers. When it is stamped, the thief will try to file the stamped letters and numbers away, but any police ident unit can raise the numbers and letters. Your records should include a photo, make, model, serial number, date bought and where, how much, copy of receipt and any other identifying marks such as your driver’s license. Hope this helps. From a retired peace officer.” – Russ Kunnick


