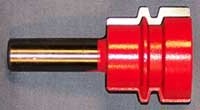
Gluing boards together to form larger panels is something of a mystery to novice woodworkers. Boards don’t line up properly, and clamps can tend to force the edges out of alignment. Boards may have a slight bow along their length, and just try to get a clamp into the middle of your panel to fix it. There is a wide array of joining systems out there to help. Biscuits, dowels, splines and even the new Domino from Festool. But my personal favorite is still the Glue Joint router bit.
Joint
This bit provides two advantages to your glue-ups. The first is to create more glue area to improve adhesion. By creating two mating tongues, it provides more surface contact between the two faces. The second advantage is alignment. The interlocking tongues keep the edges referenced to each other properly. The edges will no longer try and slip leaving ridges on your panel that need to be removed. The tighter you clamp, the more the tongues bring the edges together.
Cut 1
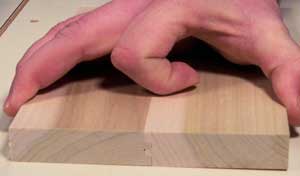
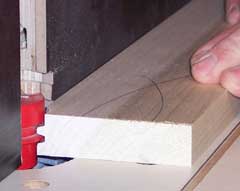
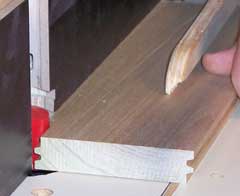
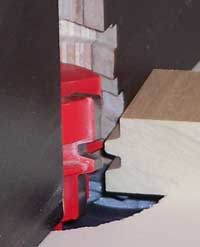
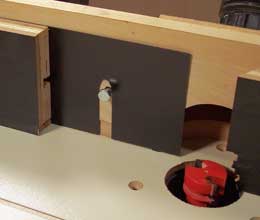
To mate the tongues, each mating edge is milled with the bit, but they are mirror images. So after running the two edges, one of the boards must be flipped over to meet the other. (See “Joint” photo) Care must be taken to keep the boards aligned properly so that grain patterns are not ruined as the parts are flipped over to glue. The outside pieces of your panel only need one edge milled. For the internal boards, I prefer to run one edge, (“Cut 1” photo) then flip the board and run the other edge. (“Cut 2″ photo) Lay out the parts and make reference marks across one face, then run the boards in sequence, flipping them for the second edge. This should keep them all in the proper order. Remember, too, that the joint overlaps, so you will lose a little width with each joint. Be sure to allow for it. This particular bit requires 1/4″ for each joint (1/8” each board).
Cut 2
Setting this bit up does take a few tries. Like many other joinery bits, the height of the bit is determined by the thickness of the stock, so be sure to make up a few setup pieces. Set the fence so that the innermost part of the cutting edge is exactly aligned with the face of the fence. Ideally, you want cut the tongues, but not the entire edge.
Setup
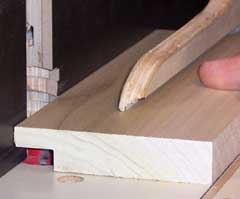
Mark the top of the parts and mill the edges, then fit them together. Adjust the height of the bit accordingly and make another pair of cuts. Remember that each adjustment affects both parts, so make small adjustments until the upper and lower faces are exactly aligned. Keep one of the final test cuts, and the next time you need to set the bit up, you can get very close with the first try (See “Setup” photo) If the joints are cut properly, finger pressure along should be enough to close the gap.
Shim Fence
None of the joining systems I discussed above will create good joints if the edges are not perfectly straight, and the Glue Joint bit is no exception. Squeezing even slight gaps closed with clamps will only add stress to the panel which may come back to haunt you later. This is when the Glue Joint bit can rescue your panel job. If you don’t happen to own a jointer, this bit can joint the boards for you.
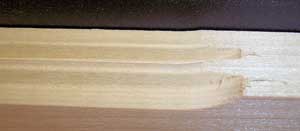
Jointed Edge
If you can’t get perfect edges, set the fence 1/32″ back from the innermost cutting edge of the bit (instead of flush) and add a 1/32″ spacer to the outfeed fence (“Shim Fence” photo). This will remove an additional 1/32″ from the edge of the part (which you will need to account for) and will remove any minor flaws in the edge (see “Jointed Edge” photo). Try that with a biscuit jointer!
Lastly, the top section of the Glue Joint bit can add wide rabeting capability to your shop. This bit is about 1-1/2″ wide so it can safely remove about 3/4 of an inch of material. Most dedicated rabet bits will not cut that deep. This rabetting ability can allow you to cut substantial tongues on the ends of your panels for adding breadboard ends.
So, next time you need panels glued up for a project, give this is bit a try. Even a lightly equipped shop can get professional results.


