This article, “An Elegant Mortar and Pestle,” by Kurt Hertzog, is from the pages of American Woodturner and is brought to you by the America Association of Woodturners (AAW) in partnership with Woodworker’s Journal.
Many turnings, while beautiful and enjoyable to make, are relegated to the mantle or display case and become more decoration than a serviceable item. Others are meant for functional, ongoing use in our daily lives, such as pens, salad bowls, jewelry, lidded boxes, and canes. This mortar and pestle project is not only fun to make, but it can be of service for many years.
History
The mortar and pestle that we know today existed at least as far back as 1000 BC, and some scientists claim ancient versions date back to 35,000 BC. Since the mortar and pestle excels at crushing and blending herbs, nuts, seeds, spices, and medicinal concoctions, it is conceivable our ancient ancestors employed them as we do today. The process may have developed in prehistoric times, when perhaps food items were simply crushed between two rocks. The lack of containment would have prompted the development of a bowl function to minimize loss. Native Americans ground nuts and acorns using mortars carved into bedrock.
Motorized grinders have lessened the use of the traditional mortar and pestle but have not replaced its overall versatility. Regardless of evolution, today’s mortar and pestle is a welcome addition to any creative kitchen and can be useful for other applications around the home, office, or studio.
Materials
Modern mortar and pestle sets are made from various materials, including ceramic, granite, and wood. They are not usually made of metal, although through history bronze, iron, and brass were sometimes used. When used in the kitchen, pharmacy, art studio, or any other place needing pulverizing, mashing, grinding, or crushing, design and material selection varies. Most commercially available units are ceramic or stone, lending themselves to dry and extended wet use. They are also virtually indestructible. Glass and porcelain are sometimes used but are most often found in pharmaceutical applications.
Some but not all woods also make for wonderful mortar and pestle sets for dry and, when properly maintained, wet use. Woods that will provide the best serviceability are dense species that will reject moisture more than porous woods. Hardwoods turn well, hold detail, and are tough enough for use. But even among hardwoods, closed-grain species such as maple and cherry would work better than open-pore woods like oak or ash, since the latter varieties are more likely to retain small bits of whatever is being crushed.
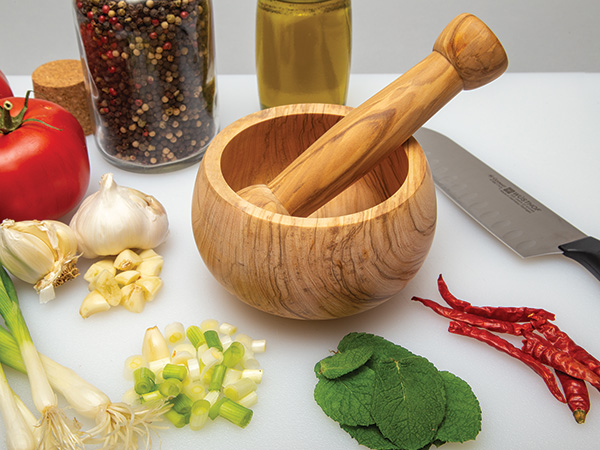
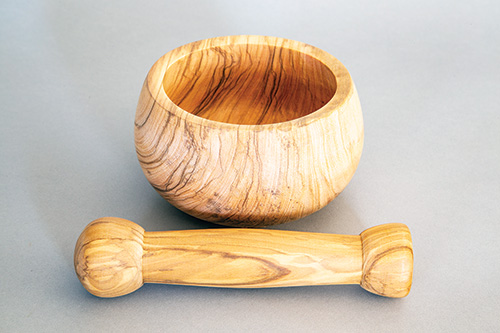
Dense fruitwoods offer many of the right properties, and I opted for olivewood. It is great to turn, pleasant to smell, and sufficiently dense, hard, and smooth. In use, olivewood performs very well. I hammered peppercorns, mashed garlic, crushed dried red peppers, and generally put the wood to the test. I hand-wash my olivewood mortar and pestle with dish soap and hot water. When dry, it shows no marks, dents, or other signs of use.
I do not apply a finish to my mortar and pestle sets, so turning and sanding is all that is required.
Design
When you are designing your mortar and pestle, think through your end use, which will impact the size and shape. For example, grinding up pigments for paints may call for a smaller size than making large batches of pesto or spiced mayonnaise, and grinding spices is different still. There is no “one size fits all” for this utility item, though I do recommend erring on the side of making it bigger rather than smaller. It is easier to use a too-large vessel than one that is too small. Also, having multiple sizes on hand is much like having kitchen knives in various styles and sizes. Each excels at different tasks and is worth owning. Having a goal for the size and shape of your mortar and pestle also helps with planning processes such as material selection, workholding, and tool needs, as well as deciding on the logical sequence of operations.
For the project shown in this article, I planned for the mortar, or bowl part, to be 6″ (15cm) in diameter at its widest point and a bit more than 2″ (5cm) deep. I wanted the walls to curve back in so that the rim diameter is slightly smaller than the widest part of the vessel. This size and shape would work well for the portions of guacamole and pesto my wife and I make, yet it would also handle spice and seasoning blends of garlic, peppers, mint leaves, and oils. The design of the pestle will have a ball end and a muddler end, rather than the typical single-ball design. Use either end in the mortar, and use the muddler end for preparing drinks. The muddler consideration meant this pestle had to be a bit longer than usual, since it would have to reach the bottom of a tall drinking glass. Even if it weren’t used for muddling, this design lends itself for use in the mortar since the flat contour works well with harder round items being ground or crushed.
Adapt the project design to your own needs.
Dual-Purpose Pestle
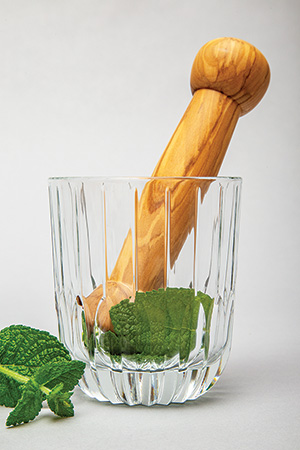
If you aren’t familiar with a muddler, it is a bartender’s tool specifically used to mash (called muddling) spices, herbs, and fruits at the bottom of a glass to release their flavors. Mojitos, Mint Juleps, and Old Fashioneds are just of few of the drinks where a muddler is useful. A typical muddler is made of wood and is about 7-1/2″ (19cm) long for sufficient reach. It has a flattened bottom with slightly rolled edges to work well in the bottom and side curves of drink glasses.
The Turning

I ordered several pieces of olivewood in sizes that would accommodate my anticipated design. Since my mortar was to be around 6″ in diameter and deeper than 2″, I ordered bowl blanks 6″ square and 3″ (8cm) thick. For the pestle stock, I purchased blanks 2″ square and 12″ (30cm) long.
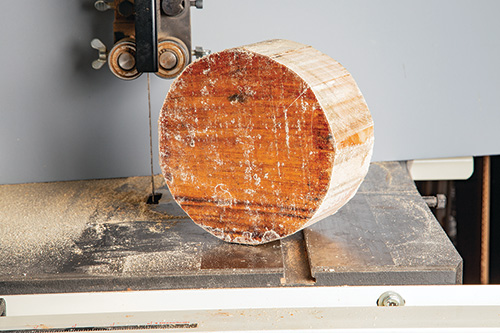
Cutting the pestle stock to 7″ (18cm) long allowed for a 6″-long pestle and some workholding scrap. Since a mortar is essentially a bowl, knocking the corners off a square blank at a minimum or ideally rounding the blank on the bandsaw is helpful.
Mortar
With the mortar blank mounted between centers, rough-shape the outside profile and begin to form a tenon at the tailstock end.
I find it easier to cut the tenon at the tailstock end of the blank, as there is more room to work and the bowl-shaping cuts will mostly be made in the direction of the headstock, which is preferable.
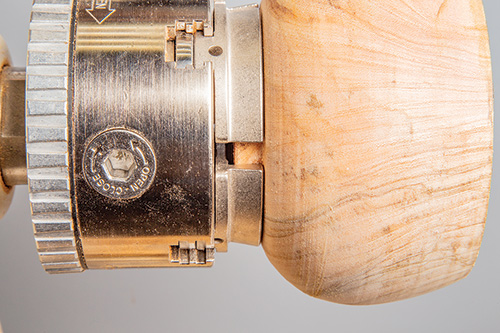
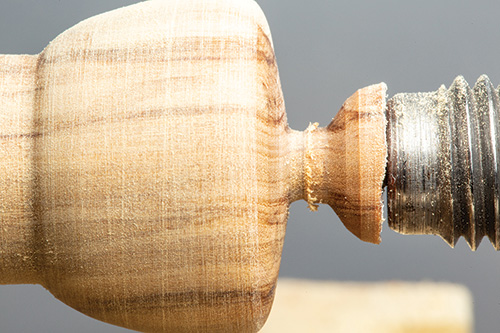
The tenon will be used for mounting the mortar in a scroll chuck for hollowing. I use a shopmade gauge to size the tenon for my chuck.
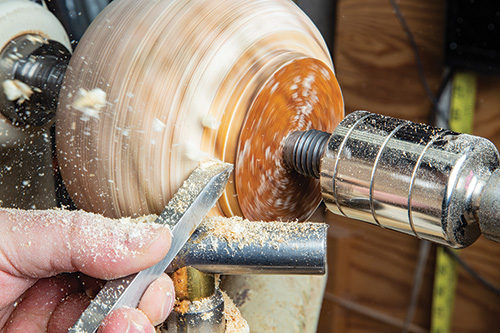
As shown, I use a scraper to refine the upper part of the outside profile. At this point, don’t agonize over the transition from bowl side to foot, as that will be addressed after hollowing.
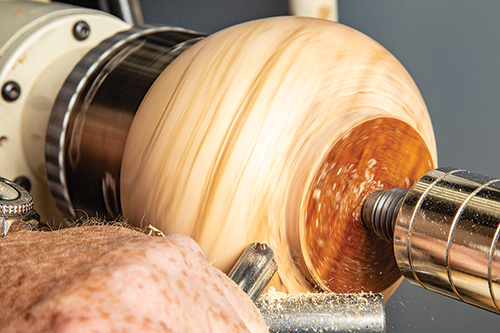
Mount the mortar blank in a chuck for hollowing. Be certain your tenon is as long as it can be without bottoming out inside the chuck jaws. The photo shows an appropriate gap between the bottom of the tenon and the bottom of the jaws.
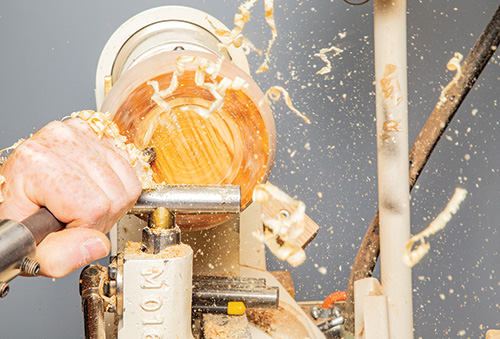
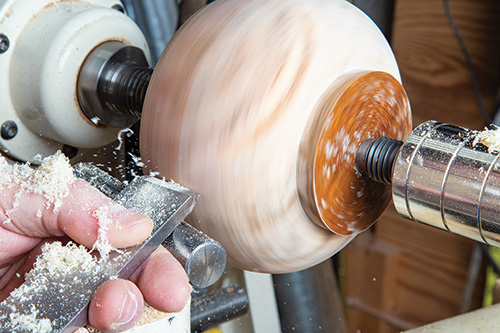
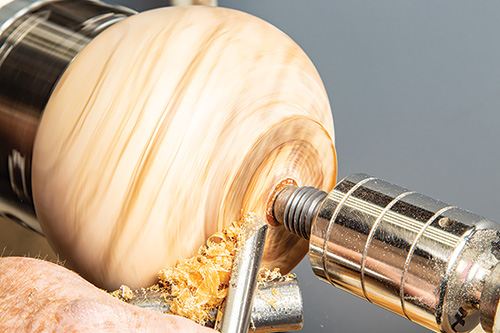
Begin hollowing as you would any bowl. Work in stages by hollowing to a shallow depth and then thinning the walls in that section to final dimension. Given the intended function of this piece, I leave the walls at least 1/4″ (6mm) thick and slightly thicker at the rim and bottom. When one section is completed, hollow to the next short depth and cut the wall thickness to size. Hollowing in stages capitalizes on the strength the remaining material in the bowl provides, reducing vibration.
Don’t forget to periodically check your depth, lest you make the bottom too thin. I use an easily made bowl depth gauge (the instructions to make your own are below).
When you have achieved your desired bottom thickness, sand the inside, as you won’t be coming back to that part of the turning. Sand slowly, letting the abrasive do the work. Progressing through the grits yields great results on olivewood. With no finish planned, I sand to 400 grit.
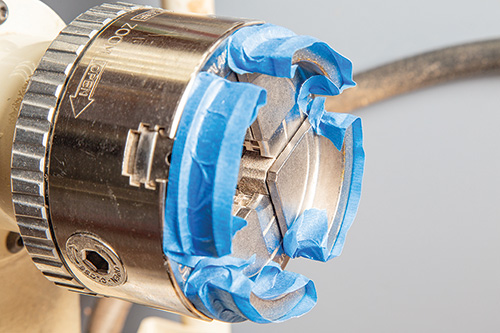
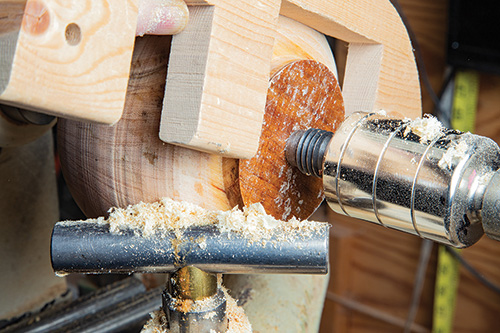
There are many ways to reverse-mount a bowl, or mortar, to turn the tenon into a foot. Here’s a way to use a scroll chuck, since for this project it is already in use. With stout sidewalls and an undercut interior, you can easily use the jaws in expansion mode to mount your hollowed mortar. I put painter’s tape over the jaws to prevent marring the wood. Orient the mortar over the tape-covered jaws and lightly expand the jaws.
Bring the tailstock up to help with centering the workpiece, placing the live center point in the indentation previously made when the piece was first mounted between centers. While applying gentle pressure from the tailstock, expand the jaws into the bowl rim for a good grip.
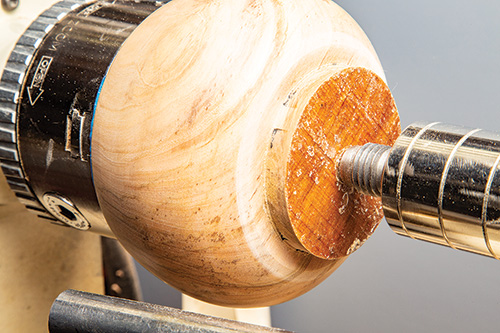
Reverse-mounting a bowl this way allows you to refine the contour of the mortar’s bottom and reshape the tenon into a stable foot. With the tailstock in place, cut the flat surface of the tenon slightly
concave.
Sand the entire outside of the mortar, except for the nub that remains under the live center. Remove the tailstock and take light cuts to remove the nub, then finish-sand that area. The mortar is now completed.
Pestle
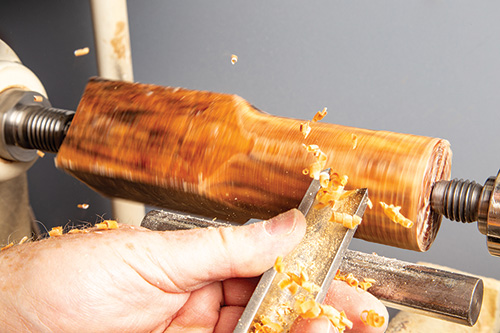
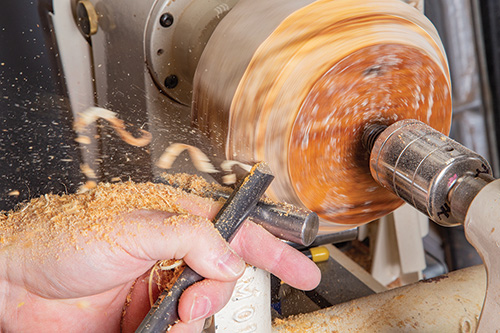
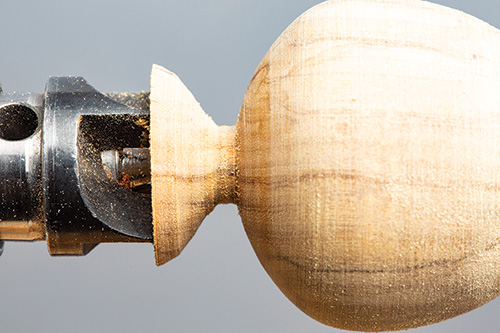
Mount the pestle stock between centers and round it to the ball-end diameter. Shape each end according to your design; this pestle has one ball-shaped end and one flat, muddler end.
The grip between them can be shaped, contoured, and decorated as desired. Sand the entire pestle.
Pare down both ends to prepare for removal. With the pestle removed from the lathe, you can cut the remaining wood from both ends using a small tenoning or razor saw. Hand-sand both ends.
Shopmade Depth Gauge
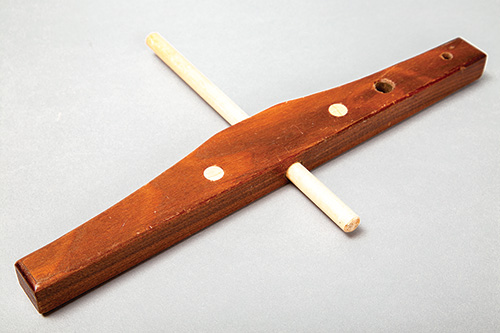
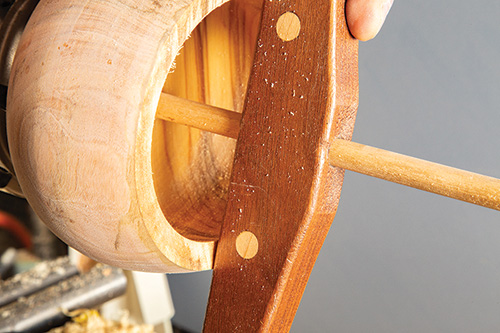
When hollowing bowls, lidded boxes, or other excavated forms, use a simple depth gauge to measure your progress and determine how much deeper you’ll need to go. My depth gauge is made from just two scraps of wood. The main part, the crosspiece, is a stick of wood whose length measures at least twice the diameter of the bowl rim. The other part is a dowel slightly longer than the height of your bowl.
Drill a hole through the crosspiece at the center of its length, sized for a snug fit of the inserted dowel. Having a snug fit allows for use without the dowel slipping or the need for a setscrew. Sand one end of the dowel round so it won’t damage the inside of your bowl.
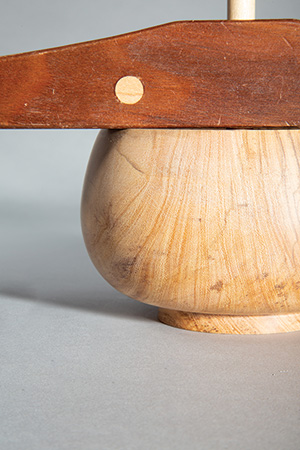
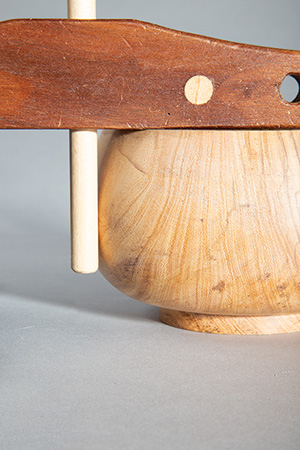
Using the gauge is simple. With the crosspiece spanning the bowl rim and the dowel extending down outside the bowl, set the rounded dowel end at a position equal to your desired inside bottom depth. This can be determined either by eye or ruler. You can set the depth for a raw blank or for a turning already in the chuck and in progress. Periodically check your depth by placing the dowel inside the bowl, without moving its position in the crosspiece. As you measure prior to completion, the gap between the bowl rim and the crosspiece will show you the amount yet to be removed. Keep hollowing until, when tested, the dowel touches the inside bottom and the crosspiece rests on the bowl rim.
Final Thoughts
For this project, I opted not to apply a finish at all. Any kind of film finish would run the risk of being damaged, fractured, or worn through in general use. The wood I chose is dense enough and looks good enough that, with proper use and cleaning, its pores do not need to be sealed with a finishing product. Nut oils such as walnut oil can pose the risk of an allergic reaction in someone with a nut allergy. All of these considerations led me to leave the wood unfinished.
This is a fun, skill-building project that reinforces fundamental woodturning practices. For craft fair turners, you might consider adding the mortar and pestle to your sales offerings. It would certainly be a wonderful gift for anyone who enjoys cooking, including yourself.
Kurt Hertzog is a past president of the AAW, past chairman of the Rochester Woodworkers Society, and a council member of the Pen Makers Guild. He has written about woodturning and woodworking extensively for various publications. For more, visit kurthertzog.com.


