This article, “Double-Offset Break Knife,” by Paul Coppinger, is from the pages of American Woodturner and is brought to you by the America Association of Woodturners (AAW) in partnership with Woodworker’s Journal.
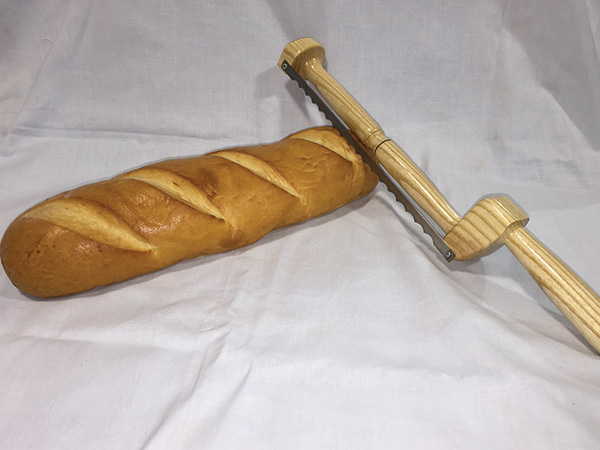
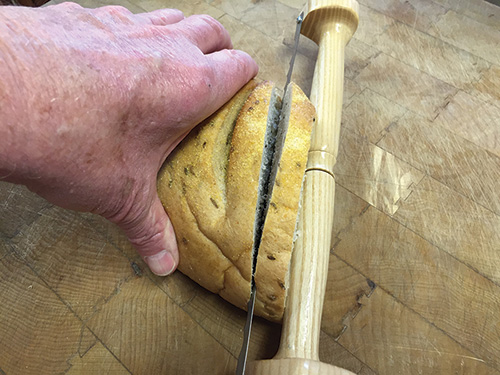
Some time ago, I spent a morning teaching turning basics to a novice turner. She left with the first bowl she had ever turned, and as a thank you, she gave me a bread knife she had made with a scroll saw. It was built from two pieces: a bow for the blade and a handle screwed to the bottom of the bow.
My wife fell in love with it. Her only comment was she wished it were turned. I looked at it and thought I could turn a one-piece version, but the project would present a couple of interesting challenges.

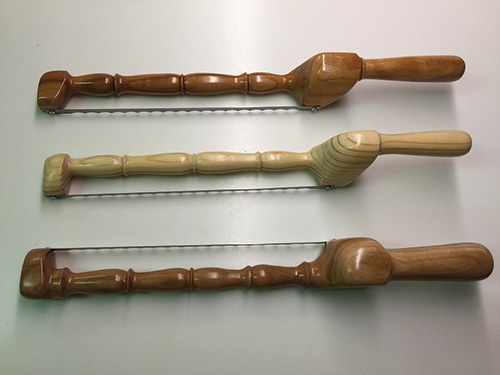
Illustration: Steven Forrest
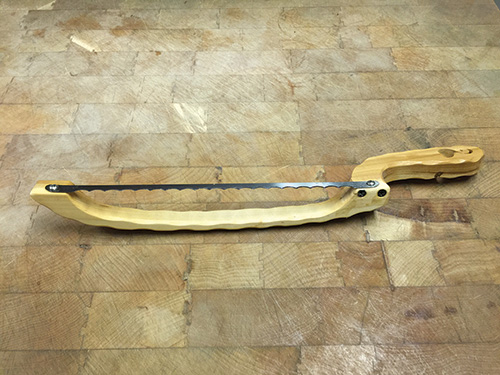
Because the handle is offset to allow your knuckles to clear the cutting board, I would have to make a two-axis turning. The first axis turns the bow spindle and the second turns the handle. In addition, after shaping the bosses (or arms) — one on the end of the bow spindle and one between the bow spindle and the handle — a jig would be needed to bend the bow spindle so that when the blade is screwed on, it would have sufficient tension for cutting. The knife blade itself is easily purchased from any of a variety of online sources.
Materials and Layout
Your choice of wood is wide open. I started practicing on a humble piece of dimensional 2×4 pine, which made a very nice-looking bread knife. Subsequently, I have made them from walnut, ash, and cherry, with cherry being my favorite. This project is built from a piece of hardwood 1-1/2″ × 2-1/2″ × 18″ (38mm × 6cm × 46cm). The maximum thickness of a slice of bread cut with this knife is determined by the 1-1/2″ starting width of the blank. To cut a thicker slice of bread, start with a thicker blank, say 1-3/4″ (4cm) wide.
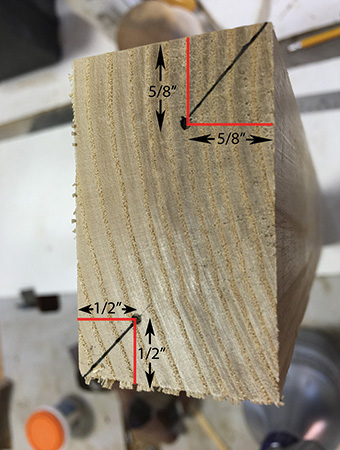
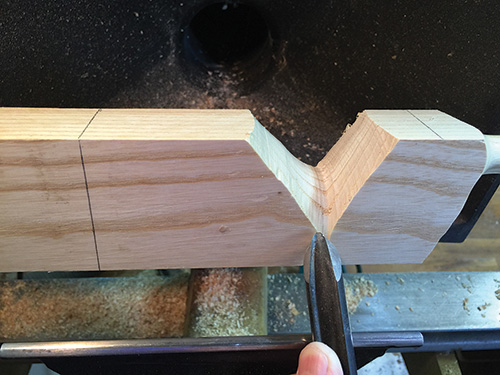
As presented, this project makes a right-handed knife. Assuming the left end of your wood blank is the bow end and the right end is the handle end, orient your blank so that the shorter sides are horizontal. On the left, or bow end, mark 45-degree lines from the bottom left and top right corners. For the lower left diagonal, measure 1/2″ (13mm) from either edge, mark this point on the diagonal line, and center-punch an indent to mark the bow’s turning axis. For the top right diagonal, mark 5/8″ (16mm) from either edge, carry the line onto the diagonal, and punch an indent to mark the handle’s turning axis.
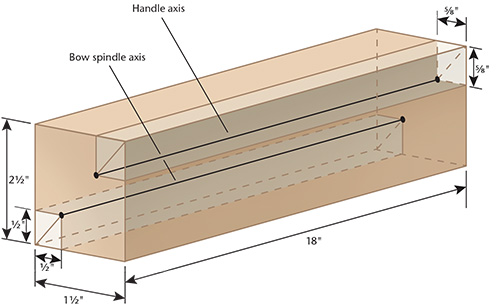
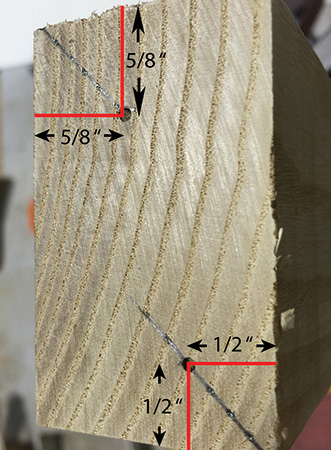
Now lay out the corresponding axis points on the handle end of the blank; the bow’s axis point is in the lower right, again measured up 1/2″ from either side, and the handle’s point is in the upper left, 5/8″ from either side. This way, each pair of axis points remains in a single axis, offset from and parallel to the center of the blank.
Offset-turning Considerations
When turning offset items, you must confront three issues: lathe speed, touch, and safety. In general, clean cuts require that you operate the lathe as fast as possible with minimal vibration. But because the wood is offset and hence out of balance, as you increase the speed, the vibrations begin to increase. Moreover, as the offset passes the cutting edge of your tool, you will then be “cutting air” until that revolution is complete and the wood again comes into contact with the tool. So you have two factors working to decrease stability and degrade the quality of your cuts. But there is a way around this. As you increase lathe speed, the vibrations increase, increase, then decrease. This first peak of vibrations is called the first harmonic. You can either back the speed down slightly to smooth out the spinning or increase the speed past the first harmonic to the smooth range before the second harmonic. In addition, faster rotation means less time cutting air. When you find that sweet spot in speed, the result is less vibration, less tool chatter, and cleaner cuts.
While speed can help smooth out your cuts, you still want to use a light touch. Aggressive cutting would mean that during the cutting air portion of each revolution, your cutting edge would advance appreciably. When the tool again encounters the wood, this usually results in a nasty catch or a chunk of wood flying off. Unlike in normal turning where aggressive cutting results in a deeper cut, offset turning demands a more patient and incremental approach.
Finally, any offset turning risks busting your knuckles. Those spinning offset corners turn into ghosts, but they will most assuredly rap you hard if you drop your guard and lose track of where they are. And, especially true for offset turning, always wear an impact-resistant polycarbonate faceshield; chemical splashguards will not protect you from impact.
Turn Two Tenons
For my first attempt, I simply placed the blank between centers using a steb drive center and a live center with a point in the tailstock. This required enough pressure from the tailstock to force the drive center to “bite in.” But I discovered the pressure caused the spindle to deflect slightly as I reduced its diameter. Lots of sanding was required to clean up the resulting tool marks. What worked best was to turn offset tenons on both ends of the blank. That way, I could use a chuck with step jaws to engage the tenon and drive the wood.
Start with the handle-end tenon first (on the right end of the blank). Mount the blank between centers on the handle axis points. Using a very sharp parting tool, begin taking very light peeling cuts to form a roughly 3⁄16″- (5mm-) long tenon on the tailstock end of the blank. Reduce the diameter until you have a cylindrical tenon, approximately 1″ (25mm) in diameter.
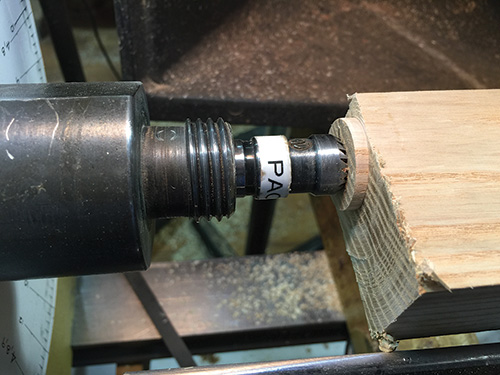
Because turning the handle-end tenon removes the marked bow spindle axis point on the right end, you’ll have to lay out that axis point again. Next mount the blank between centers on the bow spindle axis points and, using very light cuts, form a similar-length tenon on the drive end of the blank, approximately 3/4″ in diameter.
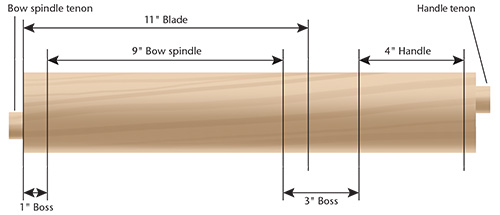
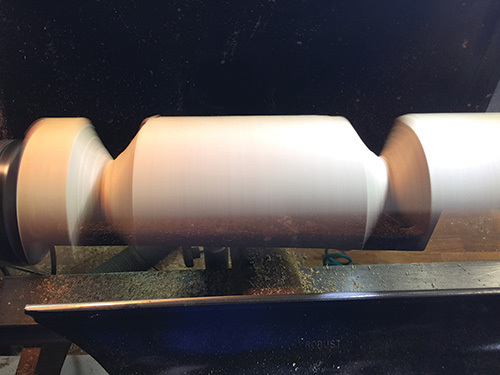
Now you are ready to mount the blank in the chuck and begin turning. Place the bow spindle tenon in the step jaws, and advance the tailstock live center into the bow spindle axis point on the handle end. Mark reference lines 1″ and 10″ (25cm) from the bow spindle tenon shoulder to map the length of the 9″ (23cm) bow spindle.
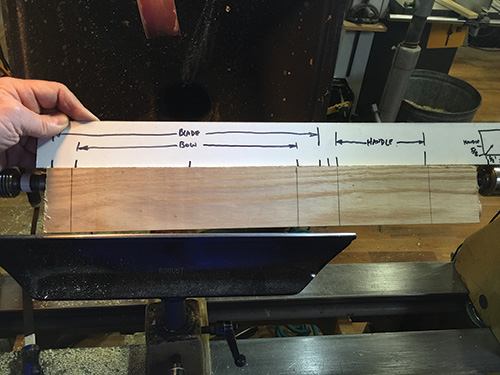
Then mark reference lines 13″ (33cm) and 17″ (43cm) from the bow spindle tenon shoulder to define your handle length. Make lines long and dark enough to see while turning. A storyboard makes layout quicker and easier.
Turn the Bow Spindle
Carefully adjust the toolrest to clear the offset blank. Increase the speed of the lathe to just below or above the first harmonic to minimize lathe vibration. Using a bowl gouge, begin forming the inner faces of the bow spindle bosses on both ends. Remember, cut very lightly to avoid tearout or catches. If you are a beginner, practice turning with both left- and right-handed approaches. This is the best way to “open” these bosses. Think of it as hollowing a bowl. But beware of the wings on the gouge, as they can catch on the opposite side from where you are cutting.
If the gouge is held vertically with the cutting end up and flute facing you, think of an analog clock face with 12 o’clock at the top of the handle. Most of my cutting is on the bevel between 11 and 1 o’clock. To define the bosses on each end, I essentially cut a sharp, deep cove, cutting down from the high point to the bottom of the curve on either side. Make the boss faces as vertical as possible with very smooth, clean cuts.
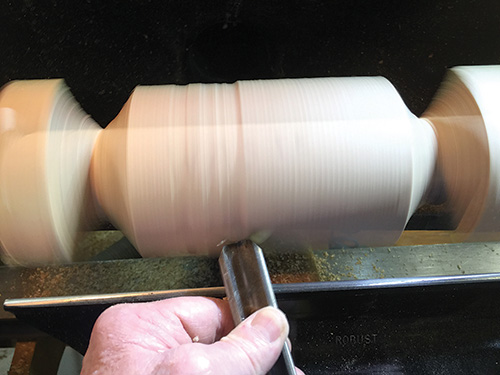
Using either a bowl gouge or a spindle-roughing gouge, remove the offset waste between the bow spindle arms. I use a smaller roughing gouge to reduce the chance of a catch. Increase the lathe speed if possible and continue shaping the bow spindle until it is approximately 3/4″ in diameter.
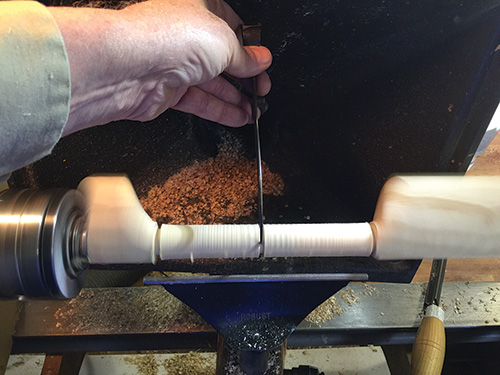
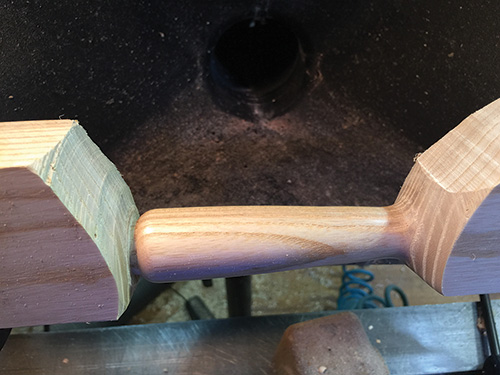
I use a peeling cut with a parting tool to reduce the diameter to size in the middle and near each arm. These reference depths help me obtain a consistent diameter across the entire spindle. Lay the knife blade across the bosses to be sure the span is wide enough (don’t ask how I know that). If the span is too short, cut more from the handle end boss. Shape the bow spindle as desired, but don’t go thinner than 1/2″ diameter. You now have a cleanly defined spindle between two relatively coarse bosses. Sand the bow spindle and inner faces of the bosses, then apply sanding sealer if desired.
Turn Handle
Next, you are ready to turn the handle, but remember that turning the bow spindle tenon removed the left handle axis point. As above, lay out the handle axis point opposite the handle tenon. Reverse the blank and place the handle tenon in the chuck and the live center in the opposite hand point. Repeating the process you used to shape the bosses around the spindle, begin shaping the boss facing the handle, then shape the handle. When you are satisfied with the boss and handle, sand while still on the lathe and apply sanding sealer if desired.
To speed up the turning process, you could utilize a bandsaw with a thin blade to remove the waste before shaping the bow spindle and then before shaping the handle. But here I chose to turn away the waste to demonstrate the offset turning.
Final Shaping
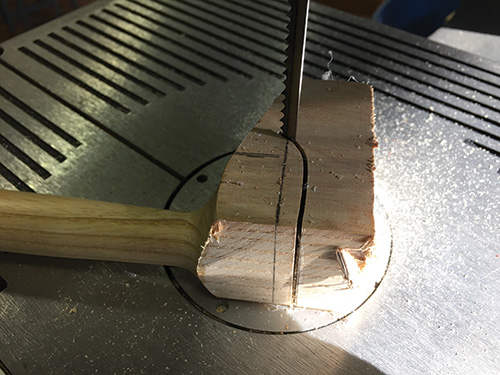
Now you are ready to begin the final shaping. Using a bandsaw or coping saw, remove and roughly shape the outer surface of the boss on the bow end of the spindle and remove the waste on the handle end.
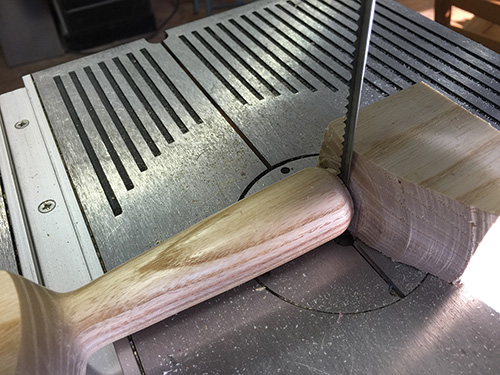
I use a power disk sander to complete shaping the outside of the boss at the bow end and to refine the end of the handle. Soften all edges except the blade mounting area. After all sanding is completed, lay the blade across the bosses, even with the bottom of the knife, and mark the location of the bow-end screw. Remove the blade, drill a pilot hole and screw one of the mounting screws into the hole, leaving it about 1/8″ (3mm) proud. This allows you to wrap a string or piece of wire around the screw to make a hanger for finishing. I spray the wood with a clear gloss lacquer, then buff to produce a great look and smooth, waxed feel.
Bending Jig
For the knife to cut bread, it has to have the blade mounted under tension, like a metal-cutting hacksaw. Initially, I attached the blade by tightening the screws at an angle to achieve tension. This did not produce the required tension, so I designed a bending jig so the blade can be attached with the spindle flexed. When the bend is relaxed, the blade will be under tension.
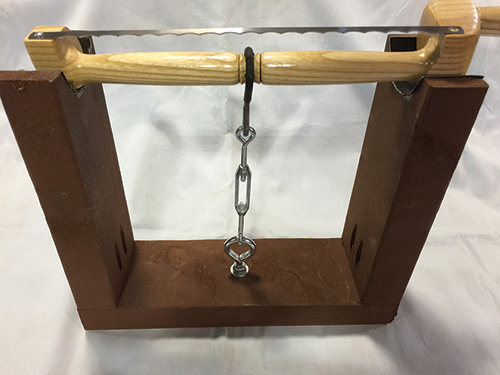
I used dimensional 2×4s to make the jig. Drill a 2-1/2″-diameter hole in the center of an 18″-long 2×4. Then cut the wood in half to make the two risers with cradles on top. These 9″-tall risers are screwed to a 12″ (30cm) base; the spread allows the bosses of the finished knife to rest in the half circles. Leather glued to the two cradles protects the finish on the knife bosses.
At the midpoint of the base, mount an eyebolt in a through-hole with a recess on the underside, using a locking nut and washer on the top and a nut and washer on the bottom. Attach a turnbuckle with a hook on one end to the eyebolt. The “eye” end of the turnbuckle has an S-hook placed through it. The other end of the S-hook, covered with heat-shrink tubing to protect the bow spindle finish, pulls down on the center of the bow spindle.
To mount the blade, place the bosses in the cradle with the blademounting flats facing up. Place the S-hook over the center of the bow spindle and tighten the turnbuckle until finger tight. This will slightly bend the wood. One end of the blade is screwed to the hole already drilled in the bow spindle end. Mark the location of the other blade hole on the handle end of the bow, drill a pilot hole, and attach the blade with the second screw. All of this is performed with the spindle bowed and under tension. When the turnbuckle is loosened, the blade should “sing” due to the resulting tension, and the completed knife is ready to slice bread.
For a left-handed version of this bread knife, reverse the orientation of the handle and spindle axis points during layout.
Paul Coppinger is a native Texan who turned his first piece in the ninth grade and still has it. Following a career in electrical engineering at Texas Instruments, Paul has turned his full attention to woodturning. A member of the East Texas Woodturners, he has presented at various clubs and teaches in his shop. Across a wide variety of work, Paul explores embellishment techniques and strives for the perfect finish.


