This article, “Manhole Cover Box with Pop-Up Lid,” is from the pages of American Woodturner and is brought to you by the America Association of Woodturners (AAW) in partnership with Woodworker’s Journal.
Inspiration!
This story is as much about inspiration as it is about making a box. It’s about that spark that turns into an idea that gets kicked around and eventually gets put out into the world.
When I attended the final Utah Woodturners Symposium in 2018, I made sure to see Benoît Averly, who was a demonstrator that year. In one session, he offered a slideshow featuring textures. I have always applauded Benoît’s way of showing slides—no more than about two seconds each— which keeps the audience focused. In this demo, he showed an amazing array of images, all of textures and patterns, meant to inspire. One in particular was of a cast iron manhole cover, the image cropped square, with brickwork around the cast iron. Bam! I was hit with a desire to make a square box with a round lid, textured and colored to simulate cast iron, maybe even the brick. And before I knew it, Benoît moved to the next slide. I’m not sure how well I paid attention after that. It was one of those ideas that takes over once started.
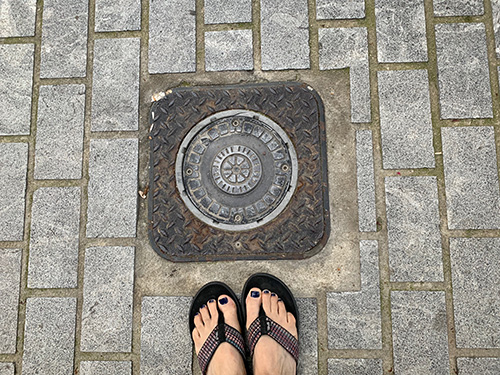
When I returned home from the symposium, I started sketching what I was thinking about. At first, I hesitated to search for images of manhole covers, but to my surprise, there are many people in the world who take photos of manhole covers and share them online. I found all sorts of cast iron “street art,” from grates and sewer covers to water access lids and urban tree grills. Some are old and worn to anonymity, while others are easily recognized, plain or complex, painted, rusted and patinated; they are a great source of inspiration!
I also sent a message to Benoît, telling him of my excitement, and asking permission to take the inspiration I found in his images and see where it would lead me. Like the gentleman he is, Benoît pointed out he doesn’t own manhole covers, had not made a box out of them, and he was happy I had found some ideas to explore from his demo.
Tip-up Lid
I am both an artist and a production turner, and that is often how I think about my projects. Sometimes, it’s a one-off piece, never to be repeated, and sometimes a project leads to an ongoing series. I approached this project by first making a prototype, expecting to find problems that would need to be solved—one of which was how the end user would remove the flat lid, which sits flush in the box. There are no knobs or fixed handles on a manhole cover, so I had to find a creative solution.
Manhole covers often have small holes that accept some kind of “key” used to pry the cover up. I thought about devising a decorative key for this purpose but discarded the idea. I didn’t want to require the user of the box to have anything extra that could get lost, which would then necessitate turning the whole box over to remove the lid. I also considered making a finger hole that could be used to lift the lid. I still do some lids that way, but I am not overly fond of the design. I also could have incorporated some sort of toggling ring that could be used to lift the lid, but that seemed too complex for a box that I wanted to be at a certain price point.
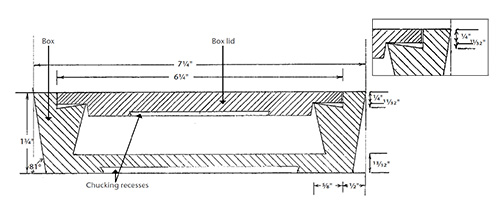
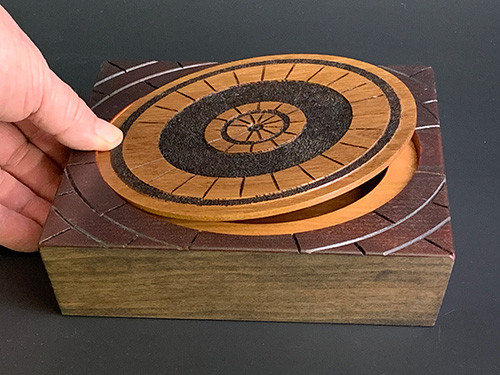
Finally, I realized I could design the box’s interior so that the flat lid could be “tipped up” at one edge by pressing down on the opposite edge, much like a teeter-totter. The drawing shows the design that makes this work. Actual manhole covers are too heavy for this approach, but my box could incorporate such a design and retain the flat top surface I was after. Eureka!
Other Considerations

I had pretty well thought through the making of the box before I even set tool to wood. A key consideration was the wood—its source, cost, and stability. Typical 8/4 (2″-thick) kiln-dried stock would work for the base of the box, as it could be purchased readily at a reasonable price and would retain its shape and flatness (for the most part). The lid material could be 4/4 (1″ thick) stock, and since I was planning to add some decoration, it wouldn’t necessarily need to be the same species as the base.
I wondered how I could use the lathe to help speed up the process of decoration and embellishment. Cutting concentric grooves is easy enough, fast and regular if I’m careful. I could use the lathe’s indexing wheel to create regularly spaced intervals, which would help in making any sort of radial designs. Center medallions would be an easy task, as would any sort of edge treatments on the lid.
Other considerations came to me as I thought through the process of making: the base should be wide and stable, as I would be pressing on the edge of the lid to flip it open. A heavier base would also help in its dimensional stability; thin walls lead to distortion. Working the bottom face to completion and then remounting the box on a recess is a quick way of working, but useful also as a means of remounting the work for decorating. I needed the basic box to be simple, and therefore less expensive to make, so keeping the base flat and square would help. With this in mind, I sent my stock through the planer before cutting blanks to size.
I decided to use 8/4 cherry to make a 7-1/4″ (18cm) square box. If you buy presurfaced stock, make sure the top and bottom are clean and parallel.
I also decided to cut the base of the box square on the table saw, and then angle the blade slightly (9 degrees) and run it through on all sides. The angled sides gave the box a simple bit of sophistication with little extra effort.
Turn a Square Box
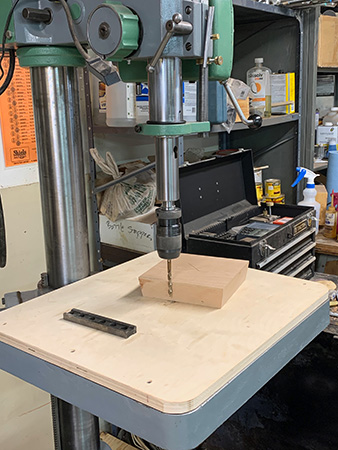
My turning sequence was to first mount the square box so I could turn the bottom, then flip it around and hollow its interior. I decided to start with a screw chuck. The predrilled hole for the screw could also double as a depth indicator when hollowing.
After planing, my 8/4 stock ended up 1-3/4″ (4cm) thick, so accounting for a mounting recess 1/8″ (3mm) deep, I drilled a screw chuck hole 1-1/4″ (32mm) deep. I used a brad-point bit, measuring to include the brad tip itself. This would leave 3/8″ (10mm) of wood in the bottom, plenty of material to be sturdy, but not so much as to be overly heavy.
With the work mounted on the screw, I formed a recess in the bottom to match my large set of chuck jaws. My recess measured 4-1/4″ (11cm) diameter and just 1/8″ deep; form a recess to accommodate your chuck jaws in expansion mode. I also turned some crisp beads and a shallow V cut inside the recess to add some simple decoration.
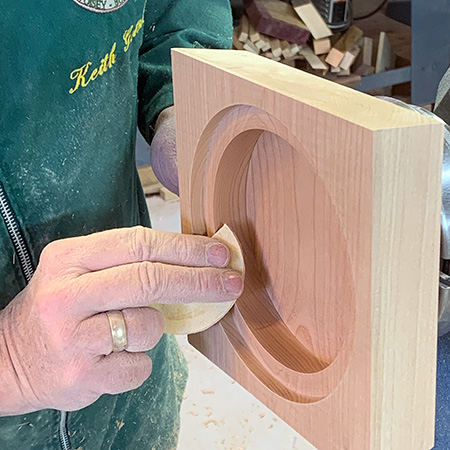
After sanding the bottom completely, I took the box off the screw and flipped it around, expanding the chuck jaws into the recess. It held well, with no need to over-tighten. My plan was to hollow the interior but leave a “shelf” for the lid to sit on and a bit of material around the lid.
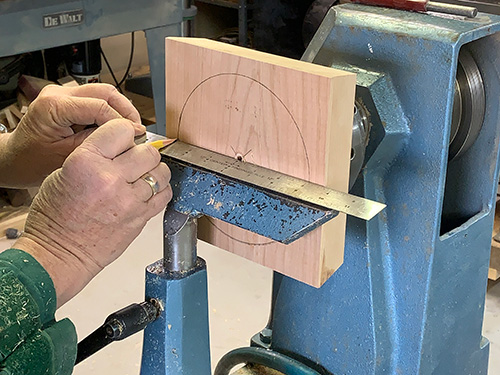
This would leave a healthy wall thickness, even with the angled sides of the box. Use a pencil to mark the diameter of the box opening—in my case, 6-1/4″, or 16cm.
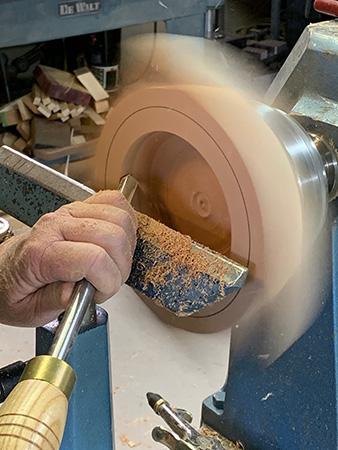
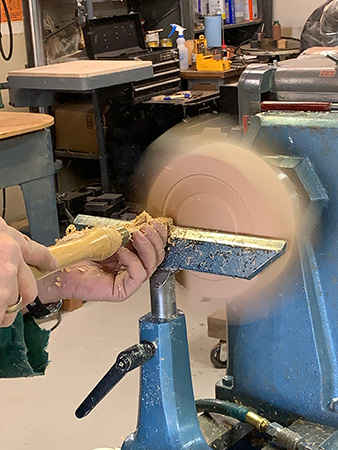
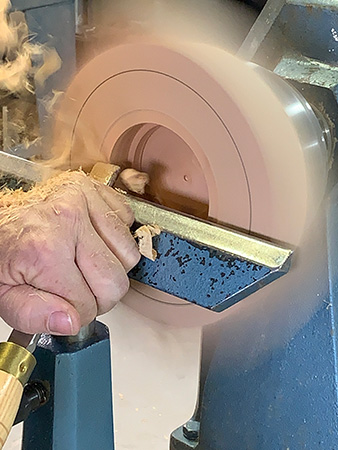
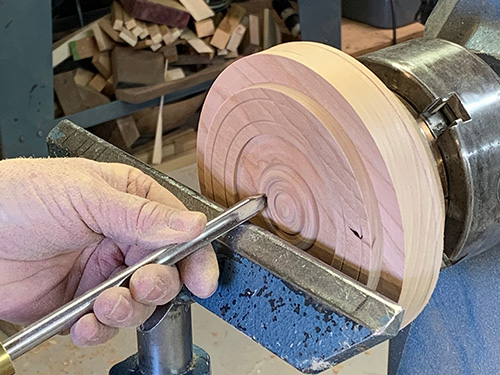
To hollow the interior, I used a skew to make a peeling cut, but a bowl gouge or even a scraper can be used just as easily and will produce similar results. Remove the waste wood down to your drill depth. I undercut the interior opening, but was careful not to overdo it. The peeling cut is efficient but doesn’t leave a good finish on the endgrain, so a spindle gouge made quick work of cleaning up that area, leaving a clean cut all the way down to the corner.
The shelf, or ledge, that the lid sits upon is 5/8″ (16mm) wide and 1/4″ (6mm) deep. After forming this shelf, I needed to address how much “lift” the lid would have by angling the shelf surface slightly deeper at its outside edge.
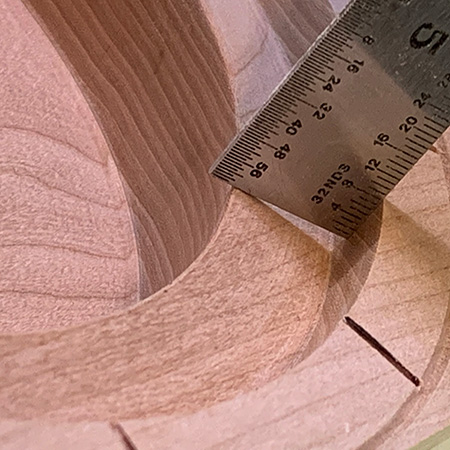
The shelf is inset below the box surface by 1/4″, but the outside edge goes 3⁄32″ (2mm) below that—just enough to allow the lid to tip up when its opposite side is pressed down.
I then sanded the interior of the box. Slow the lathe speed down, use good sandpaper, and it won’t take long. All of the interior was finish-sanded on the lathe.
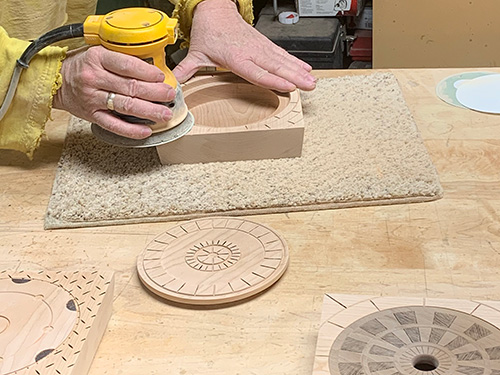
The sides, top, and bottom of the base were sanded on my workbench with a palm sander. I then sanded by hand to ease the edges.
Turn the Lid
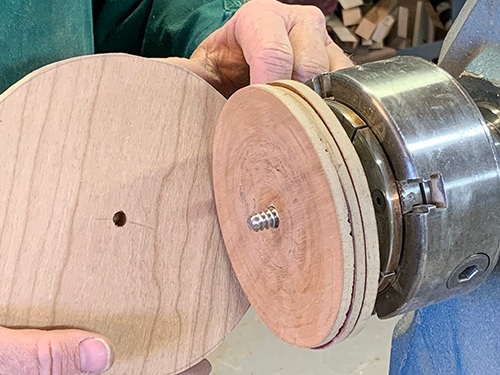
I used 6/4 (1-1/2″-thick) cherry for the lid, as I had that material on hand, but 4/4 would work as well with less waste. Just be careful how you mount it on the lathe. I mounted the blank on a screw, using spacers to reduce the depth of the screw in the lid.

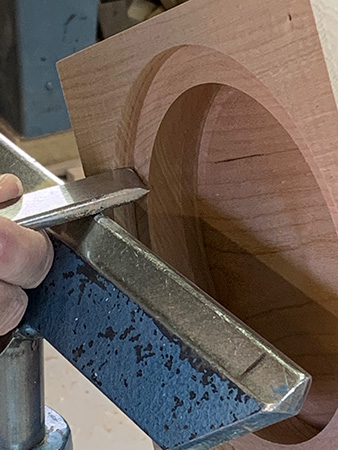
I turned the lid’s outside diameter carefully, then formed the “step” that would sit inside the opening in the base. This notch should be kept very square; undercutting the angle would counteract the tipping action we are trying to achieve.
I measured and transferred dimensions from the base to the lid, which requires a somewhat loose fit.
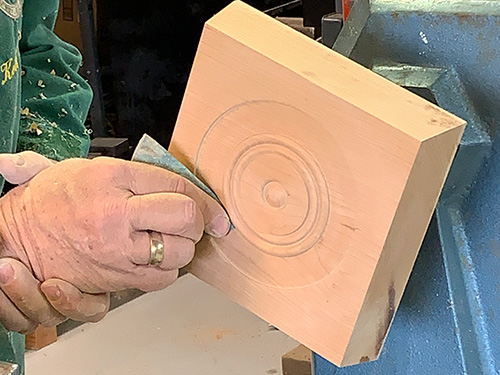
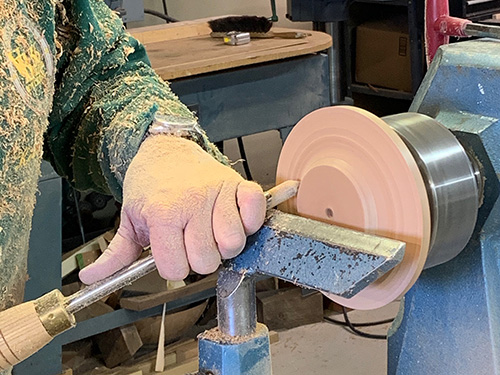
Using a skew, I scraped a recess to accept my chuck jaws in expansion mode, 1/8″ deep, in the middle of the lid. You could make a spigot here and tighten your chuck jaws onto it, but I prefer to expand into a recess so as to have wide stability and not crush the wood fibers.
Decoration on the lid’s underside is optional; I added a few beads within the recess. As you consider decorating the underside of the lid, remember you are shooting for about 1/2″ (13mm) total lid thickness.
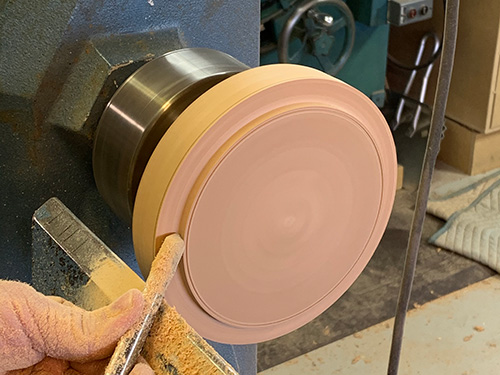
Sand the underside of the lid completely, then flip the lid around, expanding the jaws carefully into the recess. Now reduce the thickness of the lid so it will sit flush in the box base. Sand the top of the lid.
Remove the lid from the chuck and test its flip-up action in the box. Pushing on the outside edge of the lid should kick it up a good 3/4″ (19mm), allowing you to grab it. If the lid is rubbing the base anywhere, re-mount it on the lathe and adjust to a looser fit.
Decoration
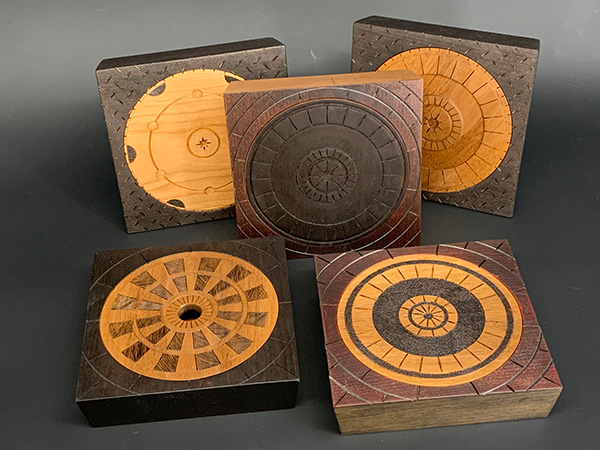
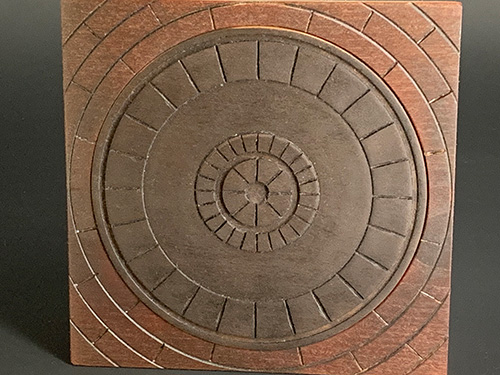
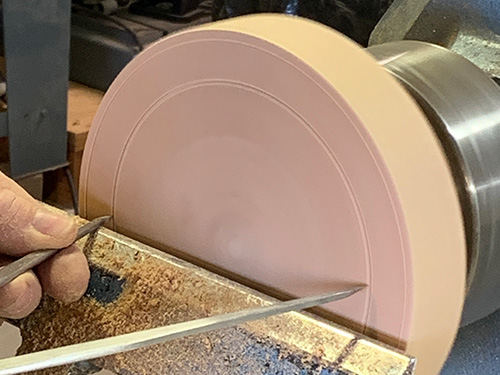
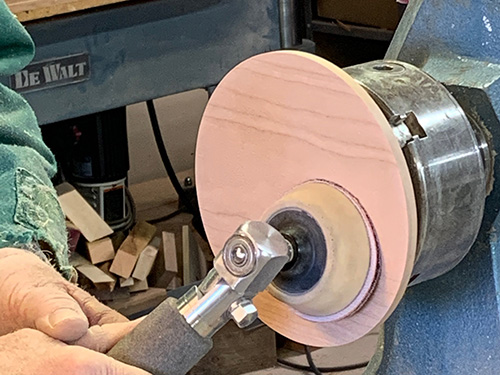
With the basic box and lid completed, you can add some decoration quickly on the lathe. Grooves, beads, or bands can be formed on both the lid and box. I almost always include a shallow groove at the outer edge of the top, which helps disguise any tolerance changes in the lid. But go easy here—even small accents make a big impact visually.
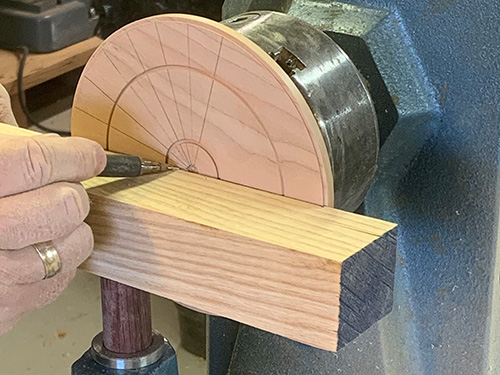
Stop the lathe and use its indexing head to lay out any radial lines you might want to use as carving guidelines. I made a simple shaft to fit in my banjo and a wood crosspiece to aid in drawing straight lines. I normally draw in all the lines, hitting every division that is included on my lathe’s dividing plate—in my case, that is twentyfour divisions.
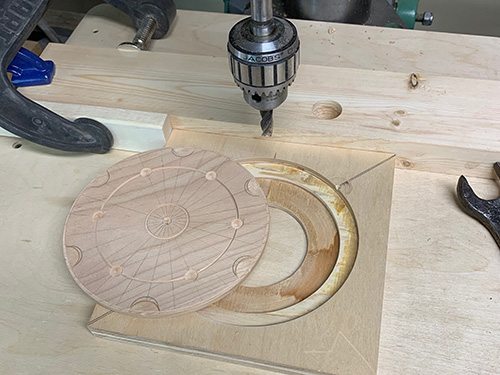
Another method of decoration is to drill shallow holes in the lid, some of which can run off the edge. I made a jig to hold the lid during drilling. Clamp or block the jig in place, then spin the lid to shift to different positions.

Creative embellishment is up to you. I use all manner of colorants, carving, and burning, often making the lid a different color than the box. After adding decorative elements, I usually finish the boxes with a few coats of tung oil.
Some who have never seen this type of box may be stumped as to how it opens, but once the trick is shown, it quickly becomes a favorite. secret to share.
Keith Gotschall, a fulltime turner and furniture maker, is a frequent demonstrator and teacher of traditional turning techniques. He lives in the mountains of Colorado with his wife Catherine and a very bad dog named Roscoe. For more,
visit his website.


