This article, “Split-turned Candy Ornament,” is from the pages of American Woodturner and is brought to you by the America Association of Woodturners (AAW) in partnership with Woodworker’s Journal.
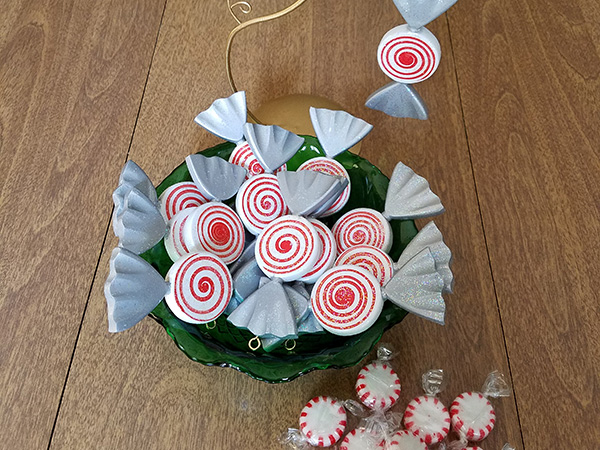
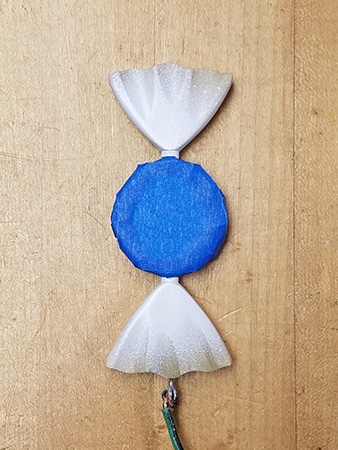
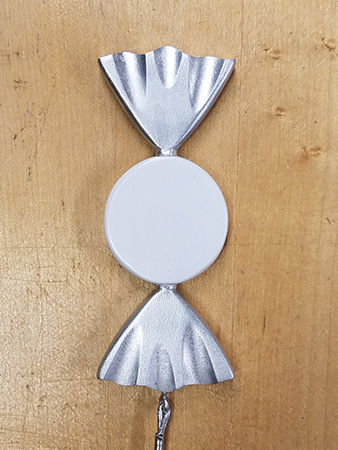
I’ve been making lathe-turned ornaments for over fifteen years. At first, they were just something special for my wife; then at some point, the gifts expanded to the family. Eventually, it turned into a yearly ritual to hand them out at Thanksgiving dinner, so they could be hung on the tree and enjoyed over the holidays. But after fifteen years, it gets harder each year to come up with a new idea. I searched online and came across an image of the iconic peppermint candy. I wanted to make something whimsical, so I decided to figure out how to make one on the lathe.
The shape is symmetrical, but it’s also thin and flat. The obvious question that comes to mind is, how can you turn a flat form? The answer is by making a split turning—adding waste blocks on both sides of the workpiece using a temporary glue joint, then splitting the blank apart after turning to reveal the flat ornament in the middle. With this idea in mind, I was off and running.
Sizing the Turning Blank
To decide on the size of the finished ornament, I downloaded the candy image I had found online and imported it into a graphics program so I could easily resize it. After some trial and error, I settled on an overall finished size of 1-5/8″ wide × 3-5/8″ long × 5/16″ thick (4cm × 9cm × 8mm).
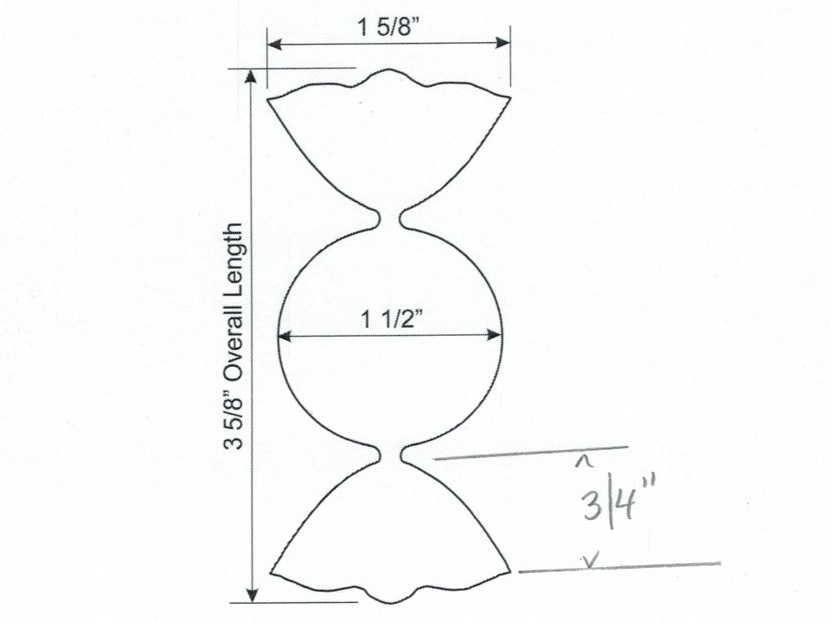
The 5/16″ thickness is based on resawing a 3/4″- (19mm-) thick board in half, then planing both sides. Much thinner and you won’t be able to shape the folds in the “wrapper” on the top and bottom. At these dimensions, the center circle for the candy is 11/2″ (38mm) diameter.
The mounting method determines how long the block should be. I decided I would mount the blank between centers to round it, turn a tenon on one end, and then remount it in a chuck. Since the twist areas will be quite thin, I thought this chucking method would place the least amount of stress on those areas. I made my turning blank 51/2″ (14cm) long. Depending on your mounting method, be sure to leave enough length in the blank to account for any waste wood.
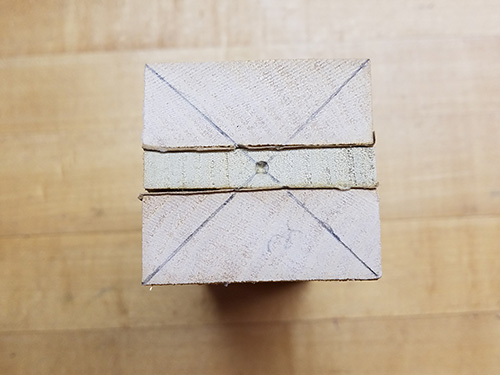
I resawed and planed 3/4″-thick material, which yielded two pieces of 5/16″-thick ornament stock. Along with 3/4″-thick waste blocks, paper, and glue, the turning blank was approximately 1-7/8″ (5cm) thick, slightly larger than the width needed for the ornament. Note that the turning blanks don’t have to be exactly square after glue-up, so if it’s easier, you can just cut everything to 2″ (5cm) wide.
Because the “twist” area of the ornament is very thin, be sure to use straight-grained wood for the ornament part, but any wood will do for the waste blocks. I chose poplar.
Glue-up
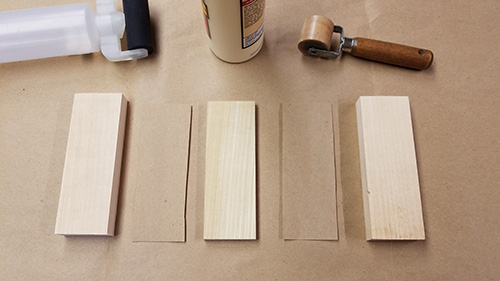
Split-turning requires a gluing method that allows for disassembly after turning. The method requires placing paper between the wood layers. A brown paper bag works well for this, as does thick card stock. But avoid writing paper—the idea here is to be able to split the paper in half to separate the parts, so it requires thicker paper. Use yellow or white wood glue. The glue-up (in order from bottom to top) consists of a waste block, paper, ornament blank, paper, and another waste block.
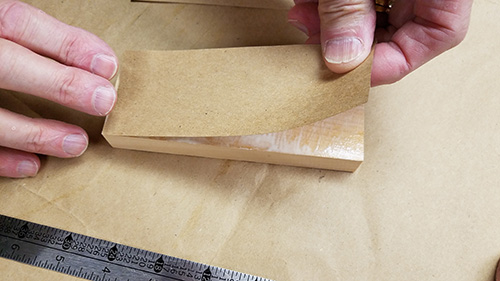
Since the glue joints are temporary, I decided to use a simple rub joint. A rub joint pulls the pieces together with friction, allowing you to skip clamping. To make the assembly, first apply glue to one of the waste blocks and spread it evenly with a brush or roller, then apply the paper layer and smooth it out.
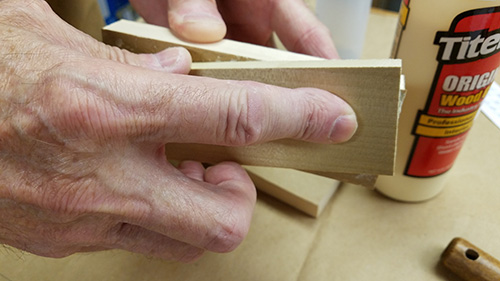
Next apply glue to the ornament block in the same manner, then press the two together and gently twist or “rub” the pieces for a few seconds . The rubbing creates a little suction that helps pull and hold the pieces together. Then glue on the other waste block in the same manner. Be sure all the pieces are aligned, then set the blank aside until the glue dries thoroughly.
Turn the Ornament

If you are turning multiple candy ornaments all the same size, you’ll want to create a few patterns for checking the shape periodically as you turn. I made a pattern that can be used in two ways. It can be folded in half to use as you work on each half of the shape, or use the full pattern to check the final shape when your ornament is near completion.
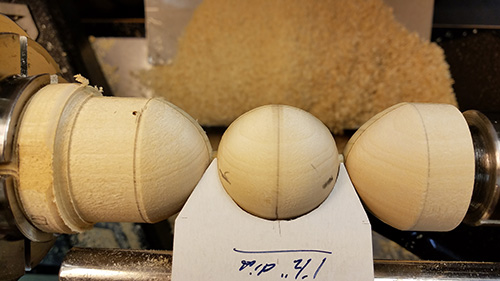
With the turning blank and pattern in hand, it’s time to mount the blank on the lathe. Although the ornament may appear a little challenging, it’s fairly easy because the only critical dimension is the center sphere. The shape at the top and bottom can vary from the pattern but should be symmetrical.
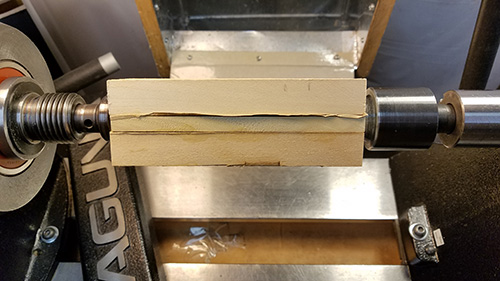
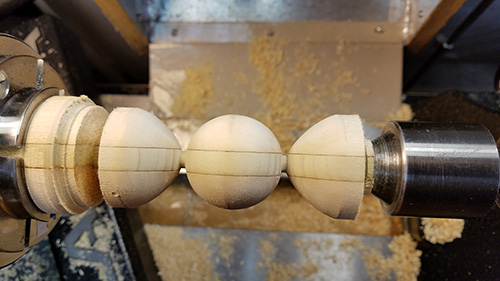
Mark the centers on the ends of the blank, mount it between centers, and turn it round, keeping as much diameter as possible.
Then turn a tenon on one end to fit in your chuck jaws (mine are dovetailed) and remount the work in a chuck. Reduce the diameter to the 1-5/8″ finished width of the cellophane ends. Then use the unfolded pattern to transfer the guidelines to the blank.
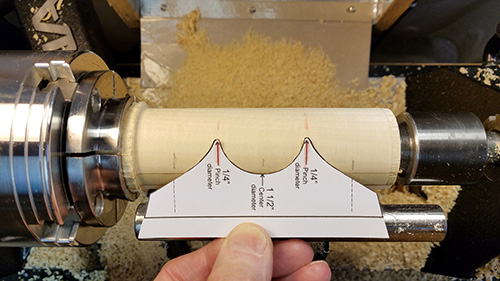
I centered the pattern on the blank, which left about 5/8″ (16mm) excess at each end. I used a red pencil to highlight the two twist area lines.
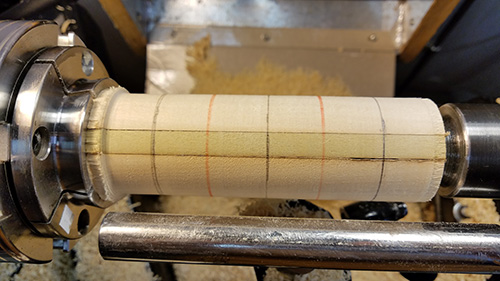
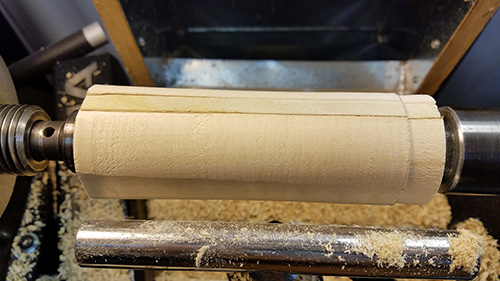
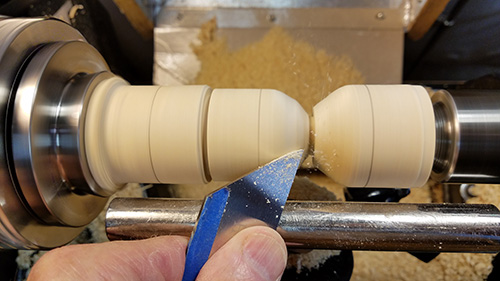
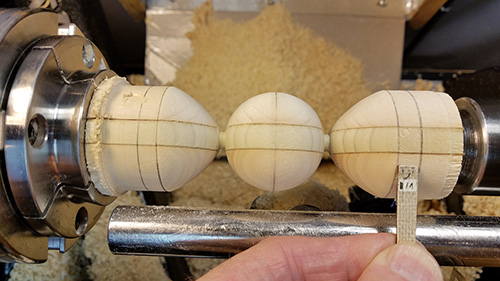
Next use a thin parting tool to cut in at the two red lines, just deep enough to mark the locations. Confirm that the center area for the sphere is 1-1/2″. With the center area established, cut the twists a little deeper so you can then reduce the center to 1-1/2″ diameter to match the width. Pencil in the sphere’s centerline again.
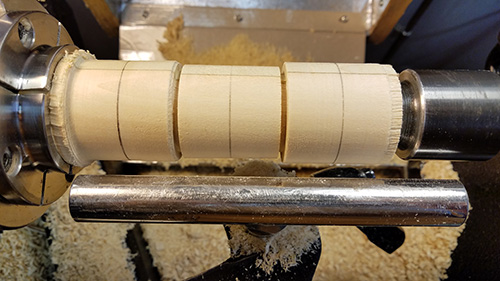
Now you can begin shaping the “cellophane” at the tailstock end, removing material from the end toward the center.
I used a small spindle gouge to shape this area, then switched to a thin wide-blade parting tool to shape the rest, using the top edge as a scraper.
Cut deeper into the twist as you go, but not to the full depth yet. Fold the template and use it to check the shape. The thin diameter at the twists can vary slightly, but try to keep them consistent. I was able to trim them to 1/4″ (6mm) diameter without any issues.
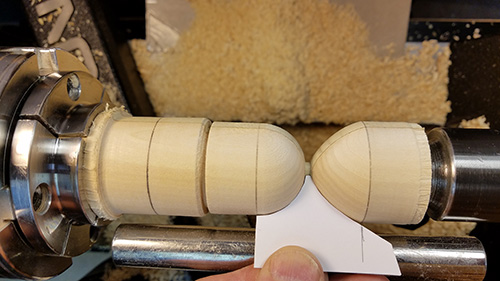
Shape the center sphere. Since the center area is already at its final diameter, work from each side up to the centerline, but don’t remove it. You can remove the sphere’s centerline during sanding.
I shaped the sphere and the other cellophane end using the same wide parting tool as a scraper. Check the shape with the center part of the template and make any necessary adjustments.
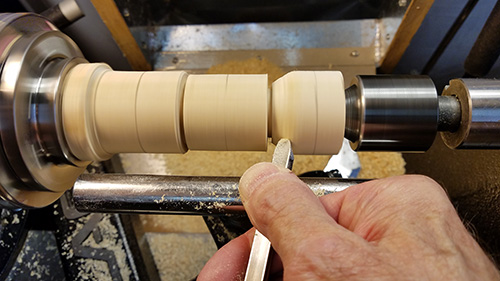
Once you have the upper end formed, check the entire shape with the unfolded template. I like to mark off and leave an extra 1/4″ at each end. This extra material will come in handy when shaping the ends later. Cut in about halfway at these new end lines to delineate the overall length.
When you are satisfied with the shape, sand the ornament and part it from the lathe. You can either finish cutting in at each end to part-it off or remove it as is and cut away the remaining waste with a saw.
Split the Blank
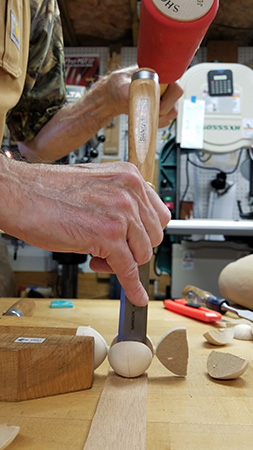
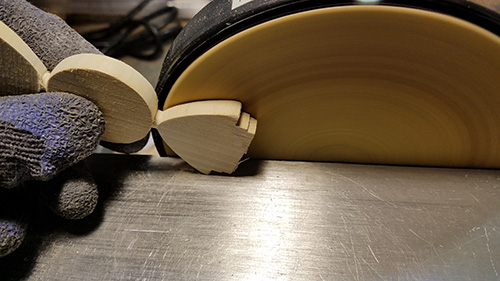
With the turning removed from the lathe, split the waste pieces from the ornament using a chisel or stiff knife.
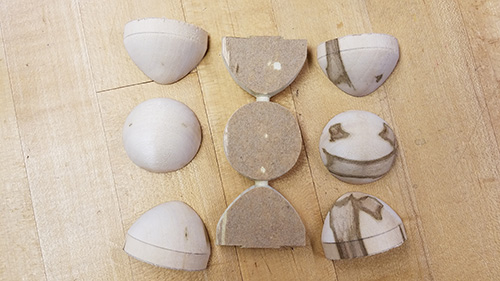
They should break off with just a little persuasion. You’ll have to remove the remaining paper and glue from the ornament.
I do this by running it across the top of a stationary belt sander, but you could also rub it across a sheet of sandpaper laid out on a flat surface.
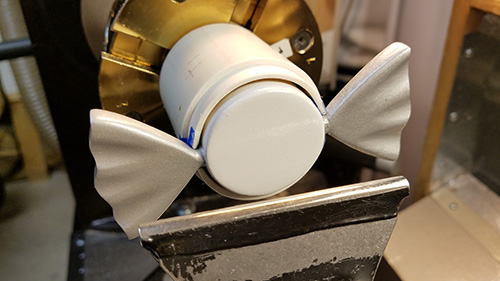
Shape and Paint
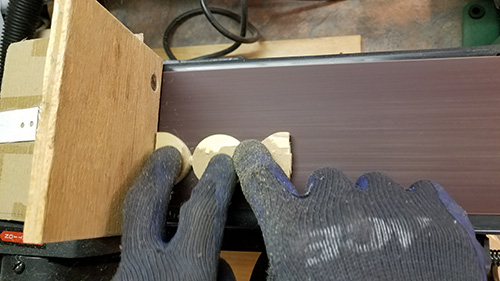
Now it’s time to do the final shaping. The ends of a candy wrapper have what I would call ruffles, and I wanted to mimic that on my ornament. I did this by first pressing each side of the ends against the outside edge of disk sander. The object is to press firmly on the upper portion (below the twist) to add a slight inward taper. The taper isn’t much, just enough to give the wrapper a slightly thinner profile.
Next, draw and shape the curved “ruffles” at each end. I used a small bandsaw to cut away most of the excess material, then finalized the shape on a spindle sander with a 1/2″- (13mm-) diameter sleeve
You could also use a scroll or coping saw to cut away the excess, then a piece of sandpaper wrapped around a dowel to sand the ruffles. They don’t have to be perfect or the same — it’s just crinkled cellophane!
To bring the candy to life, it needs a few embellishments. After hand-sanding the ornament, I applied a coat of spray shellac to seal the wood, followed by a light sanding with 320-grit sandpaper. Wipe off the dust using a tack cloth.
To add the colors, first paint the center (circle) with white spray paint. Make sure to get the edges, especially around the twists. Don’t worry about overspray on the ends, as they will get paint next. After the white dries, mask off the center only, keeping the tape tight around the base of the twists, then spray the cellophane ends with silver paint, including the twists.
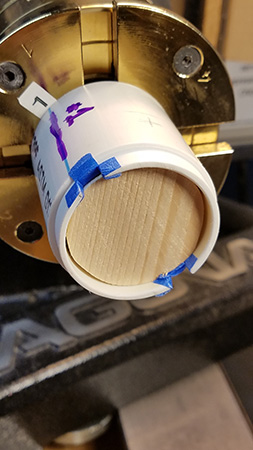
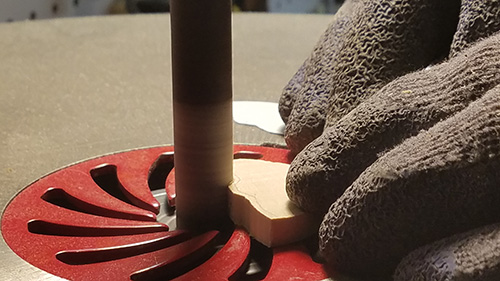
I decided to use the lathe to apply the swirl to the center candy part. I made a mounting jig using a short piece of 1-1/2″ ID PVC pipe to hold the ornament with the flat sides facing out. I turned down the outside diameter until the wall thickness matched the gap at the twists, then cut two notches across the center. If your ornament ends up a little smaller, you can use 1-1/4″ ID PVC instead, but then enlarge the inside of the pipe to the diameter needed. If the notches end up a little wide, that’s OK. Just apply some masking tape to tighten the gap.
To keep the ornament from twisting in the jig, add a backer block behind it. Anything will work, even a piece of foam. Then install the ornament in the jig, making sure it’s secure, and bring up the toolrest for support. It’s a good idea to rotate the lathe by hand before turning it on to make sure the ends of the ornament don’t catch your toolrest.
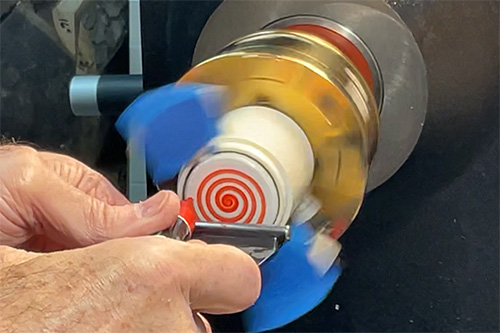
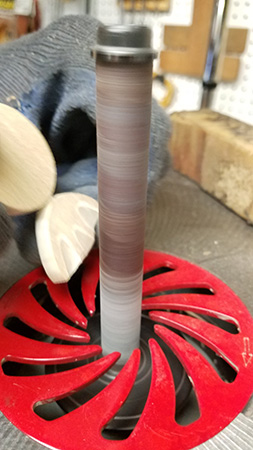
I applied the swirl with a red medium-point enamel paint pen by sliding the pen across the toolrest with the lathe running slowly (135 rpm). I set the toolrest height so the tip of the pen was at dead center. But before using the pen, I marked the center with a pencil as a guide. The paint went on very smoothly, leaving crisp lines. I suggest practicing first — I applied some paper disks to an ornament with double-sided tape to do a trial run. Be careful not to overcharge the pen or the paint could splatter. If your lathe can run in the reverse direction, you could paint the opposite side in reverse. I doubt anyone will notice if both sides are in same direction, but it would be a nice touch anyway.
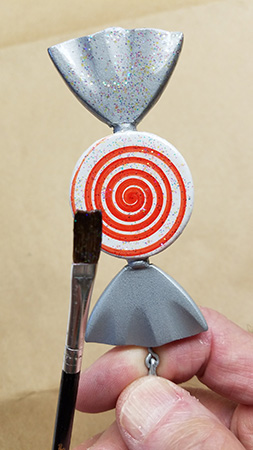
I wanted the ornament to have that glistening “cellophane” look. So I applied a final coat of brush-on craft glitter. The type I used had the glitter suspended in a thick gel, so I dabbed it on with a small flat artist’s brush, then smoothed it out.
The final step is to install a screw eye, and you’re ready to hang your new ornament or give it to someone special as a gift.
Photography by Erik Brady
John E. Brady is a former member of the South-Central Pennsylvania Woodturners. A lifelong woodworker, he started turning wood eighteen years ago as a means of staying active when a back injury restricted his activities. Although he enjoys turning a variety of items, his specialty is custom fountain pens, which he advertises through, his
website.


