This article, “A Modern Lamp for Any Table” is from the pages of American Woodturner and is brought to you by the America Association of Woodturners (AAW) in partnership with Woodworker’s Journal.
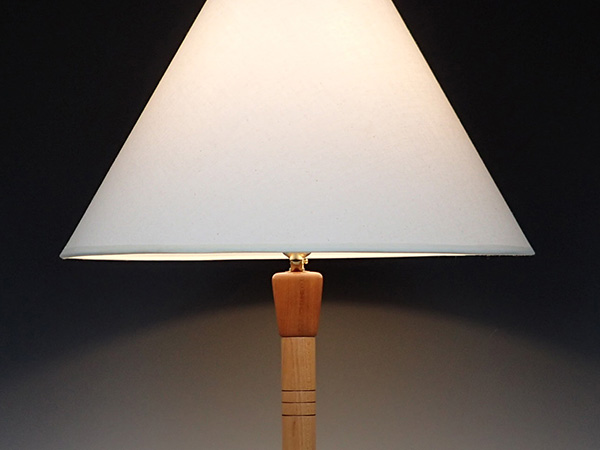
Here is a modern table lamp project that is relatively easy to turn. Its shaft comprises three separately turned pieces in spindle orientation (grain running parallel to the lathe’s bed ways), which allows for the attractive use of contrasting woods and avoids the need for a long lamp auger. The lamp’s base is a simple component turned in faceplate orientation (grain running perpendicular to the bed ways).
The prospect of drilling long holes into endgrain with a lamp auger creates stress and anguish I can do without. This project allows you to avoid that stress by dividing the lamp shaft into three pieces and drilling all the holes on the drill press prior to turning. I used a table saw to cut the blanks perfectly square, which makes aligning them on the drill press easier and more accurate. If you don’t have a table saw, careful cutting on a bandsaw will do.
My students and I have made roughly a dozen lamps using this design. Over time, I have tried various alternatives (different hole sizes, no lamp rod, etc.). I have found the following simplified approach works best for most turners.
Material Prep and Layout
I like to use contrasting wood colors in the lamp shaft and base—black cherry for the dark color and hard maple for the light color. Using different species creates an attractive lamp and precludes any grain-matching issues that could result from using a single piece of wood cut into three sections and rejoined. I like to alternate the wood species top to bottom—either dark-light-dark-light or light-dark-light-dark.
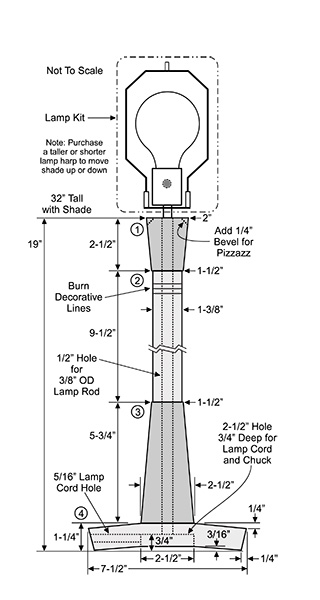
When you prepare the blanks, start with square stock 1/4″ (6mm) wider than the finished diameter. Straight grain wood is easy to work with, but not required. Using wild grain can turn a simple spindle project into a torn-grain sanding nightmare. Following are the dimensions of each wood component prior to turning; the numbered pieces correspond to the labels in the drawing:
1. Lamp Shaft Top: 2-1/4″ square × 2-1/2″ long (57mm × 64mm)
2. Lamp Shaft Middle: 1-1/2″ square × 9-1/2″ long (38mm × 24cm)
3. Lamp Shaft Bottom: 2-3/4″ square × 5-3/4″ long (7cm × 15cm)
4. Lamp Base: 8″ square × 1-1/4″ thick (20cm × 32mm)
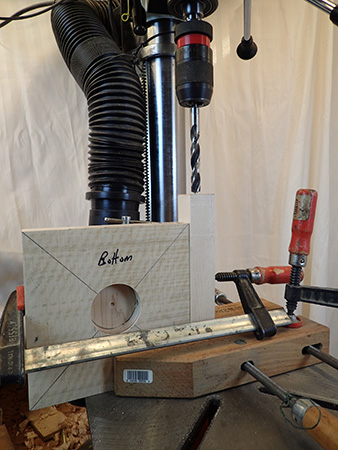
For many lathe projects, I see no point in making blanks perfectly square before turning them round. However, that approach will not work for this project. Since the through holes are drilled prior to turning, starting with perfectly square stock is critical to laying out the hole locations accurately. Pay special attention to making the ends of shaft blanks parallel. This means registering the same face of the blank against the miter gauge when crosscutting the pieces on the table saw (or against the fence on a chop saw). Mark precise centers on both ends of the three lamp shaft blanks and on the base blank. Drawing two pencil lines corner to corner works best. If you are using a center-marking jig, be sure to use the jig on all four corners and find the average in the middle. Mark the bottom of the lamp base “bottom” for future reference.
Lamp Kit and Hardware
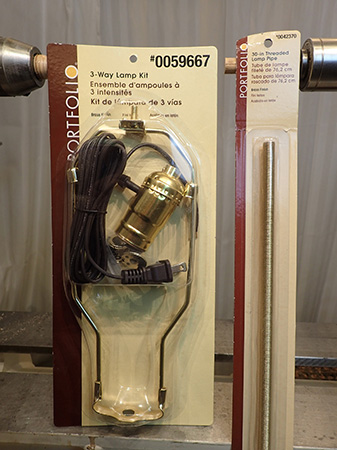
You’ll need to acquire the following lamp parts, readily available online or at big box stores:
• Lamp Kit, including socket, harp, cord, nuts, etc.
• Lamp Rod, 3/8″ (9.5mm) OD, 20″ (51cm) long
• Lamp Shade, suggested size: 6″ (15cm) top diameter × 19″ (48cm) bottom diameter × 13″ (33cm) slant height
Pre-drill Holes
Shaft Blanks
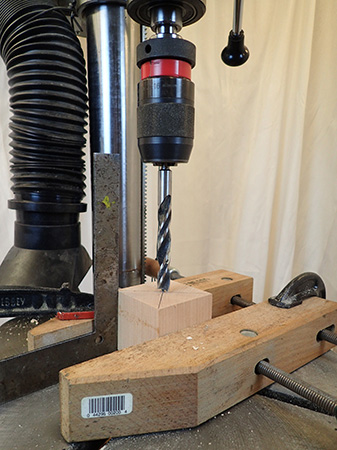
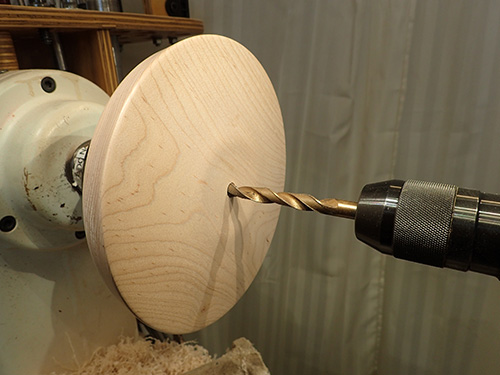
You can drill straight holes using a good old-fashioned wooden hand screw clamp and a drill press. Before drilling, use a square to confirm that the lamp shaft blank is held vertically in the clamp. Use a 1/2″ (13mm) bradpoint bit to start the holes on center.
All of the through holes in the lamp shaft are 1/2″ diameter. A 3/8″ OD lamp rod fits easily in a 1/2″ hole. You can drill a hole all the way through the shorter top blank with a standardlength 1/2″ bradpoint bit. The lower two shaft blanks, being longer, are more challenging. You will have to drill the 1/2″ hole from both ends so the holes meet in the middle. For the 9-1/2″ blank, it may be necessary to complete the drilling with a longer twist drill.
Important: The holes in the lamp shaft blanks must enter the wood at dead center. It is less critical how the holes meet in the middle of each blank; if the lamp rod passes through the hole, it is good enough.
Base Blank
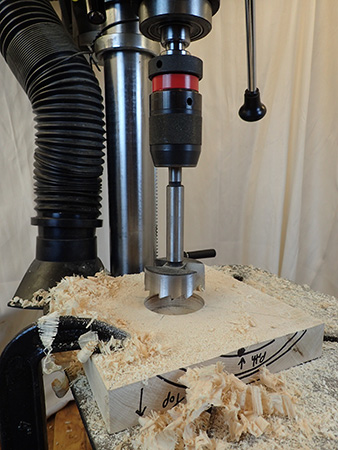
Using a 2-1/2″-diameter Forstner bit, drill a hole in the bottom of the lamp base 3/4″ deep. To drill a hole of this size safely, clamp the workpiece to the drill press table before drilling. This hole will be used as a chucking recess, so you may need to make it larger, depending on the minimum jaw size of your chuck in expansion mode.
Do not drill the 1/2″-diameter through hole in the base just yet—this hole will be drilled later on the lathe.

Next, drill a hole in the side of the lamp base to allow the cord to escape from the center. This hole is best drilled now, while the lamp base blank is still square and thus easy to clamp on the drill press table. Drill a 5/16″ (8mm) hole in the center of the sidegrain (not into the endgrain). This hole should intersect the 2-1/2″-diameter hole already drilled in the bottom of the lamp base.
Turn the Base
I like to start by turning the lamp base and then working my way up. The first step is to turn the bottom of the lamp base, but to do this, you’ll have to drill a pilot hole for your screw chuck in the top of the base. I have found this is best done on the lathe.
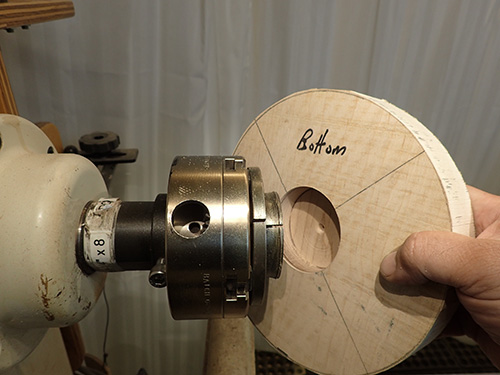
I cut my blanks close to round on the bandsaw and then make them truly round on the lathe. Draw a 7-1/2″- (19cm-) diameter circle on your lamp base blank with a compass. Then use a bandsaw to cut outside the line. Mount this blank in a four-jaw chuck, expanding the jaws into the 2-1/2″-diameter hole in the bottom. The jaws should not bottom out in the chucking recess.
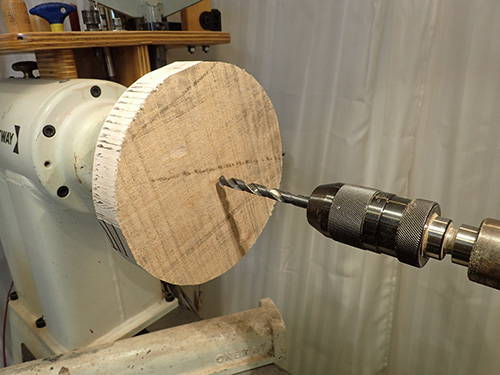
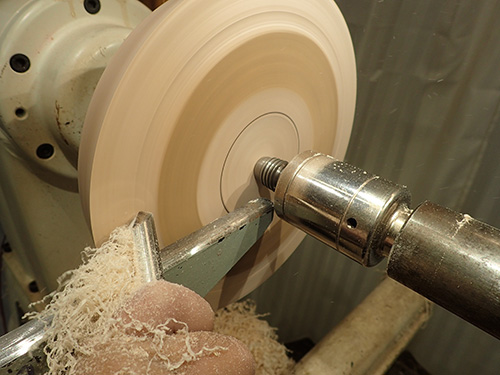
Install a drill chuck in the lathe’s tailstock with a drill bit sized for your screw chuck—in my case, a 3/8″ drill. Drill a hole all the way through your blank. Now turn a flat area for the face of your chuck jaws to sit against when you mount the blank on the screw chuck. Don’t remove too much wood at this point, just create a flat 3″ to 4″ (8cm to 10cm) wide in the center.

With the workpiece remounted on the screw chuck, shape the bottom of the lamp base. Start by truing up the outside edge of the base with a bowl gouge. Then true up the bottom and create a 3/16″ dip in the middle (refer to the drawing). For stability, only the outside of the lamp base should make contact with the table. But beware — if you undercut the base too deeply, you risk cutting into the lamp cord hole.
Create the 1/4″ back cut angle on the side of the lamp base. I used a 1/2″ bowl gouge and a shear-scraper to form this surface. This subtle detail gives the lamp an elegant, modern look. Sand the bottom before removing the base from the lathe.
Flip the lamp base over and remount it on your four-jaw chuck by expanding the jaws into the chucking recess. Mark a 2-1/2″-diameter circle in the middle of the top. This is where the lamp base will contact the bottom of the lamp shaft. Since the bottom of the lamp shaft is flat, don’t try to also make the top of the base flat; any variation could mean a visible gap.
Instead, create a small recess in the top of the lamp base so only the outside edges of the shaft will make contact. I used a shear-scraper to create this small recess, running downhill from the marked 2-1/2″ circle to the hole in the center. Now shape the remainder of the top of the lamp base.
Since the screw chuck pilot hole was just 3/8″ diameter, the hole should be enlarged slightly to better accommodate the 3/8″ OD lamp rod. A 13/32″ or 7/16″ twist drill should do the job. Sand the top of the lamp base.
Turn the Shaft Pieces
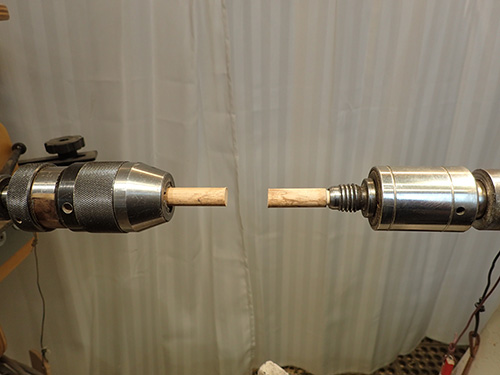
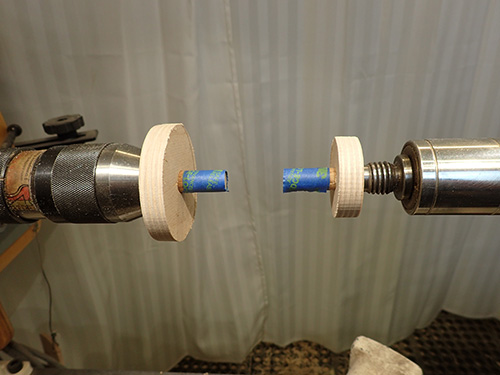
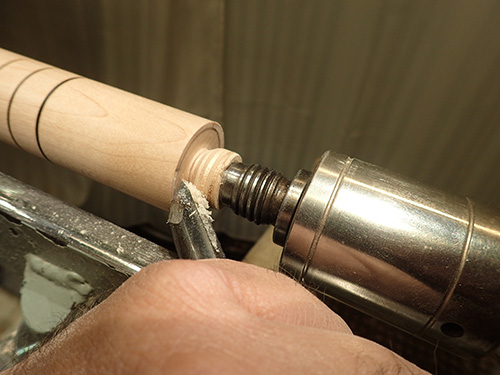
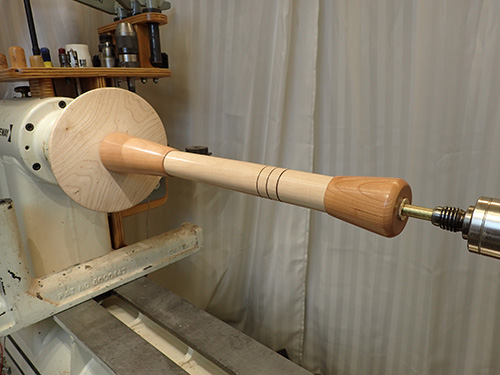
Each of the three lamp shaft blanks should be mounted between centers to provide access to the entirety of each blank, end to end. The 1/2″-diameter through hole makes traditional mounting a challenge. My solution is to mount the shaft segments using two 2-1/2″-long pieces of 1/2″-diameter wooden dowels—no special-purpose lamp centers needed.
Top: straight-walled live center with setscrew.
Bottom: tapered live center with no setscrew.
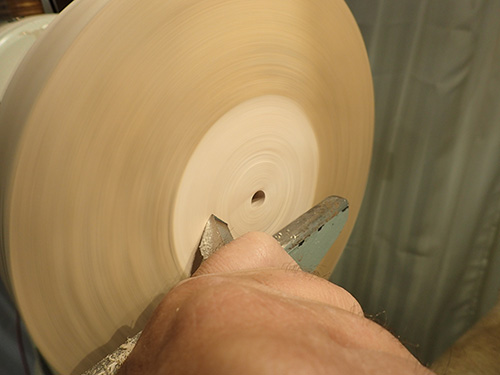
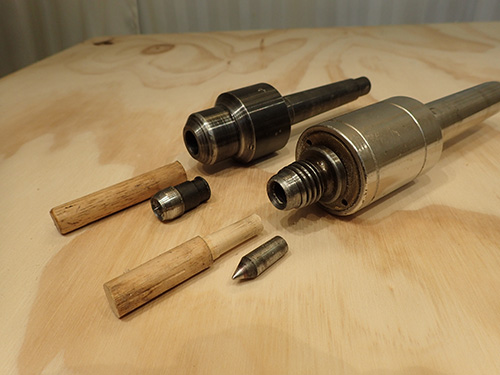
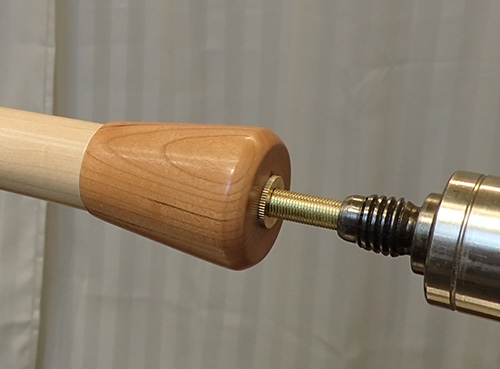
At the headstock end, mount a 1/2″ dowel in a collet chuck, small chuck jaws, or a drill chuck. At the tailstock end, remove the center point from the live center and replace it with a 1/2″ dowel. Some live center holes have straight sides and a setscrew, which can be used to secure your dowel. But if the hole is tapered and has no setscrew, you will have to turn a tenon and shoulder on the dowel to register against the end of the live center. Both of these approaches are shown. Be sure to make the tenon long enough to support the dowel sticking out of the live center. The dowel may not run perfectly true in the tailstock, but it will suffice after you mount your blanks on the two dowels.
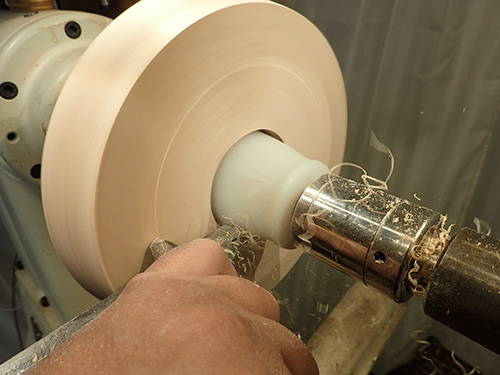
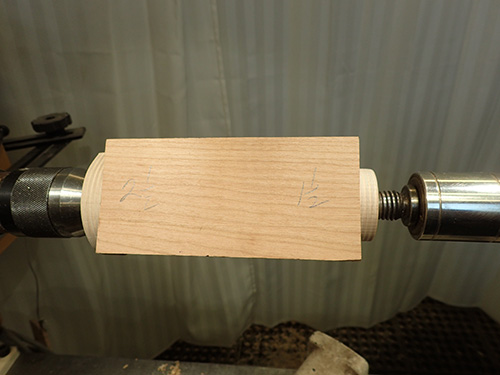
Mount and turn each lamp shaft section, one at a time, on the 1/2″ dowels. Note that standard 1/2″ wooden dowels are frequently undersized, so you might need to wrap masking tape around the dowel to make it fit snugly in the 1/2″ holes in the blanks. The shape of each shaft segment is a simple taper or cylinder, so I just use a spindle-roughing gouge and sandpaper. If you are careful, you can get really clean finish cuts with a roughing gouge.
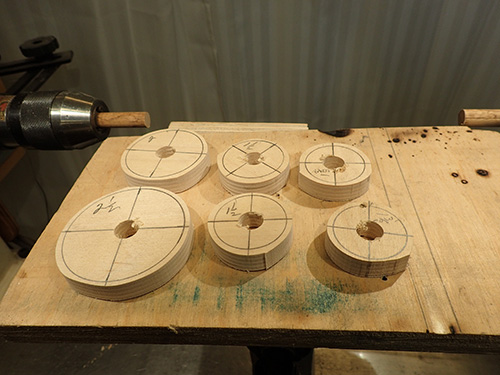
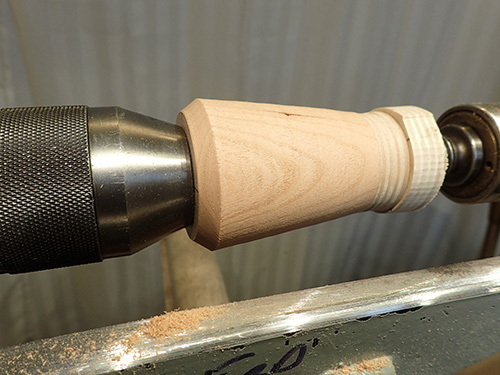
I have found that adding correctly sized wasteblocks on both ends of the blanks makes the turning simple. They help you avoid sizing mistakes and prevent tearout at the ends of the shaft sections. I make my wasteblocks out of 1/2″-thick plywood. Rough them round on the bandsaw slightly oversized after drilling a 1/2″ hole in the middle. To turn the three shaft segments as specified in the drawing, you will need six wasteblocks in the following sizes:
• Top segment: 2″ and 1-1/2″ diameter
• Middle segment: Two at 1-3/8″ diameter
• Lower segment: 2-1/2″ and 1-1/2″ diameter
Mount the appropriate wasteblocks over the 1/2″ dowels with the turning blank mounted between them. Turn the wasteblocks down to their final diameter before turning the lamp sections.
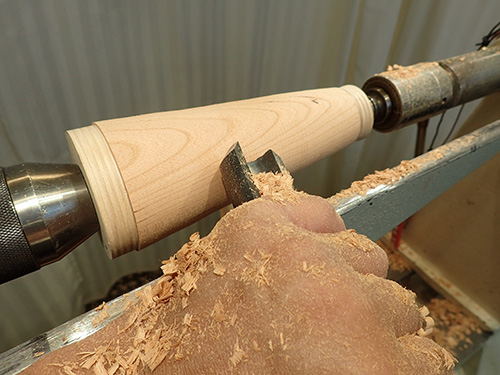
After the wasteblocks are correctly sized, you only need to “connect the dots” to turn the blank to the correct taper. Leave each blank a little oversized, and sand to the final diameter.
If you run into problems with the blanks slipping on the dowels, add masking tape to the dowels to get a tighter fit.
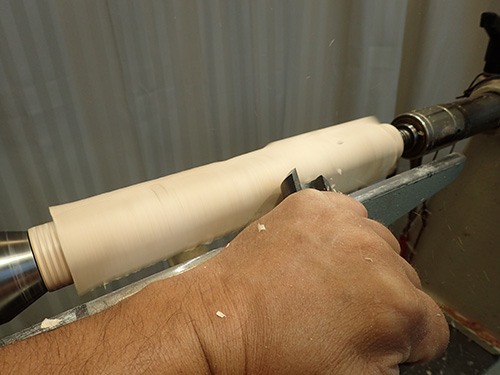
After you turn the middle section to a cylinder, you can add some decorative burn lines, but remember the old adage: less is more. Burn the lines with a wire after you make a shallow groove to get the wire started.
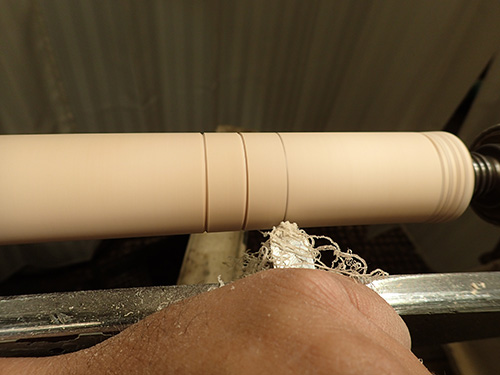
I form the groove with a point tool. You can purchase burn wires, but a piano wire or guitar string will also work.
Safety Note: If you make your own burn wires, securely install wood balls or handles at each end of the wire.
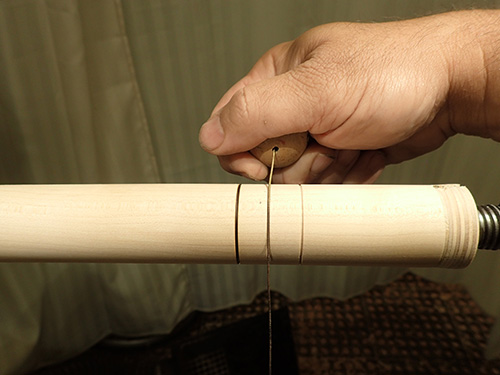
Never wrap the wire around your fingers! The lathe must be running at a high speed to create enough friction to make a nice burn line. Press the wire into the groove until smoke appears. Assembling the lamp will be easier if you turn the ends of the middle shaft section slightly concave. Undercutting both ends will help the sections mate up without unsightly gaps.
You can do this by reducing the wasteblock at the tailstock end, then use a spindle gouge to undercut the endgrain of the shaft. segment. Flip the piece end for end and repeat the process, again from the tailstock position. Use a spindle gouge to add a 1/4″ bevel at the top of the upper shaft section.
When sanding the lamp shaft sections, remove the wasteblocks so you can access the ends to slightly round over the edges. But do not sand the ends that you made perfectly square on the table saw.
Finish and Assemble Lamp Parts
It is a good idea to pre-finish all the wood lamp parts before assembly. I apply two coats of semigloss sprayon polyurethane, lightly sanding with synthetic steel wool and buffing between coats.
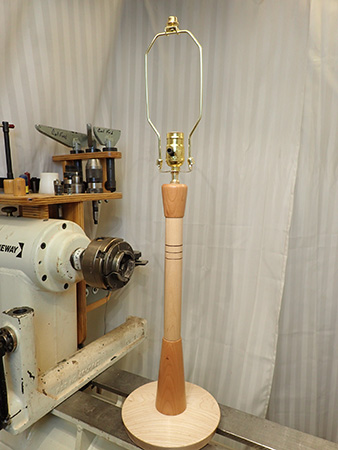
I like to use the lathe as a big clamp. Use it to align and dry-fit the pieces before gluing them together. Epoxy is a good choice of adhesive because of its gap-filling qualities. The 3/8″ lamp rod fits loosely in the 1/2″ center hole. I have found it easier to allow the epoxy to fill some of that gap near the joints than to force a 3/8″ lamp rod through a long 3/8″ hole with no play.
Insert the lamp rod through all of the turned parts and install lamp rod nuts at the top and bottom. Do not leave any extra lamp rod protruding at the bottom, but do leave 1-1/2″ or so extra lamp rod sticking out the top. Cut off any excess rod only after you have test fitted the lamp socket at the top of the lamp rod.
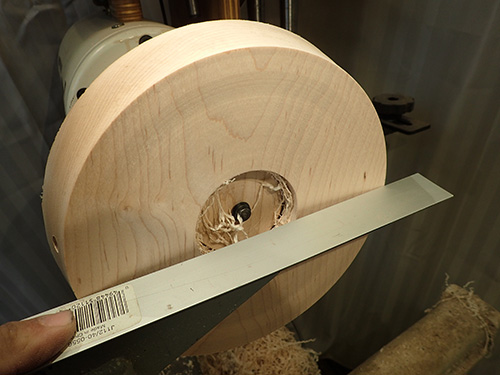
Mount the lamp base on a chuck on your lathe, expanding the jaws once again into the chucking recess on the bottom of the base. Then position the center point of the tailstock live center in the hole at the top of the lamp rod. Hand-rotate the wood parts on the lamp rod to position the grain to your liking. When you are happy with the dry-fit, loosen the lamp rod nut at the tailstock end and add some five-minute epoxy to the joints. You don’t need much glue. Tighten the nut to hold the parts in place while the epoxy dries.
If you need to clean up any excess epoxy after it dries, you can do this by turning the lathe on at a very slow speed and buffing with fine synthetic steel wool. Finally, I like to add one last coat of finish after assembling the lamp to help tie everything together and hide any problems created during the assembly process.
Install Lamp Hardware
Install the lamp socket and cord according to the manufacturer’s instructions. It is important to use a UL-approved lamp cord knot, also called an Underwriter’s Knot, under the socket. An Internet search for “UL lamp cord knot” will reveal the correct way to tie this knot, which prevents the electrical connections from being pulled and becoming disconnected. This is an important safety precaution.
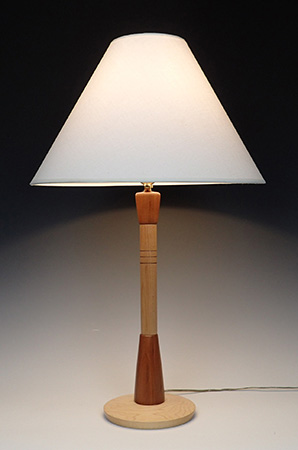
When positioning the lampshade on the lamp, I like the bottom of the shade to be above the top of my beautifully turned lamp. The height of the harp determines how high or low a shade sits. The harp that comes in your lamp kit may not be the ideal size, but you can purchase a taller or shorter harp separately.
Carl Ford is an accomplished woodturner, a member of the Kaatskill Woodturners (Hurley, New York), and loves teaching people how to turn. His website is carlford.us.


