This article, “Turn a Windsor-Style Footstool,” by Janet A. Collins, is from the pages of American Woodturner and is brought to you by the America Association of Woodturners (AAW) in partnership with Woodworker’s Journal.
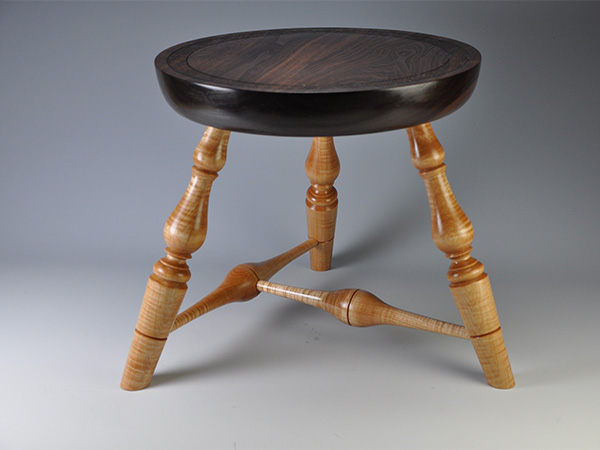
Several years ago, while teaching at a woodworking school in Vermont, I was asked to develop a workshop that would teach both spindle and faceplate turning to furniture-making students. The project has evolved since then, but I still teach it, usually over the course of four days, to beginner and intermediate woodturners. This footstool, inspired by both Shaker- and Windsor-style furniture, is about 13″ (33cm) in diameter and 13″ tall. It comprises a seat supported by three splayed legs, which are braced by two stretchers.
Design Considerations
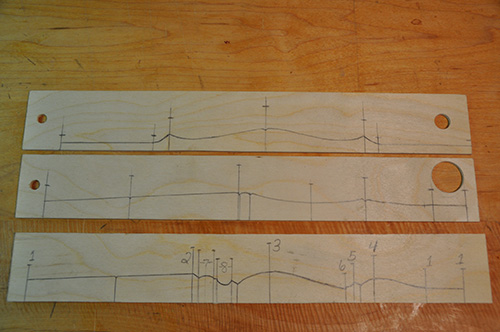
I offer my students two leg designs — one simpler and one more complex—to accommodate different levels of experience. Both leg patterns, plus a stretcher design, but here are some tips to help you develop your own patterns:
– Be willing to draw the shapes several times, making changes until you are happy with the design. You may not know if the shape will be right until you make the commitment to a piece of wood by turning a prototype.
– Cut out a paper rectangle the size of the blank. I wanted the legs for this stool to come from 8/4, or 2″- (5cm-) thick, kiln-dried lumber, 13″ long, so my paper rectangle would be 2″ square by 13″. Draw a centerline the length of the paper. You will only need to draw half the shape along the centerline. When you have a design you like, fold the paper in half along the centerline and trace the shape onto the other side of the paper. This will give you a good representation of the final leg shape.
– For a taller stool, lengthen the leg pattern, noting that 1″ (25mm) of it will be a tenon inside the top. If the legs are made longer and/or if the top is made a larger diameter, calculate a longer length for the stretchers, too. The surest way to do this is to draw the shapes full size with the desired angles and measure the length between the legs where you want the stretchers.
– Don’t be tempted to create a shoulder at the ends of tenons. Shoulders on parts that are connected with angles other than ninety degrees are difficult to fit.
– To help with consistency across identical parts, make a story stick by transferring the half spindle profile from the paper pattern to a piece of thin plywood, aligning the pattern’s centerline with the edge of the plywood.
Prepping Material
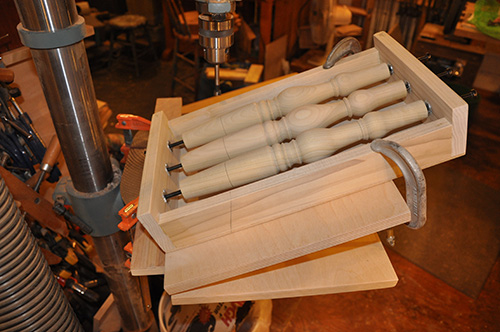
The next step is to prepare the materials for turning. To illustrate this article, I used poplar, on which layout marks show up clearly. When I am teaching this workshop, we also use poplar for all the parts because it is a good wood for learning woodturning. But any hardwood can be substituted. I like to use walnut for the top and curly or birdseye maple for the legs and stretchers.
The leg and stretcher stock can be cut directly from rough-sawn lumber, with no surfacing necessary. I cut the spindle blanks on the bandsaw, using a fence to get roughly 2″-square blocks, which I then cut to length on a chop saw or radial-arm saw. The leg and stretcher blanks must all be the same length, and the ends should be close to square. This will make the placement of the pattern and indicator marks, and the drilling of all the holes, more accurate.
The top, or seat, blank is about 14″ (36cm) square and 2″ thick but can certainly be made larger. If the top is made larger, the stretchers may need to be made longer to fit between the legs. The stretcher pattern is intentionally longer than needed, as the stretchers will be custom fitted after the legs are dry-fitted to the seat. If the top is made smaller, the legs become closer together and this can make the stool a bit tippy. One solution if using a smaller top is to drill different-angled holes to spread the footprint of the legs out farther. This should be drawn to scale on paper ahead of time to calculate the dimensions of all parts.
I mill the blank for the top by jointing one face and planing the opposite face, making the top and bottom surfaces parallel. At the very least, mill or hand-plane the bottom of the seat, as this is where all the layout for the joinery is done. If you do not have the machines to mill material, most lumberyards will surface the material for you. If you can find wide 8/4 stock for the top, you will not have to glue boards together to make up the size needed. If not, glue up the necessary boards to make the top approximately 14″ square. This will ensure you can end up with a 13″ seat.
Seat Layout
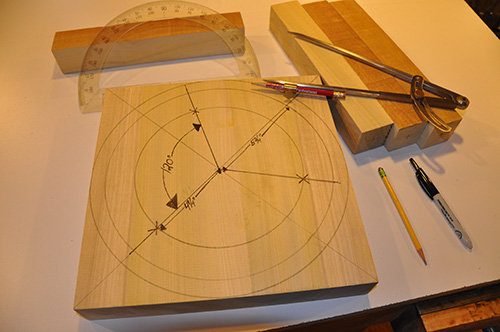
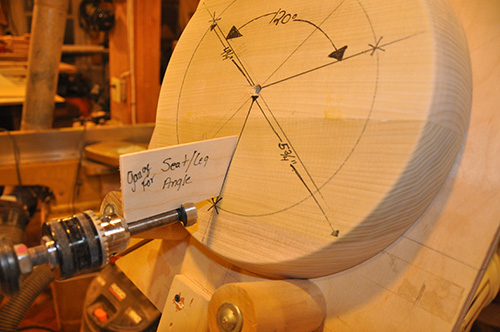
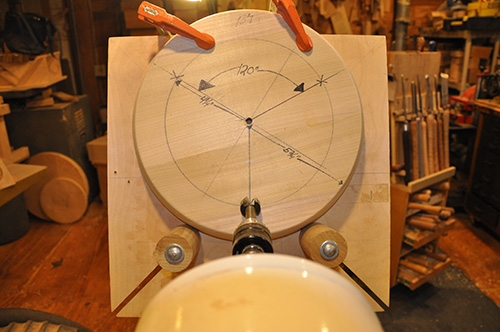
The layout on the underside of the square seat blank starts with a pair of lines drawn from corner to corner. Where the lines intersect is the center of the blank. From this center point, use a compass to draw three circles:
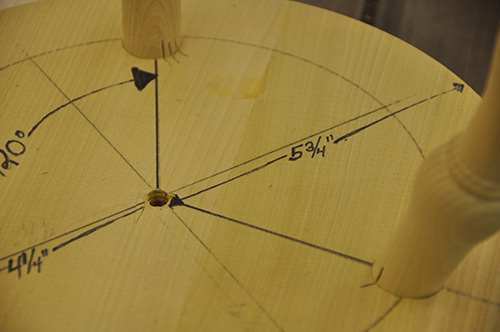
1. A 4-1/4″- (11cm-) radius circle, to be used for locating the leg holes
2. A 5-1/4″- (15cm-) radius circle, to be used as a guide during turning when shaping a slight contour from the top surface toward the underside
3. A 6-1/2″- (17cm-) radius circle, to be used as a cut line for shaping the blank on the bandsaw prior to turning
Where either of the diagonal lines intersects the smallest circle will be the location for one of the leg holes. Use a protractor to locate the other two leg holes. Place the protractor’s origin, or center mark, at the center of the seat blank with its base line on the line on which the first leg hole is located. Mark 120 degrees, then draw a line through the center to the smallest circle. This intersection is the location of the second leg hole. Locate the third leg hole in the same manner, on the smallest circle and 120 degrees from the second hole’s centerline.
After all these lines are drawn and the leg holes are located, drill a hole at the center mark for mounting the blank on a screw chuck. At the bandsaw, cut the seat blank round, using the largest circle as a guideline.
Turn the Parts
Legs and Stretchers

Start by turning the legs and stretchers. This is spindle turning, where the grain of the wood is parallel to the bed of the lathe. The four turning tools I use are the spindle-roughing gouge, the parting tool, the spindle gouge, and the skew chisel.
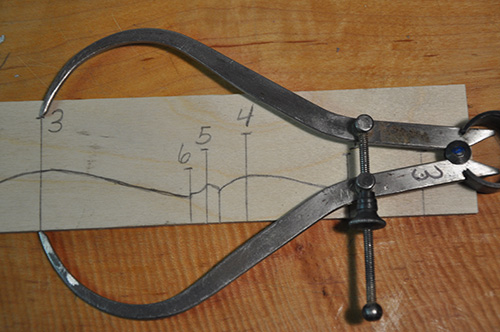
After roughing the spindle blank round, transfer key points from your story stick to the blank. The parting tool is used to size the diameters of the various components of the pattern. If you have access to multiple pairs of calipers, number them with a marker and set each to the corresponding dimensions on the pattern.
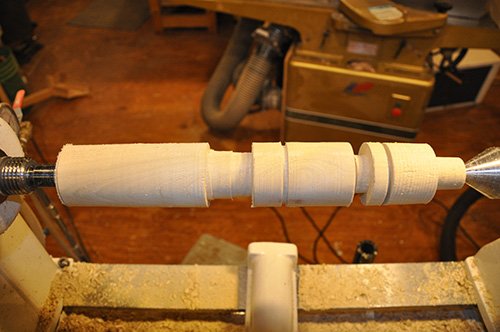
The calipers can stay set and help with producing matching spindles. I start with the largest diameter and use the parting tool to turn that area of the spindle to the diameter of the set caliper. Move through the numbered sequence until all the settings have been cut to the appropriate diameter.
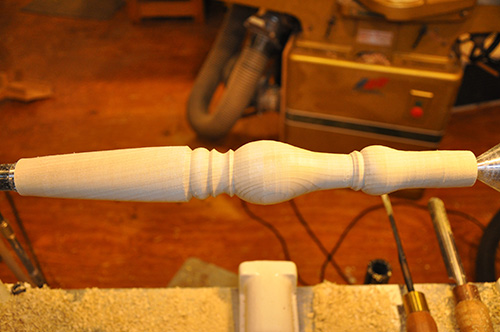
I form the beads and coves using a spindle gouge.
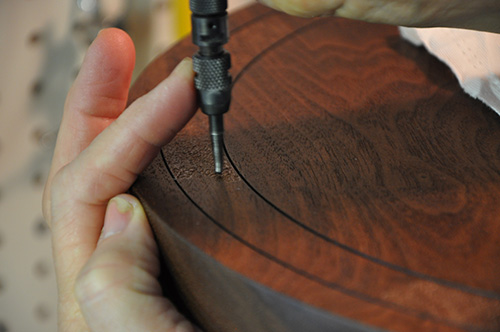
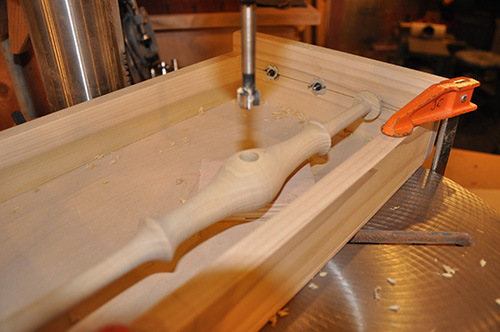
The straight lower section of the legs is formed by connecting the points using either a spindle or roughing gouge. This section can be made flat with a sanding block, which will even the high spots. Mark this section of the leg at the height where you will drill for the stretcher to be inserted. Use a skew chisel with the long point down on the toolrest, arcing it into the wood to form a shallow V-groove (Photo 7). Since the legs are already cut to length, it is important the mark be at the same height on each leg.
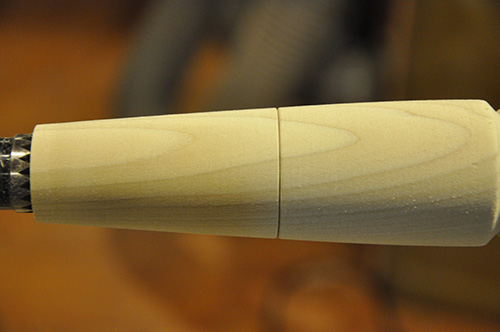
The leg tenons should be sized to match the drill bit used to form the holes in the seat bottom (1″ diameter). Likewise, the stretcher tenons should be sized to the drill bit used to make their mortises (1/2″, or 13mm, diameter). I drill a hole in a thin piece of plywood or a story stick and use it to test-fit the tenon. If the hole can be slipped snugly over the tenon along its length, this will ensure a tight fit in the mortise. The tenons might be too snug when fitting them to the seat bottom, but they can be sanded later to fine-tune the fit. A loose tenon makes for a structurally weak joint that will not last.
After turning, sand each leg and stretcher to at least 180 grit if you plan to paint the stool, finer if you are applying a clear finish.
The Seat
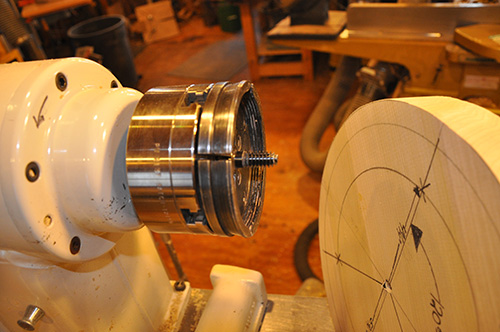
Now it is time to turn the seat. Mount the seat blank on a screw chuck. I use the screw that came with my chuck, mounted in large jaws, which provide excellent backing support for the mass of the seat blank. It is possible to mount the blank on a faceplate instead, but the faceplate must be truly centered on the wood since the leg hole locations were based on the blank’s center.
If the piece was milled flat with parallel surfaces, the top of the stool will need only minimal turning. True the edge of the seat using a bowl gouge. Never use a spindle-roughing gouge on faceplate work, as the tool’s tang, which is inserted into the handle, is not robust enough to withstand the significant forces of wood rotating with its grain perpendicular to the bed of the lathe. In addition, the corners of the spindle-roughing gouge will act like a splitting wedge to the wood if they catch the endgrain.
The top surface can be made slightly concave or left flat. Turn an undercut profile into the edge of the seat, removing material from the top edge to the 5-3/4″- radius circle drawn on the bottom face, which is approximately 3/4″ smaller than the seat’s overall diameter. Keep in mind the 4-1/4″-radius circle is the location of the leg holes, or mortises, and the edge needs to be kept slightly away from this line.
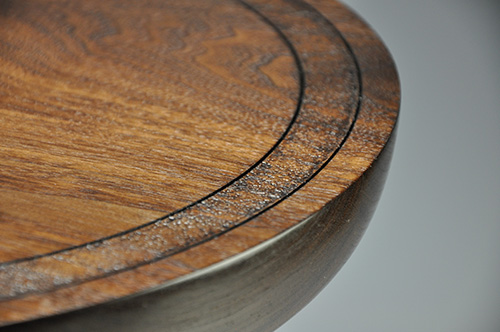
Sand the seat. If a decorative ring is desired on top, now is the time to define that feature using the long point of a skew chisel or a spear-point scraper. I often texture the area within two lines for added visual interest.
A Lathe-Based Drilling Jig
Front
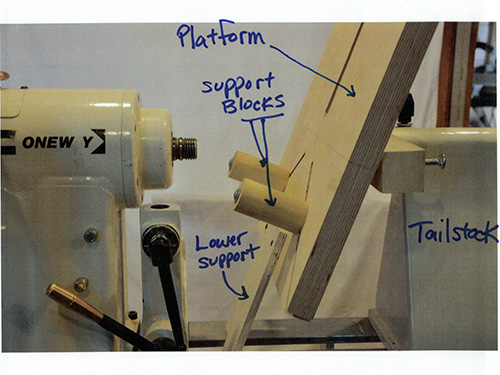
The main platform comprises two layers of 3/4″- (19mm-) thick Baltic birch plywood, 16″ (41cm) square, glued together. Round adjustable support blocks, 3-1/2″ (9cm) long and 2″ (5cm) in diameter, slide on diagonal slots and are bolted in position with 5/16″ (8mm) carriage bolts.
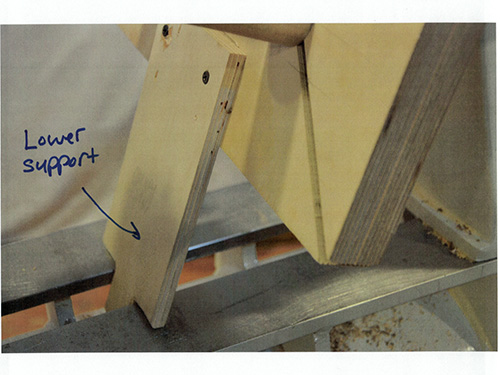
The lower support, made of 1/2″- (13mm-) thick plywood, is cut to fit in and slide along the space between the bed ways to prevent the jig from pivoting during drilling. (The slot in the top section of the platform is used for clamping smaller workpieces.)
Back
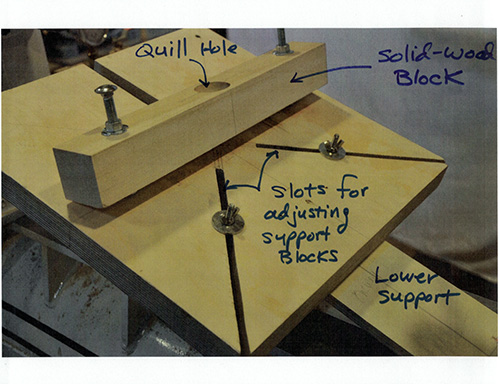
The solid-wood block on the back, or tailstock, side measures 15″ (38cm) long and 2″ square. The hole drilled in the block matches the diameter of the tailstock quill and is drilled deep enough to accept about 1-1/2″ (38mm) of the quill (live center removed). The block, attached with hinges to the back of the platform, should be positioned so the quill hole is centered on the platform.
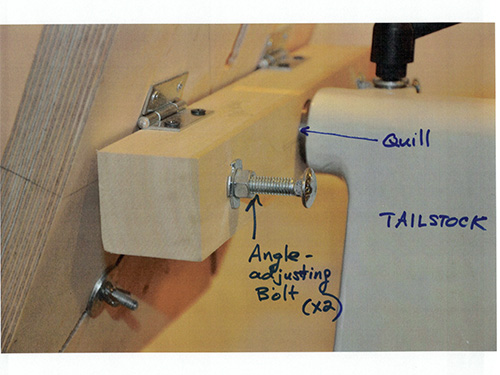
The hinging allows for drilling at different angles, adjusted by two 5/16″ carriage bolts (with threaded inserts) set/locked at a specific length with nuts and washers on both sides of the block. The weight of the platform and the pressure of drilling from the headstock maintain the angle during drilling.
Drill the Seat
I drill the 1″-diameter by 1″-deep holes in the seat bottom using a fixture that mounts to the lathe’s tailstock. The holes are drilled at a 15-degree angle using a Forstner bit mounted in a drill chuck held in the lathe’s headstock.
With the jig’s angle set to 15 degrees, I set the front support blocks so that the workpiece is at the correct height, which means the drill bit lines up with one of the marked locations for a leg hole. Position the seat so that a 120-degree line is perpendicular to the lathe bed. This can be visualized by sighting down from the headstock and seeing if the line is angled to the left or right of the drill bit.
With the seat accurately placed in the jig, clamp the seat in place and advance the tailstock quill, moving the seat in the fixture until the drill bit is almost touching the surface. Turn the lathe on slow speed and advance the jig, drilling the seat to the desired 1″ depth. I use a 1″-wide ruler to slip in the space between the mounting block and the tailstock body, indicating when the unit has advanced the desired distance. Repeat for the additional two leg mortises.
Position the Legs
Fit the legs in the mortises in the seat. Rotate them to your desired position. Once they are drilled to accept the stretchers, you cannot change their rotation. You may not care about the location of the legs if the piece will be painted, but if you are using figured maple for the legs and stretchers, you may want to rotate them to show off the best figure.
Once the legs are positioned, mark each leg and the underside of the seat with corresponding index marks. For the first leg I use one mark, second leg two marks, third leg three marks. These marks are critical because once the mortises are drilled in the legs for the stretchers, there is only one way the assembly can go together.
On the legs that will have the stretcher between them, make opposing marks on the V-grooves where the stretcher holes will be drilled. Mark the third leg on the V-groove where the surface faces the center of the seat.
Drill Legs and Stretchers
The mortises in the legs are drilled at a 15-degree angle. These holes can be drilled with one setup using an angled fixture that sits on the table of the drill press, which remains at 90 degrees.
Only one of the stretchers gets a mortise, and it is drilled at 90 degrees. The same fixture can be used to hold the stretcher but without an angle.
Cut Stretchers to Length
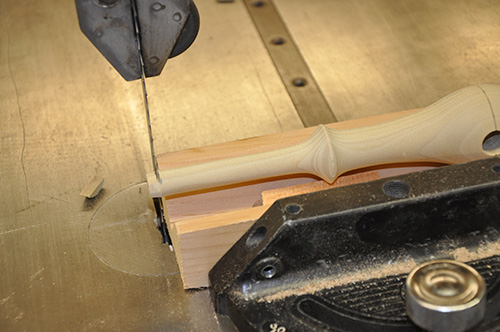
Before cutting the stretchers to length, remove the excess material that was used for holding the work on the lathe. This can be done with a chisel, a handsaw, or carefully on the bandsaw. It is not advisable to cut round objects, including spindles, on the bandsaw without a safe holding method such as a V-block, as the piece can spin during the cut and pull your hand into the blade.
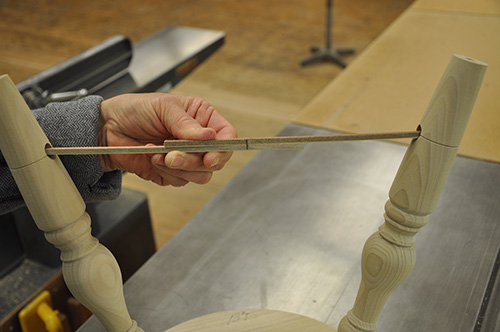
Determine the required length of the stretchers by finding the distance between the bottoms of the mortises of each leg. This can be done with a pair of thin strips of wood or plywood. Place the legs in their appropriate mortises, carefully aligning your registration marks. Place one end of each strip in the mortises facing each other. Overlap the strips and make one or two marks across both. Take the strips out, realign the marks, measure end to end, and you have the length of the first stretcher. If you divide this length in half, you can mark cut lines at each end measured from the middle of the stretcher. This will ensure the center of the stretcher stays in the center after assembly, which is important because it will need to align with the other stretcher.
Cut the stretcher to length and sand, if necessary, to fit in the mortises of the legs. Rotate the stretcher so the hole you drilled is facing the third leg. Find the required length of the second stretcher using the same method as before, and cut it to length.
Assembly
To assemble the stool, put the stretcher assembly together first. With the stool upside down on a flat surface, place the legs in the seat, again carefully aligning the registration marks. The legs can be splayed out a bit to fit the stretcher assembly within the legs. A rubber mallet may help with the parts going together.
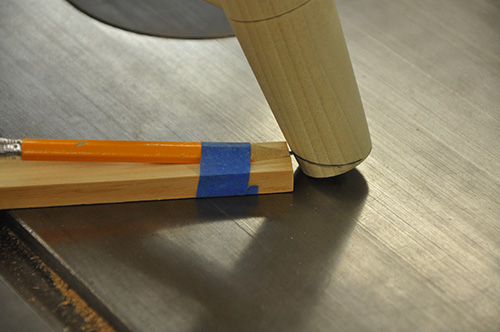
The last step before gluing is to cut the bottom of the legs at the correct angle so they will sit flat. Turn the stool over and place it on a flat and level surface. You can see the angle that needs to be cut off each leg. Make a simple scribe tool from a scrap of wood and a pencil. Use a flat scrap the thickness of the largest part of the gap. Flatten a pencil using a block plane or sander and tape the flat side of the pencil to the block of wood. Keeping the scribe flat on the surface, scribe a pencil line around each leg. Disassemble the stool and cut off the leg ends at your scribe lines using a handsaw or bandsaw with the turned work held in a V-block.
Reassemble the stool and ensure a good fit of all parts. If the feet are not sitting flat, more material may need to be cut or sanded off. Once you are happy with the fit, it is time to glue up the stool.
This is where the leg registration marks are an important guide. Make sure you can see them once you start spreading glue and align them as soon as possible before the glue sets. Start with gluing the stretcher assembly, placing glue in the mortise and some on the tenon. If you have tight-fitting tenons, you must work quickly because once the glue is in the mortise, the wood starts to swell.
Place glue in one of the seat bottom mortises and fit its corresponding leg, making sure it is aligned according to the registration marks. Glue the next two legs in place, being sure they are aligned properly. Place glue in the mortises of the legs and a bit of glue on the tenons of the stretchers. Splay the legs and fit the stretcher assembly in place. Tap the legs and stretchers with a rubber mallet to be sure all joints are seated. If the mortise-and-tenon joints fit well, clamping will not be necessary.
All that is left now is to apply the finish of your choice and enjoy using this classic piece of furniture.
Janet A. Collins has been a furniture maker, woodturner, and teacher since graduating from the North Bennet Street School furniture-making program in the mid-1990s. Her shop is located in a barn at her home in Ryegate, Vermont, and she teaches woodworking full time at Dartmouth College in Hanover, New Hampshire. Janet’s work can be seen at her website.


