This joint is fast, easy to make, and takes a beating.
Sometimes you require the strength of dovetails, but just don’t have the time or need the beauty that dovetails bring to the party. Instead, what you want is joinery that’s just fast, easy to make, and takes a beating. If so, a locking joint that combines a rabbet with a dado is the perfect solution.
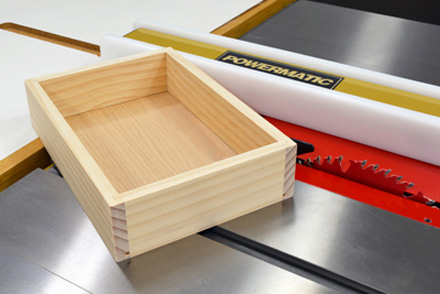
Drawer boxes are a great example of a need for high strength, because they’re stressed twice with each use. When suddenly opened, the corner joints are pulled; when closed, the abrupt stop puts several pounds of stress on the joints again, especially on the front. After hundreds of open/close cycles, it’s no wonder that a drawer — even one reinforced with screws — can begin to come apart. But when the tongue of a rabbet is secured into a matching dado, it creates joints that lock, mechanically arresting the stress of this front-to-back motion. To illustrate how these joints come together, let’s build a simple drawer box.
STEP 1: To get started, create a groove for the drawer bottom. I’ll use a piece of 1/8″ plywood as the drawer bottom, so a quick pass over a standard blade does the trick (Photo 1). For a thin-kerf blade, you’ll need to make a first pass, adjust the fence slightly, and then take a second pass. By the way, it’s best to cut this groove in a single piece of full-length stock at the beginning of the project; it’s faster and safer than cutting several shorter pieces.
STEP 2: With the groove cut, now trim the drawer sides to length as in Photo 2. For the box front and back, be sure to allow a bit of length to account for the length of the rabbet.
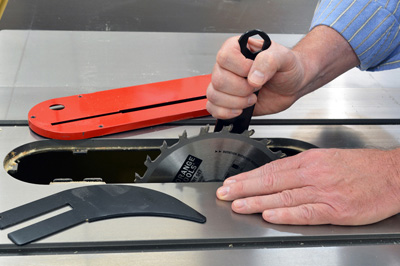
STEP 3: When making these joints, I like to base the dimensions of the rabbet and dado on the stock thickness, making them exactly half. This makes everything very simple — every measurement you need to make will be the same, and you only need to set the blade height once. I’m using 1/2″ stock here, so my rabbets will be half that at 1/4″ x 1/4″, while the dadoes will be 1/4″ wide and 1/4″ deep. To make the cuts, I’m installing a 1/4″ dado blade into my table saw (Photo 3). Since dado blades are typically smaller than regular blades, if your table has a riving knife or splitter you’ll need to remove it temporarily.
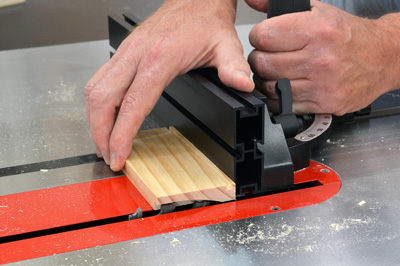
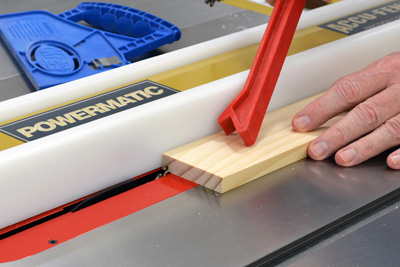
STEP 4: Raise the blade to exactly 1/4″; you’ll leave it set there for all the cuts in the next two steps. Line up the box front and back with the outer side of the blade and cut a 1/4″ rabbet on the ends of the workpiece as in Photo 4. Be sure to keep the groove you cut for the drawer bottom oriented upward, cutting the rabbet on the back of the workpiece.
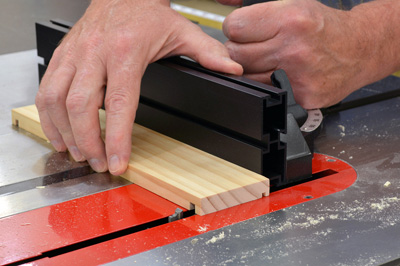
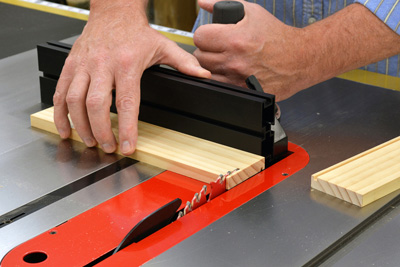
STEP 5: Measure in 1/4″ on each end of the box sides and align the workpiece with the blade, this time with the groove facing down as in Photo 5. When you run the workpiece through the blade, you’ll have a 1/4″ x 1/4″ dado, exactly 1/4″ from the ends. (See what I mean about simplicity?)

STEP 6: After cutting the first dado, do a test fit. In Photo 6, I’ve darkened the tongue of the rabbet with a pencil so you can see how the joint fits smoothly together. If all is well, cut the remainder of your dadoes.
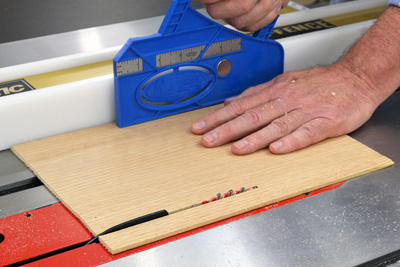
STEP 7: Remove the dado blade and return the regular blade to the saw, then cut the plywood for the drawer bottom (Photo 7). This piece will measure the length and width of the box interior, plus the depth of the groove on each side.
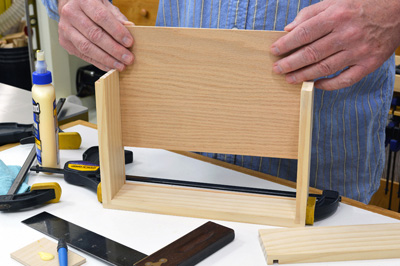
STEP 8: To assemble the drawer box, apply glue to the ends of one of the box sides and insert the box ends as in Photo 8. A clamp lightly positioned running lengthwise will help keep everything upright. It’s important that you assemble in this order and slide the drawer bottom in from the side — with the rabbets on the end pieces and the dadoes on the sides, the finished drawer box is “locked” front-to-back, meaning that the last piece to be attached is a side. With the bottom inserted fully, glue the remaining box side into place, reorient clamps so they apply pressure side-to-side, and check for square. When everything is dry, remove the clamps and add the drawer front, which will hide the grooves we cut into the box sides for the drawer bottom. Finally, drill and add the drawer hardware of your choice.
This method works great for any size drawer; just adjust the dimensions of your rabbet and dado to exactly half the stock you’re using for the box. I’ve used 1/4″ joinery here with 1/2″ stock as an example. A drawer using 3/8″ stock would have rabbets and dadoes measuring 3/16″, while a hefty drawer with 3/4″ sides would take 3/8″ rabbets and dadoes. The real key is making sure that you cut the rabbets in the drawer front and back so they lock into dadoes cut into the drawer sides. This ensures that the locking action perfectly counterbalances the front-to-back motion of the drawer.


