This article, “The Sensational Skew, Simplified,” by Jim Echter, is from the pages of American Woodturner and is brought to you by the America Association of Woodturners (AAW) in partnership with Woodworker’s Journal.
Believe it or not, everything you need to know to use a skew chisel you learned in kindergarten. It is not a difficult tool if you practice, fully understand how the tool works, and use the lessons you learned. Just remember the skew is a finesse tool and does not remove wood nearly as quickly as a bowl gouge cutting through green wood.
The following three basic skills/concepts, learned in kindergarten, are all you need to know: counting — one, two, three, four; knowing the alphabet — A, B, C, D; and playing nice/using good manners. Here’s how they can help simplify your understanding of the skew.
Counting
There are only two types of cuts with the skew—edge-slicing (such as shear-cutting with a planing cut and peeling) and point-cutting (used for forming V-grooves, truing tenons, or cutting pommels). There are only three profiles, or shapes, you can cut on a spindle with a skew: straight lines (cylinders or tapers), shallow concave (long coves), and convex (beads). There are four surfaces that need to be honed on a skew during sharpening.
Knowing the Alphabet
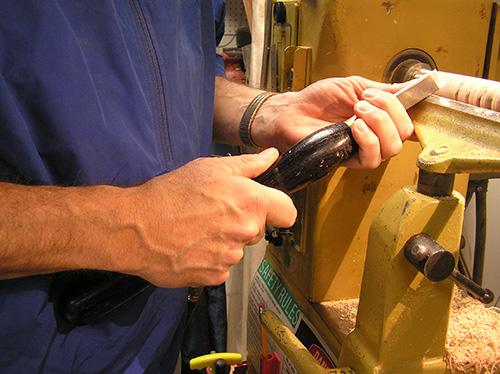
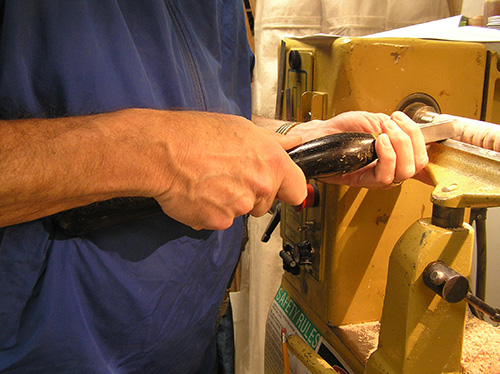
Most turners have heard about the “ABCs of woodturning”: Anchor, Bevel, Cut. I would add D for the Dance of the Woodturner. You must move your body when using the skew chisel. This is different from the stationary stance many beginners and bowl turners are tempted to adopt. Bowl turners often stand in one place, plant their feet, and make large swing movements with the tool handle and their arms. Similarly, beginners tend to move the skew with just their arms. But the skew needs to be locked into position with your body, and both are moved as a single unit, as in a dance.
Playing Nice
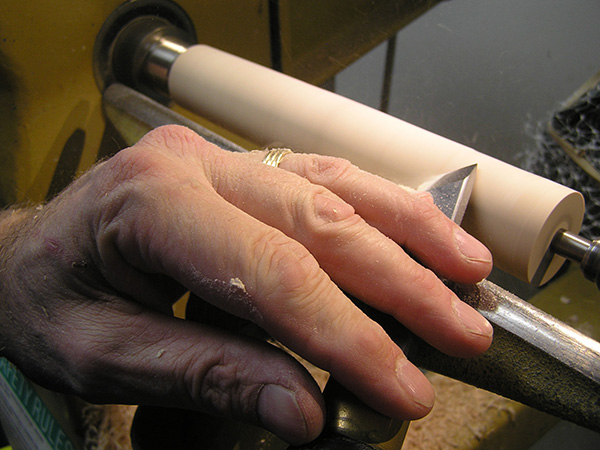
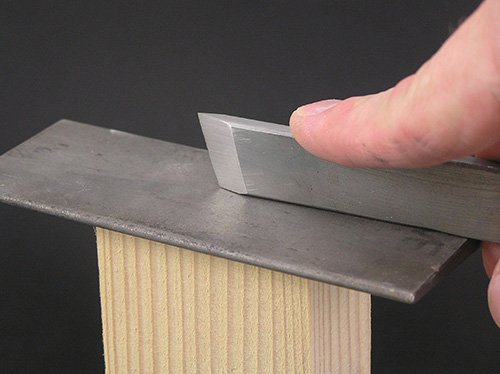
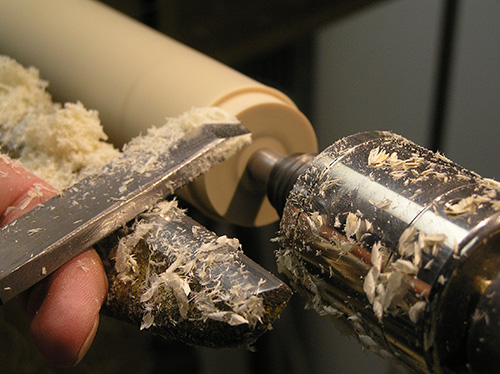
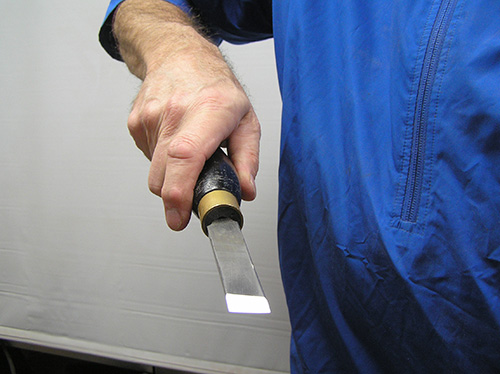
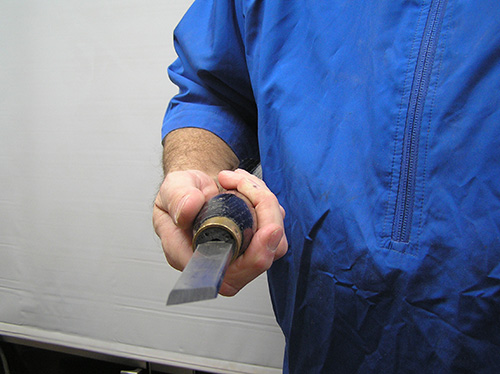
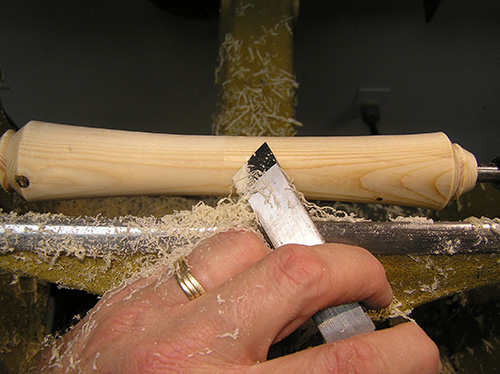
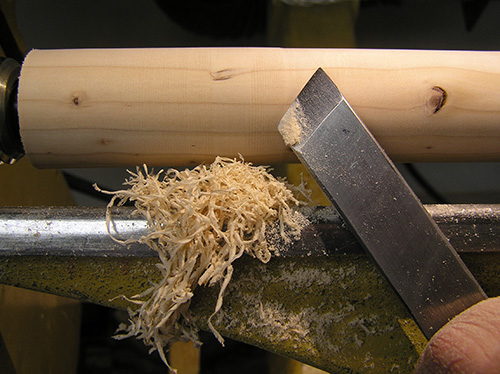
Turners have been taught for years to rub the bevel when cutting, and this concept holds true for the skew but with a caveat. The skew’s bevel actually should glide over the wood surface and not rub it. Gliding the bevel requires a much lighter touch than rubbing. Many turners new to the skew apply too much pressure toward and into the turning blank. In practice, the pressure should be on the tool shank into the toolrest and toward the ground (as shown in the lead image). With the bevel properly positioned just above the wood surface, anchor the tool to the toolrest, raise the handle to start cutting, and then glide the tool over the work in the direction of the cut. This gentler approach results in less pressure on the wood and a higher quality cut.
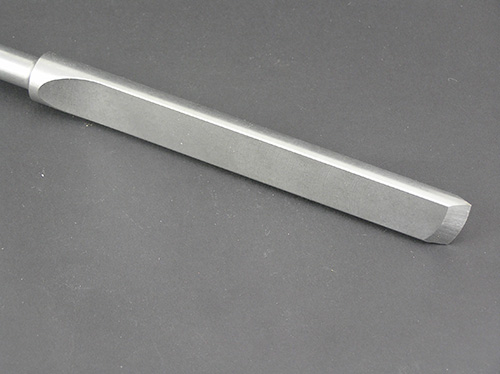
Skew Profiles and Angles
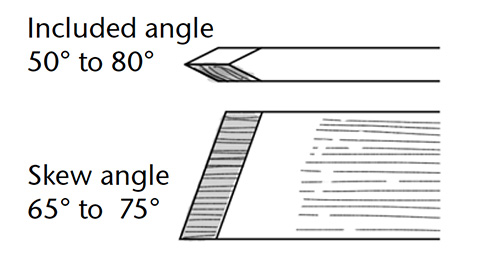
When learning to use the skew, I recommend you start with a tried-and-true profile (described below) with a skew angle of 70° and a straight bevel between 25° and 30°. This shape can be achieved by sizing the bevel two to three times the thickness of the tool shank. Once you develop your skills, then experiment with other profiles and bevel angles.
The three basic shapes of skew shanks are rectangular, round, and square. A forth profile, the oval skew, is not one I recommend, as it is difficult to sharpen without a jig and, carrying less metal mass, tends to chatter.
Rectangular
For rectangular-shanked skews, I recommend starting with a 3/4″ (19mm) or 1/2″ (13mm) tool. Anything larger is difficult to wrap your finger around for certain types of cuts. These sizes are perfect for use in the practice exercises described later in this article. They are also all you need for turning pens, tops, pepper mills, chair legs, and balusters.
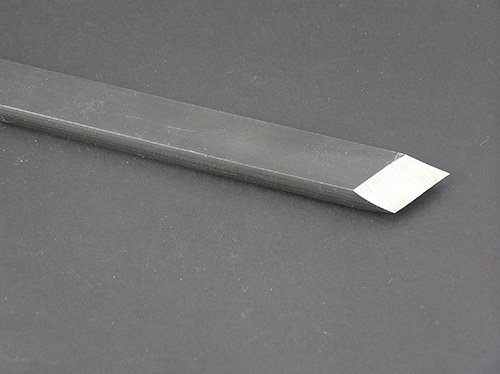
Even though they are called rectangular skews, they have a rounded bottom edge that helps the tool glide easily over the toolrest and allows smooth movement when rolling beads. I prefer a skew that has a flat top surface with no sharp edges, as I find it easier to control when cutting V-grooves and pommels with the long point. Some turners prefer a rounded top surface. If you purchase an inexpensive skew, it may have sharp top edges you’ll need to grind over; you might also have to grind a radius on the bottom edge. This is not difficult to do and worth the cost savings while you learn the tool. Once you master it, then make the investment in a higher-quality tool.
Most beginners try to use the skew with a factory grind, which is often too blunt. A skew with a 25° bevel is great for softwoods like pine and poplar, while a 30° bevel is good for exotics and hardwoods. A skew angle of 70° has been used for years and works well.
Round
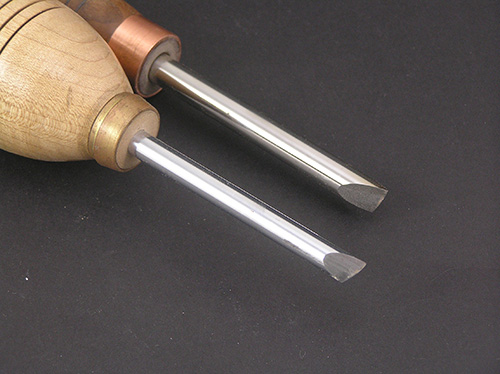
A round-shanked skew can be purchased or easily made from an inexpensive high-speed-steel (HSS) blank. Sizes of 1/4″ to 3/8″ (6mm to 9.5mm) diameter are most useful; round skews larger in diameter necessitate a bevel that is so long it is hard to control the tool. Round skews are nice to use when turning small items like the “icicle,” or finial, below a Christmas ornament.
Square
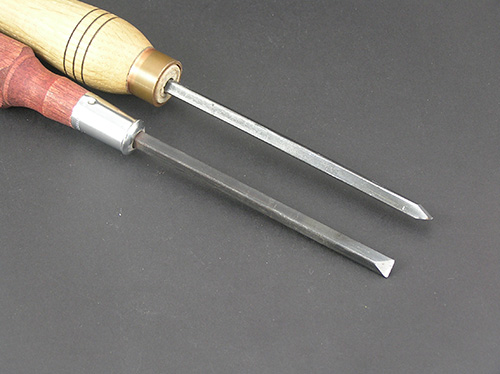
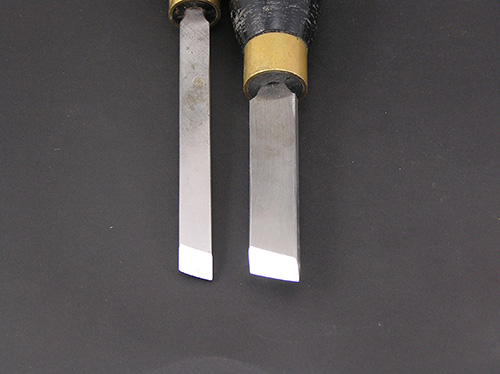
Square-shanked skews, also known as beading and parting tools, are good for performing the tasks the names suggest. You can purchase them or make them yourself — I made mine out of old square shanked screwdrivers purchased for 50 cents at a thrift store. They are ground straight across with a 45° to 50° bevel. As these tools are used for small details and light cuts, I don’t see the need for exotic metal or even HSS. The steel in a screwdriver will win over the wood.
Basic Skew Rules
- The skew is a finesse tool. It is primarily used as a finishing tool that provides a wonderfully smooth surface. Go gentle with it and remember to play nice.
- The toolrest must be absolutely smooth so the tool can glide over it without catching. File or dress the toolrest on a belt sander to remove any nicks. Then rub a little candle wax on it to reduce friction.
- Concentrate on the cutting edge, bevel, and point positions. Let the tool handle go where it has to go to put the point and edge into proper position. The edge and point are master over handle position. Beginners often will not swing the handle nearly enough to position the edge and point into their proper position. If you have to move your body, then dance it out of the way as needed.

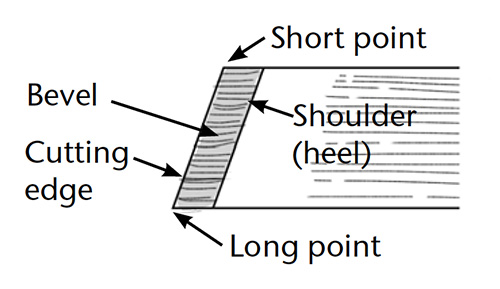
- The skew edge must be razor sharp and have very sharp points at the ends (long and short points). True points (with no radii) help to reduce catches when cutting V-grooves and pommels or when rolling beads. To achieve sharp points, hone all four surfaces—two bevels, the top, and bottom.
You will achieve sharp points at the ends of the cutting edge (long and short points). Both carbon steel and HSS tools can be honed with an oil stone, but skews containing exotic metals should be honed with a 600-grit diamond or CBN slip.
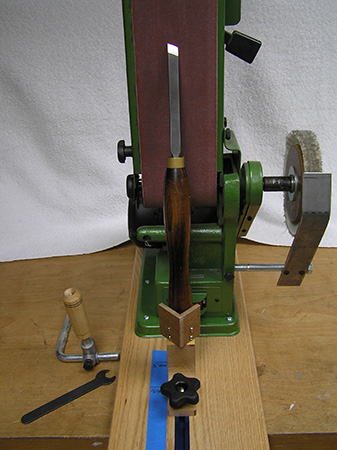
The author’s shopmade belt sander sharpening station exceeds at forming flat bevels on skews. You can also use a belt sharpening system like the one I designed using an inexpensive belt sander. Belt sharpening provides a flat bevel which is easy to power hone using a buffing wheel charged with honing paste.
Types of Skew Cuts
Planing Cut
The skew is known for the sensational finish it can leave on the surface when used to plane a cylinder. You can often start sanding with 220-grit abrasive or higher because anything coarser would damage the surface. Planing is an edge-slicing cut (the short point does not push into the fibers).
Focus your attention on keeping the cutting edge at a 45° angle to the blank, locking the tool to your body and moving your body and tool as a single unit. The planing cut process follows the A, B, C, and D reminders.
-
-
- A: Anchor the tool to the toolrest. Remember that pressure should be applied downward, towards the floor and into the toolrest.
- B: Bevel—Starting with the tool handle low, raise the handle until the heel of the bevel starts to gently rub against the blank.
- C: Cut—Continue slowly raising the handle until the edge engages the wood, keeping the cutting action to the bottom half of the edge (what I call the Green Zone).
- D: Dance—Start cutting in the direction you want to go, using the Dance of the Woodturner, which means moving your body/tool as a single unit. Remember to glide the bevel over the surface and not rub too hard.
-
Peeling Cut
Remember how we used small handheld pencil sharpeners in kindergarten to put sharp points on our pencils and crayons? I liked watching the shavings peel off the pencil. In a similar fashion, a skew “peels” away wood efficiently as it spins on the lathe. The peeling cut does not leave nearly as fine a finish as the slicing, or planing, cut. But the surface is perfect for things like chair tenons that will be glued into a mortise.
To perform a peeling cut, start with the tool handle low and position the cutting edge 90° to the rotation of the blank. Anchor the tool to the toolrest. Raise the handle until the back of the bevel starts to rub. Continue to raise the handle until the edge starts to peel away the wood. As the cylinder’s diameter decreases, continue raising the handle to keep the peel of wood coming off the surface. When you are still learning, use only a quarter to half of the cutting edge. Once you develop your skills, try using the entire length of the edge. Remember, this is not a scraping cut. With the tool handle low, you are peeling shavings off the wood.
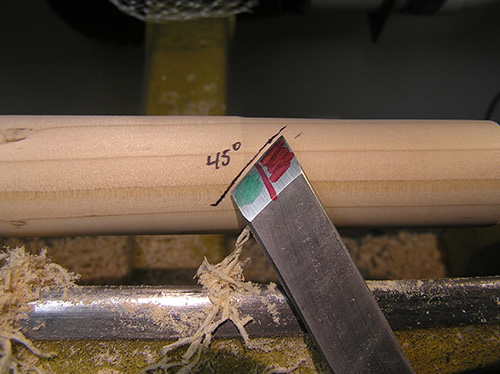
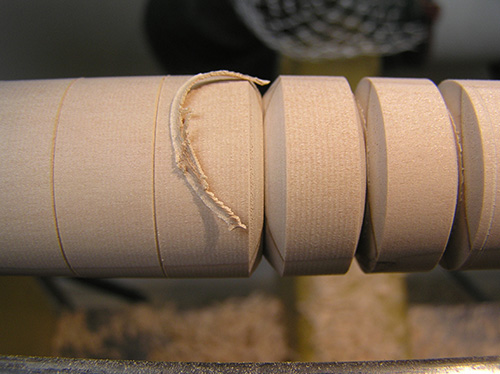
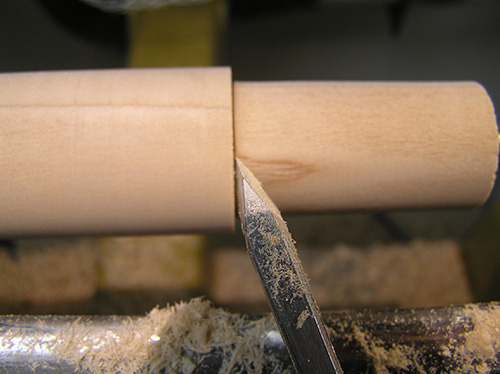
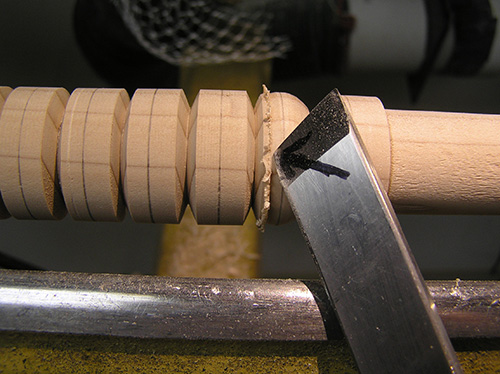
V-groove Cut
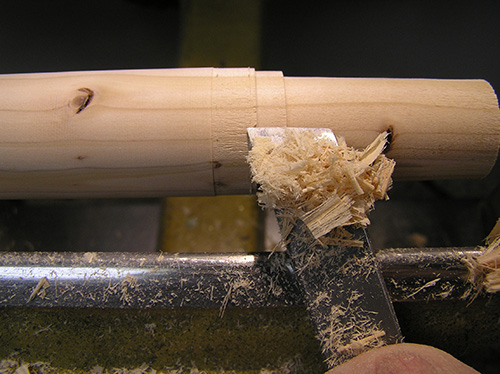
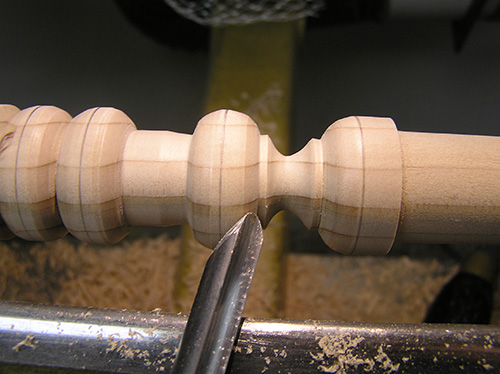
The V-groove is a useful visual detail on spindles. It is also the first step needed before forming a bead. The V-groove is made using only the long point of the skew (Figure 2). The tool’s bevel does not contact the wood. Start with the handle low, position the long point down on the toolrest, aim it in the direction of cut, and enter the wood. As you cut, rotate the tool very slightly to provide clearance between the cutting edge and the just-cut surface and lift the handle straight up to swing the long point deeper into the wood.
One challenge beginners have with this cut is that they want to push the tool forward into the blank instead of pivoting the point into the wood by lifting the handle. Beginners also want to swing the hand left to right, when the handle just needs to be lifted straight up. It’s also important to move your body to the left or right before the start of the cut, so you can see the tool’s point going in the desired direction.
This is a 1-2 dance step. When teaching beginners, I have them make exaggerated movements by counting out loud, “1-2,” as they step left or right by a foot or so to get their body into position. When you make a proper V-groove cut with just the long point, you will end up with a circular chip that will often pop off the blank straight up into the air.
Paring Cut
The paring cut is very similar to the V-groove, except the direction of the cut is 90° to the wood, or straight into the blank. This is used for cleaning up endgrain on spindle work or to refine tenon shoulders; on boxes, you could use a paring cut to clean up the joint lines between box and top. The process is the same: start with the tool handle low, aim the bevel 90° to the surface you want to clean up, lift the handle until the long point enters the wood, and rotate the handle slightly to provide clearance. Raise the handle straight up to pivot the long point farther into the wood.
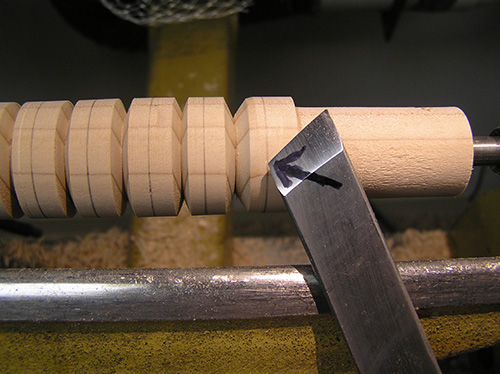
Bead Cut
There are two methods for cutting beads with a skew: short point only and edge slicing. I suggest beginners use the point only method, as it is less prone to catches that can result in the tool spiraling out of control down the workpiece. Once you have mastered this basic cut, then try rolling beads with an edge-slicing cut.
One challenge beginners have forming beads with a skew is that they don’t move the tool handle properly to swing the short point through a complete arc to cut a nice round bead. Think of the multiple, perfectly timed, steps required when making a turn from a stop light on a hill with a manual-shift car: you have to remove your foot from the brake, press on the gas, let off on the clutch, and turn the steering wheel at just the right moments. When cutting a bead with a skew chisel, you need to rotate and lift the handle with coordinated timing and, if the bead is large enough, slide the tool along the toolrest.

To help visualize these movements, think of your hand position when shaking hands. When rolling a bead with a skew, you want to endthe cut in the normal hand-shaking position. If you are cutting the right side of a bead, prepare to cut by twisting your hand counterclockwise 90° and positioning the tool flat at the top of the bead.
With the skew’s short point engaged, roll the tool to the right by twisting clockwise as you lift the handle. You should end the cut with your hand in the shaking position and the tool’s cutting edge vertical. When cutting the left side of a bead, simply reverse these directions. Prepare by twisting your hand 90° clockwise, position the tool at the top of the bead, engage the short point, and roll the tool counterclockwise to the normal hand-shaking position.
Beads are typically formed between two V-grooves. Anchor the tool on the toolrest with the handle low. Swing it so the short point is aimed in the direction of cut. Raise the handle until the point enters the wood and raises a curl.
Sweep the cutting tip through the desired arc while rotating the tool handle. The cutting edge starts horizontal and ends vertical. Make the necessary number of light cuts to remove wood until the final bead is cut.
Shallow Concave Cut
Shallow concave cuts are straightforward with a skew. They are edge-slicing cuts, just like planing cuts except you direct the tool to cut a shallow concave shape. This is useful when making tool handles or for turning balusters and furniture parts.
Practice Exercises for the Skew
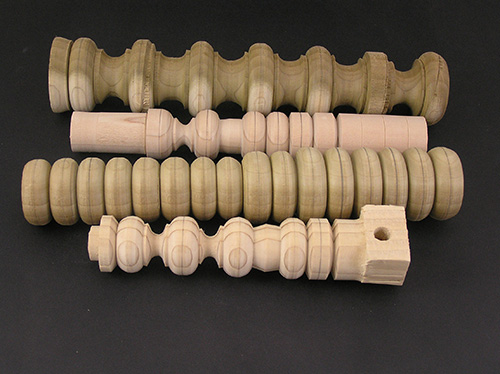
The best blanks for practicing skew cuts are 2″- (5cm-) diameter green (unseasoned) branch wood or 2″ × 2″ pine blanks about 10″ (25cm) long. Green wood is ideal because you can probably find plenty of it at no charge and it cuts more easily than dried wood. Don’t try to learn the skew with expensive exotics or hardwoods. Once you have mastered the tool with green wood and pine, then apply your skills to progressively harder woods—poplar, cherry, maple, then oak. The harder woods will necessitate lighter and slower cuts.
Mount practice blanks between centers using a cup drive or a safety drive in the headstock. These will allow some slippage when you get a catch, whereas a four-pronged drive center will not. It is easiest to use a spindle-roughing gouge to prepare a rough cylinder, then proceed to the exercises below. I recommend practicing each exercise with a series of twelve blanks each.
Exercise 1: Planing and Peeling
Plane a cylinder smooth with the skew five to ten times.
Peel cut the cylinder to 3/4″ (19mm) diameter, stepping down the length of the blank.
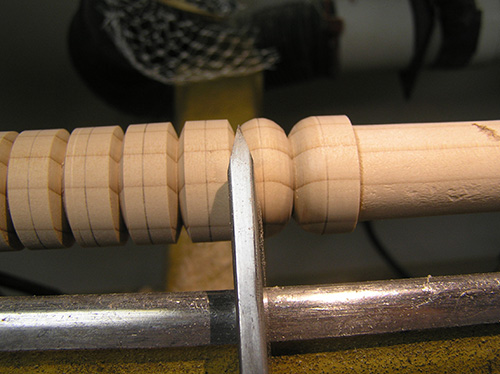
Exercise 2: V-grooves and Beads
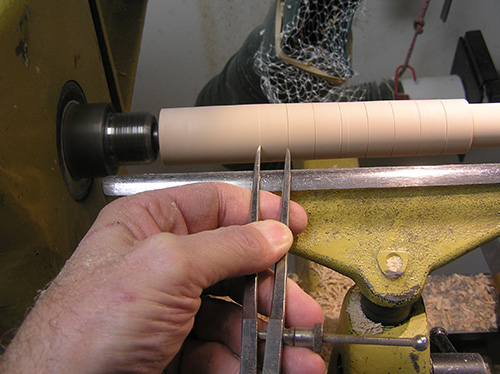
Plane a cylinder smooth with the skew, and mark out 5/8″ (16mm) intervals with a ruler and pencil or with dividers.
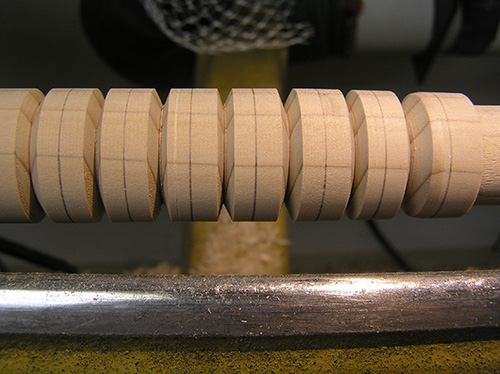
Form V-grooves at every mark about 1/4″ (6mm) deep, then mark centerlines between all the V-grooves.

Roll beads with the goal of leaving the marked centerline at the top of the beads and ending with the tool’s cutting edge vertical and your hand in the handshake position.
Exercise 3: Beads and Coves
Start as you did in Exercise 2: plane a cylinder smooth with the skew, and mark out 5/8″ (16mm) intervals with a ruler and pencil or with dividers. Form V-grooves at every mark about 1/4″ (6mm) deep, then mark centerlines between all the V-grooves. After rolling beads as you did in Exercise 2, turn away every other bead using a peeling cut.
Form coves with a spindle gouge between the remaining beads, leaving a short fillet (flat area) between the cove and bead. Note that although the skew can do well to form long, shallow coves (concave shapes), it does not excel at the short, deeper coves recommended in this exercise.
With more than 40 years’ experience in custom woodturning, writing, demonstrating, and teaching, Jim Echter specializes in spindle turning and makes products for spinners and fiber artists around the world. He is well known for his custom and architectural restoration work. Jim was the founding president of the Finger Lakes Woodturners Association, an AAW chapter. For more, visit tcturning.com.


