This article, “Tips for Turning Figured Woods” is from the pages of American Woodturner and is brought to you by the America Association of Woodturners (AAW) in partnership with Woodworker’s Journal.
I enjoy turning large platters from highly figured woods. Highly figured woods are beautiful, but they present special challenges for woodturners. They tear out readily and ripple if sanded excessively. In this article, I will explain how to cut highly figured woods successfully — to turn them absolutely smooth and tearout-free right off the tool. This reduces the need for sanding and thereby avoids rippling, resulting in gallery-quality woodturnings.
A Challenging Material
The figure in wood is created by irregular wood fibers. Think of wood fibers as a bundle of tiny cellulose straws. In straight-grained woods, the straws are arranged together in straight lines, hence the name straight-grained. But in figured woods, the cellulose straws grow in irregular patterns. The more irregular the patterns, the more figured the wood. The sides of the cellulose straws appear lighter and more reflective, while their open ends appear darker, creating beautiful patterns of light and dark.
As woodturners, we know that cutting into sidegrain (the sides of the straws) is easy, but cutting into endgrain (the ends of the straws) is more difficult and often produces tearout. As figured wood turns on the lathe, we are continuously cutting into a mixture of side- and endgrain fibers. Without specialized techniques, tearout is inevitable.
More sanding is not the answer. Excessive sanding on highly figure woods creates ripples because sidegrain and endgrain are intermixed, and the sidegrain abrades much more rapidly.
Ready Your Tools
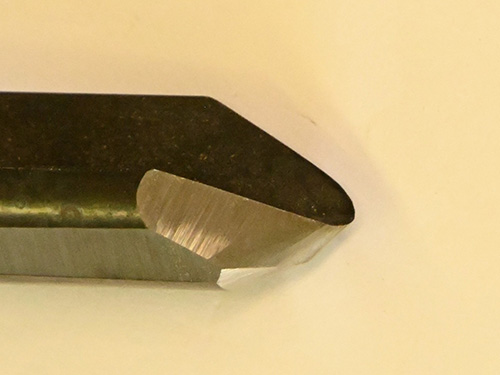
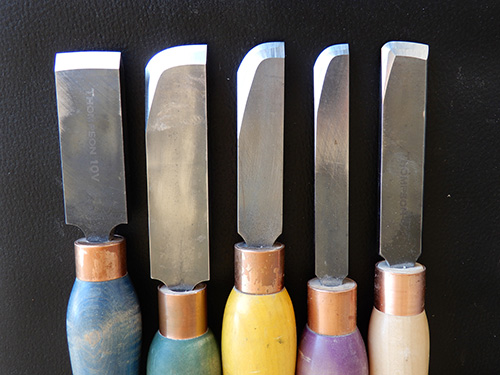
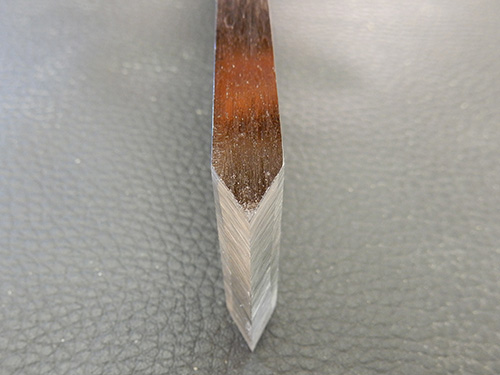
For most of my woodturning, I use gouges with cutting edges ground at about 40 degrees. On straight-grained woods, these gouges cut fast and clean. But on highly figured woods, the 40-degree cutting edge tends to get under the irregular fibers of dry wood and tear them out. If the gouge is sharpened with a 55-degree bevel, however, it has far less tendency to get under the irregular endgrain fibers. So for finishing cuts on highly figured woods, I prefer a gouge sharpened at 55 degrees.
A dull gouge with a 55-degree bevel will hardly cut at all, but a very sharp gouge will cut like a dream. Dull tools always cause tearout, always! So keep your tools sharp. For finishing cuts on dry wood, I prefer a gouge with a U-shaped flute. Why? The U flute is broader at the bottom, and if the wings are not swept back, the nose of the tool has a longer, straighter cutting edge. If the gouge is presented to the workpiece with the bevel rubbing and the cutting edge held almost parallel to the direction of travel of the spinning wood, the cutting edge slices the wood fibers smoothly and beautifully, minimizing tearout and producing fine, hair-like shavings.
For years, I used tools made of M2 steel, which is a wonderful, conventional high-speed steel. But in recent years, I have upgraded to tools made of particle metal. I prefer them because the cutting edge of a particle-metal tool is richly supplied with tiny, uniformly distributed, carbides. There are many excellent particle metals. My personal preference is CPM 10V (an A11 metal), which contains almost 10% vanadium. Vanadium carbides are particularly hard and abrasion-resistant, which is why tools rich in vanadium stay sharp longer. For finishing cuts, I sharpen with a 600- grit Cubic Boron Nitride (CBN) wheel. It gets particle-metal tools wonderfully sharp, so they cut highly figured woods cleanly and stay sharp longer.
Sharp Tools = Better Results
Keeping tools very sharp is fundamental to success when turning highly figured woods. To get the best results, take advantage of the technology improvements in both tool steels and grinders. Consider upgrading your tools to particle-metal. They offer significant advantages over conventional tools.
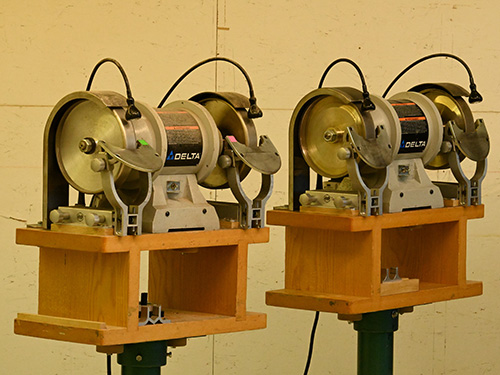
I grind and sharpen my tools on two low-speed 8″ (20cm) grinders, each fitted with two CBN wheels. One grinder has an 80-grit wheel for rough-shaping tools and a 180-grit wheel for sharpening negative-rake scrapers. The other grinder has a 350-grit wheel for sharpening gouges used for rough-shaping platters and bowls and a 600-grit wheel for sharpening gouges used for finishing cuts. Consider replacing your old wheels with CBN as soon as your budget allows it. You’ll be amazed at how much better they are.
Your grinder setup should invite you to sharpen frequently. The necessity to fiddle with anything on a grinder is a disincentive to grinding. My platforms are always set at the correct angles for my gouges and scrapers, and I never move the platforms. I can quickly regrind every tool and be back at the lathe in just seconds.
Two-step Turning Process
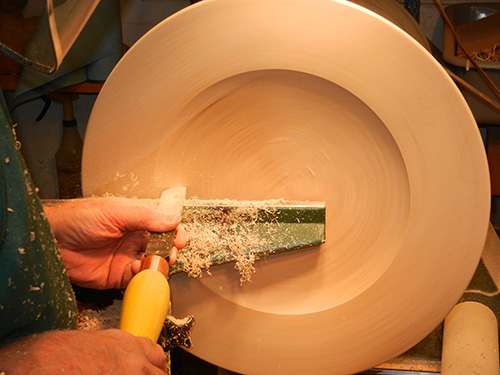
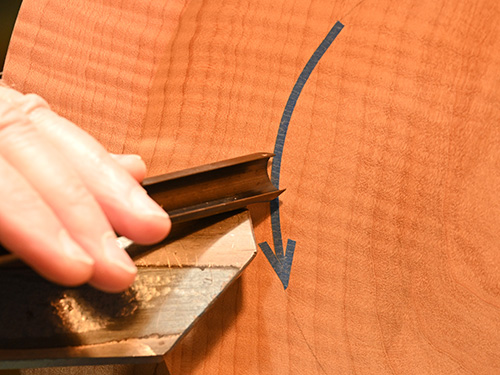
I advocate using a two-step turning process. I remove 99% of the wood with my gouges, but before sanding, I smooth and refine every square millimeter of the surface with negative-rake scrapers. These tools can smooth curves, crisp-up transitions, and remove every vestige of tearout, getting the workpiece “perfect” before any sanding commences. Negative-rake scrapers are particularly effective on dry highly figured woods.
You might be wondering…If the surface is “perfect,” why sand at all? Under magnification, the burr on the cutting edge of a freshly sharpened NRS looks like sandpaper. It smooths the wood beautifully but inevitably leaves a pattern of fine scratches. Light sanding removes these scratches and prepares the workpiece for a gallery-quality finish. I hand-sand, usually beginning with 220-grit sandpaper, progressing through 400 grit, and ending with a very slightly dampened 500-grit Abralon pad. This process removes all of the fine scratches left by the NRS.
Negative-Rake Scrapers
Unlike traditional scrapers, negative-rake scrapers have a bevel on both the top and bottom, ground to the same angle. You can customize their edge profiles to match the surfaces of your workpiece.
A negative-rake scraper need not be heavy. Since effective scraping requires a very delicate touch, I prefer a lightweight tool. And since it is a finishing tool, it should be “floated” delicately across the wood with almost no forward pressure on the tool. It should not be used to remove much wood, but instead only to smooth the surface. Used correctly, a negative-rake scraper produces fine, hair-like shavings, not dust.
At the Grinder
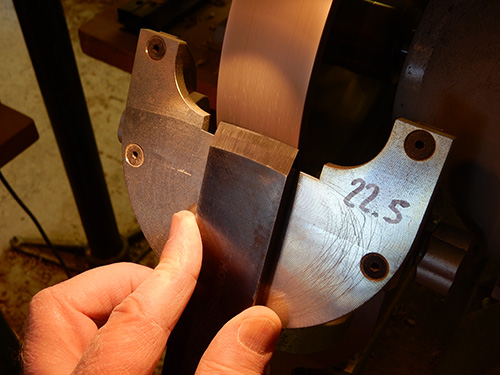
I set my grinding platform at 22.5 degrees so, after grinding both sides, the included angle at the cutting edge is 45 degrees.
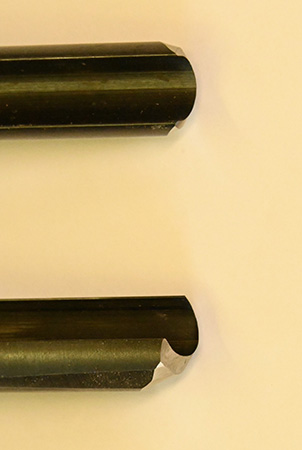
As the scraper is ground, a burr forms on the upper side of the grind, and in use, the scraper is held horizontally on the toolrest, burr-side up. Feel the upper edge of the tool as it comes off the grinder to make sure it has a good burr. When the burr is gone, the tool must be resharpened immediately, as the burr is the only part of the scraper that cuts. When the burr has worn away, the tool is dull and will do more harm than good. But when a freshly sharpened negative-rake scraper is used correctly, it is very effective in removing tearout on figured woods.
In Summary
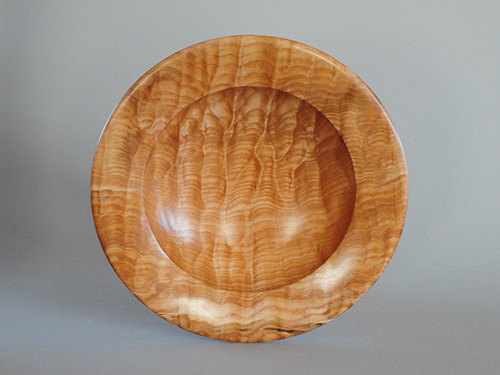
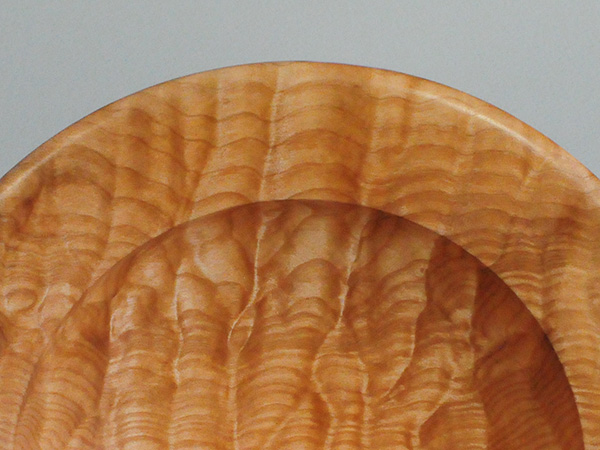
2012, 13-3/4″ (35cm) diameter.
Twisted grain is challenging to turn well, but using proper techniques, beautiful results are achievable.
Keep your tools very sharp. A dull tool will always tear the wood, and heavily sanding figured woods may cause a different problem—rippling. Take advantage of new technologies by using particle-metal tools sharpened on CBN wheels.
When making finishing cuts on highly figured woods, choose a gouge with a U-shaped flute, ground to a 55-degree bevel. Then smooth and refine the entire surface of the workpiece with negative-rake scrapers, getting everything “perfect” right off the tool before sanding. Sand lightly but thoroughly before applying a finish.
Tom Wirsing is a physicist, woodturner, furniture maker, and a former AAW Board member and president. A past president of the Front Range Woodturners (Denver), Tom lives on a ranch in the foothills of the Colorado Rocky Mountains, where he turns wood, builds furniture, and grazes Angus cattle. For more, visit thomaswirsing.com.


