This article, “Turn a Better Mallet,” by Janet A. Collins, is from the pages of American Woodturner and is brought to you by the America Association of Woodturners (AAW) in partnership with Woodworker’s Journal.
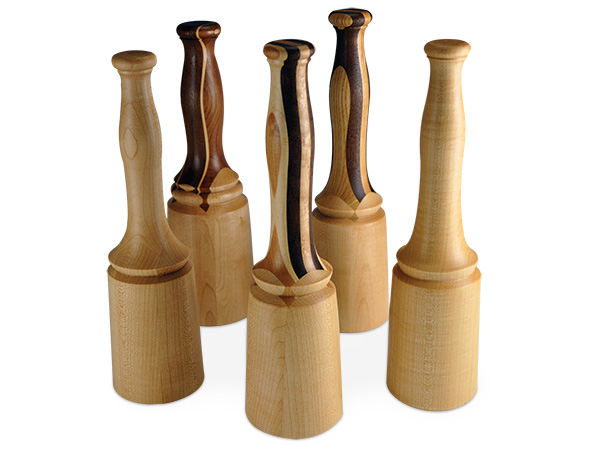
Designing a mallet offers opportunities to include beads, coves, and straight tapers, or any number of elements, which makes turning a mallet a great exercise to challenge and improve spindle-turning skills. The result will be a useful tool for woodturning and general woodworking.
Design Your Mallet
Possibly the most common approach to turning a mallet is to start with a 3″ × 3″ × 12″ (8cm × 8cm × 30cm) block of seasoned or kiln-dried wood. Woods with interlocking grain, such as apple, dogwood, or lignum vitae, are traditional choices but can be difficult to obtain; hard maple or ash are my usual choices.
The laminated blank is where the “better mallet” comes in (see A Laminated Mallet Blank sidebar). Wooden baseball bats are labeled on the weakest (flat-sawn) grain so the batter knows to hold the bat with the label up or down, striking the ball with the stronger quarter-sawn grain. The growth rings in flat-sawn stock can separate with repeated impact, whereas quarter-sawn grain will not separate.
Either method described here will produce a great mallet and will give you the opportunity to practice spindle turning and copying a pattern. The ideal blank is free of defects, but small knots at one end of the blank can be consigned to the handle end, as they may be turned away. The ends should be approximately square. I find and mark the centers of both ends with an awl before mounting on the lathe.
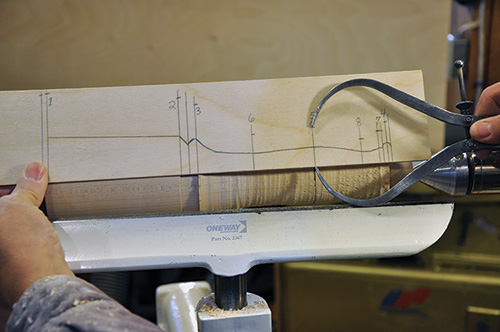
I like to plan out my design on paper and then transfer my drawing onto 1/4″ (6mm) plywood with the centerline of the pattern placed on the edge of the plywood. The critical dimensions and transition points are marked with a line squared from the edge and the finished diameter marked on this line. This simplifies transferring measurements to calipers as well as the transition marks to the mallet blank. My pattern creates a mallet that suits my hand, but is easily altered to fit the hand of the final owner. For the best ergonomics, I recommend offsetting the rise to the largest diameter of the handle slightly closer to the end. My experience has also been that a handle with a smaller diameter than the one I show here is at risk of breaking during use, and the head-to-handle junction is the point of greatest stress.
True the Blank
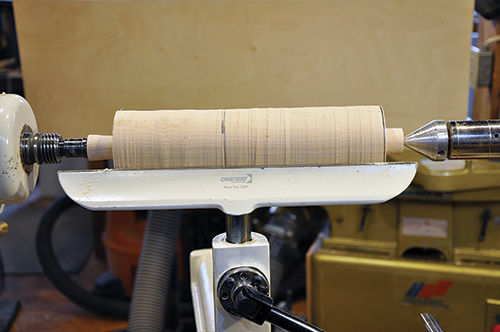
With preparations complete, the blank is mounted between centers on the lathe, with the head of the mallet positioned toward the headstock. This arrangement offers the best support for the heavy head of the mallet.
I use three tools for this project: a 3/4″ (19mm) spindle-roughing gouge with a 45° bevel, a 1/8″ (3mm) parting tool with a 25° angle on each side of the tip, and a 3/8″ (10mm) spindle gouge with a 35° bevel and swept-back sides.
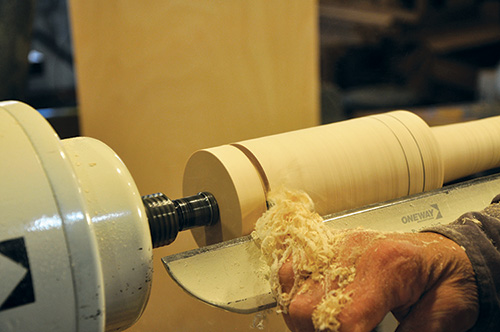
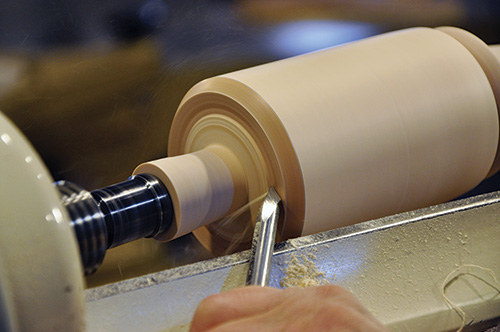
The first step in turning the mallet is to create a cylinder out of the blank using the spindle-roughing gouge. The tool rides the bevel on the wood just behind the cut, with the toolrest supporting the tool just behind the bevel. I approach the spinning wood with the tool on the toolrest and the handle almost vertical, and then raise the handle to present the cutting edge to the wood. When shavings appear, I hold the handle at this cutting angle and begin moving the tool to the left or right. This approach is useful in spindle turning with any tool; enter the cut by raising the handle from vertical and exit the cut by dropping the handle back to vertical.
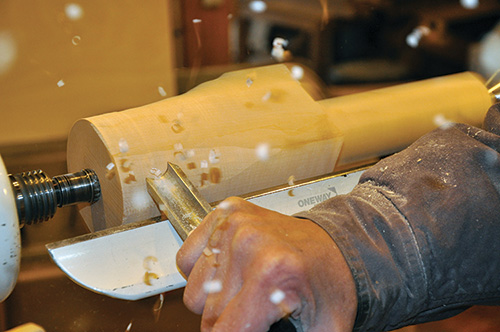
With the roughing gouge, it is easiest to start the cut about 1″ (25mm) from one end and cut towards the closest end of the blank. The next cut starts another inch nearer the center and moves towards the same end of the blank. This approach cuts in manageable amounts and in a direction that has already been cut, which is easier than starting the cut in the middle. Using this technique, I rough the entire blank to a cylinder approximately 3″ in diameter. With the laminated blank, the portion of the handle nearest the head can be left slightly square to be turned to final shape later.
A Laminated Mallet Blank
A mallet made from a single piece of flat-sawn wood has an increased chance of failure because the growth rings in the sidegrain area can come apart with repeated impact. An “ideal” mallet would always present quarter-sawn grain around the full 360 degrees of its striking face, an impossible attribute in a single block of natural wood.
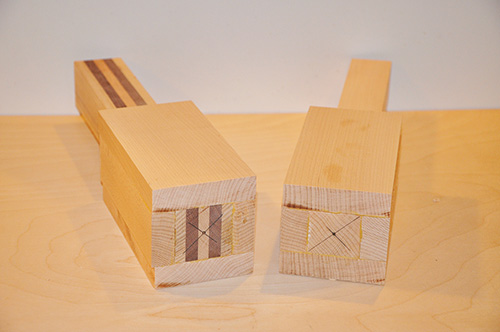
It is possible, however, to create a laminated blank that shows quarter-sawn grain around its entire circumference. Laminating a blank also offers creative opportunities to pair contrasting species of wood, as shown in this article’s lead photo.
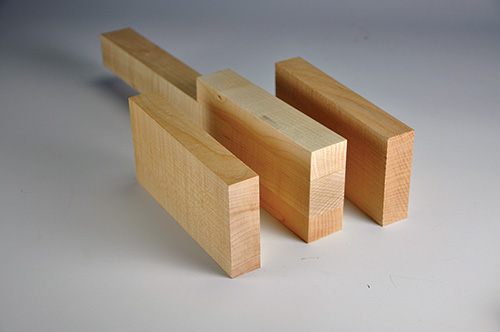
Quarter-sawn hardwoods are usually more expensive than flat-sawn material. Because little material is needed for this project, enough wood can often be cut from larger pieces of flat-sawn boards to make the mallet. I usually start with 12/4 rough maple or ash with the appropriate grain characteristics and cut and mill the pieces I need for this project.

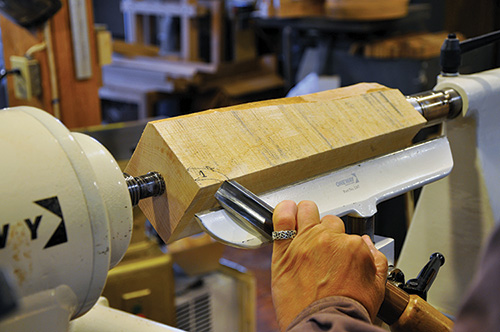
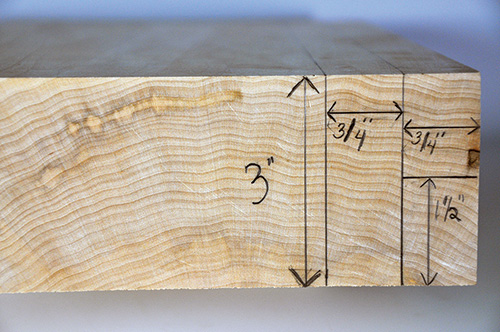
I start with a 1-1/2″ × 1-1/2″ × 13″ (4cm × 4cm × 33cm) handle core with all four faces milled smooth and parallel. Four pieces of milled quarter-sawn timber comprise the head (Photo c); two pieces are 6″ × 3″ × 3/4″ (15cm × 8cm × 19mm), and two are 6″ × 1-1/2″ × 3/4″. The four head pieces are glued and clamped to the handle core to make a 3″ × 3″ × 13″ blank.
The joints must be tight to ensure the mallet will not fall apart during use, or worse, during turning. I wait a full twenty-four hours after glue-up before turning to ensure the adhesive has achieved full bonding strength. Once the blank is ready, turning proceeds as for the solid-wood (non-laminated) blank.
Define the Features, Shape the Head
I transfer my design from the pattern, including marking each end of the head of the mallet and the transition between the head and the handle. The top of the head is closest to the headstock, while the bottom will join with the handle.
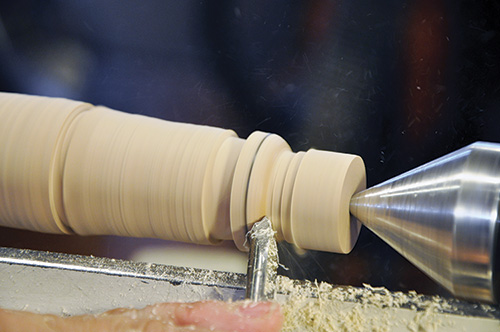
Using the parting tool, reduce the diameter at both ends of the mallet blank to about 1″. This establishes the length of the mallet.
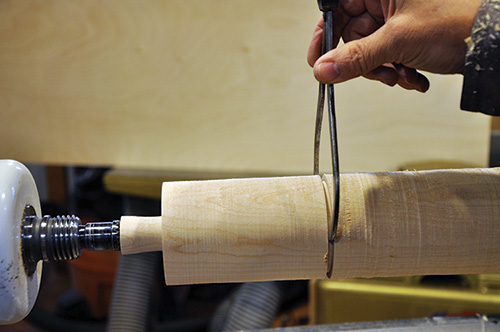
I use calipers and a parting tool to establish the diameter of the top and the slightly smaller bottom of the mallet head. The top of the mallet may already be 3″ in diameter and may not need to be reduced.
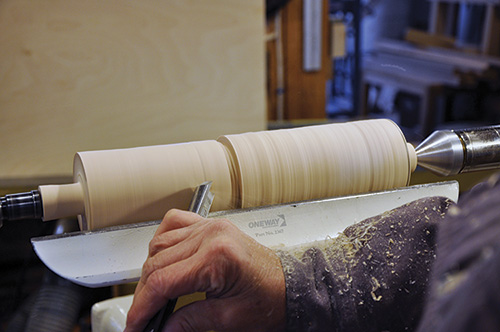
I use the roughing gouge to bring the handle down to a diameter about 1/4″ smaller than the head of the mallet to provide clearance to further shape the head. I also use the roughing gouge to taper the head from the top to bottom, cutting from large-to-small diameter to avoid grain tearout.
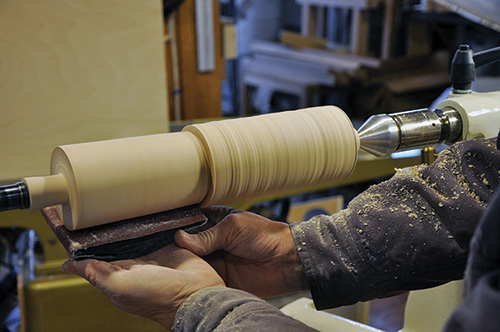
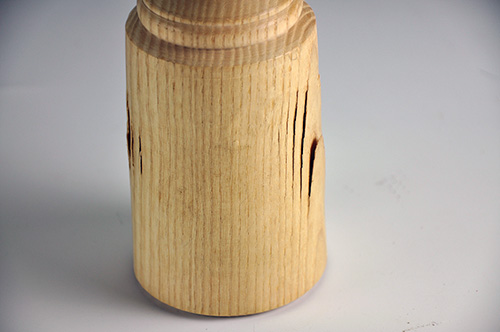
This will be the striking face of the head and it should be a smooth, continuous line. Once I have cut this surface as uniformly as I can with the roughing gouge, I follow up with a hardwood sanding block to ensure it is straight and flat.
Shape the Handle
Waste material from the handle can be quickly removed with the spindle-roughing gouge, maintaining a diameter slightly larger than the final dimension. I set my calipers to the diameter of the end of the mallet handle, where there is a bead the same diameter as the largest part of the handle. I mark the transition points on the handle using the pattern for reference and part down to the bead diameter and largest diameter of the handle. I then part down on either side of the bead to create space to roll the bead.
To create the final shape of the handle, I use a 3/8″ spindle gouge and start with the bead at the handle’s end. The swept-back sides of my spindle gouge allow me to turn beads easily, as the tool tip reaches the bottom of the curve without the sides contacting the wood on either side of the tool.
To encourage a symmetrical bead, I draw a line at the center of that feature. When the bead is complete, the centerline should still be there, leaving the bead slightly flat at the center. Without this flat spot, the bead will be pointed rather than round.
Starting with the right side of the bead, I place the tool against the rest with the flute open (facing straight up, or 12 o’clock, and just to the right of the center line). I lift the handle to start the cut, and once shavings indicate the bevel is on the wood, I rotate the tool, using wrist action only, to the bottom of the parting tool cut. When I finish the cut, the flute will be facing to the right, or the 3 o’clock position. There is also a subtle movement of the spindle gouge in the wrist rotation that requires a slight lifting of the handle toward the end of the arc. The center of the bevel is the only part of the tool used to create the bead. I think of the center of the bevel as the pencil that is drawing the curve; it needs to stay on the wood in order to draw the curve. Turning the left side of the bead uses the same motions, but ends with the flute facing left, at the 9 o’clock position.
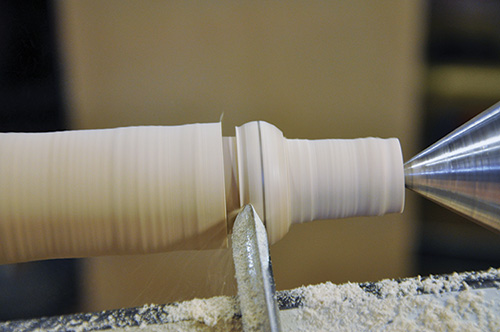
All of the design elements from the head transition and the handle are turned with the 3/8″ spindle gouge. The transition between the head and the handle incorporates a chamfer (a straight, angled cut descending from the mallet head) and a half bead. To enter the chamfer cut, the flute faces 3 o’clock and the handle is almost horizontal on the toolrest. The presentation of the tool to the wood is approximately 45°, the same angle that the chamfer will be. The half bead uses the same technique described for the bead at the end of the handle.

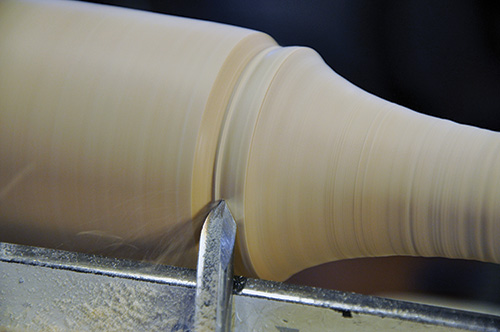
The cove starts at the top of the half bead and descends to the smallest diameter of the handle. The opposite side of this cove is turned from the largest diameter of the handle down to the smallest diameter. The section between the bead at the end and the largest diameter of the handle is also a cove and requires the same technique.
Coves start with the flute facing either 3 o’clock (cutting toward the right) or 9 o’clock (cutting toward the left) and end with the flute facing 12 o’clock at the bottom of the cove. To start the cove at the end of the mallet handle, place the spindle gouge approximately 1/8″ from the left side of the bead with the flute facing to the left, or 9 o’clock, and the tool handle horizontal. If the center of the tool starts cutting at the center of the wood, the tool is less likely to skate out of the cut and damage the bead. Once the tool is cutting, it can be rotated so the flute is at about 11 o’clock and brought down the slope of the cove shape, stopping at the bottom of the cove. Continuing the cut up the slope of the adjacent side of the cove will tear the grain. To cut the other side of the cove, start with the flute in the 3 o’clock position and cut to the bottom of the cove with the flute facing 1-to-2 o’clock. At this point, the handle should fit your hand and the final shaping and smoothing is done with abrasives. Start with a grit that will efficiently remove any ridges or bumps and work through 220 grit.
Complete the Head and Finish
I cut a chamfer on the top of the head to match the chamfer at the handle transition. A mallet often stands on its head on the bench when not in use, so the top should be slightly concave so the mallet will stand steadily. To cleanly cut the endgrain, make several light cuts with the spindle gouge, working from largest-to-smallest diameter. With the head tooling completed, finish with a round of sanding before parting off.
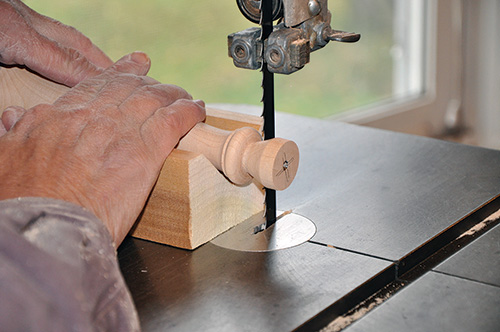
I part off the mallet at the headstock, gently supporting the mallet head with my left hand while making the final light cuts with the tool in my right hand. It is also possible to remove the spigot with the form off the lathe using a carving knife or chisel. The spigot at the handle end will have to be removed off the lathe with the assistance of a handsaw, knife, or chisel. The spigot can also be removed on the bandsaw with a v-block jig firmly holding the round mallet. A few strokes with abrasives will clean up the spigot attachment points.
The mallet can be finished on or off the lathe with any type of oil finish, or it can be left unfinished. My preference is a beeswax and oil finish.
Janet A. Collins has been a furniture maker, woodturner, and teacher since graduating from the North Bennet Street School furnituremaking program in the mid-1990s. Her shop is located in a barn at her home in Ryegate, Vermont, and she teaches woodworking full time at Dartmouth College in Hanover, New Hampshire. Janet’s work can be seen at greenmountainwoodturning.com.


