This article, “Turn a Carving Mallet,” is from the pages of American Woodturner and is brought to you by the America Association of Woodturners (AAW) in partnership with Woodworker’s Journal.
Recently, I was looking for my dead-blow hammer, and when I couldn’t find it, I picked up my woodcarver’s mallet and used it to set a spur drive into the end of a spindle blank. The carving mallet is an indispensable tool for a woodcarver. It is
better balanced than a hammer and won’t “mushroom” the end of your chisel handles. It occurred to me that this would be a good project for teaching and practicing spindle turning skills. Here, I describe the process of making a woodcarver’s mallet using three tools: a spindle-roughing gouge, a parting tool, and a skew chisel.
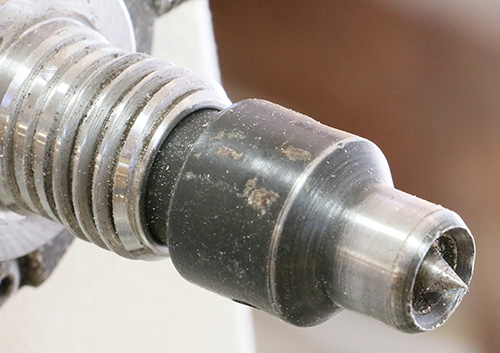
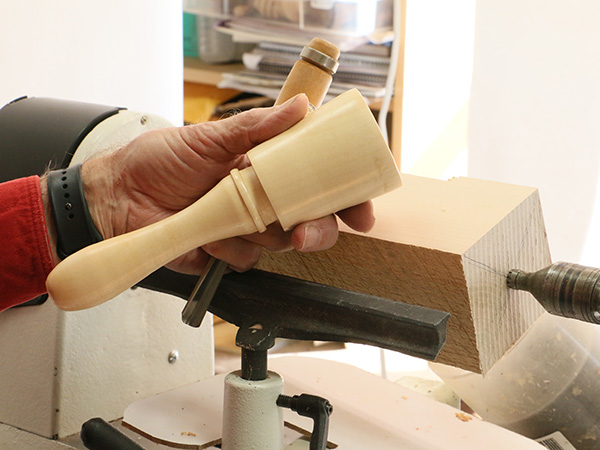
Start with a blank 3″ (8cm) square and 9″ (23cm) long. Mount the wood between centers. If you are just learning to use a skew chisel, I suggest a medium-density hardwood like cherry or soft maple. And if you are new to spindle turning, you might want to use a safety, or cup, drive center like the one shown. This allows the wood to “slip” in the drive if you get a catch. You can regulate the amount of pressure on the safety drive using the tailstock. A safety drive encourages you to use a light touch when using the skew.
Rough It Round
The first step is to round off the edges using a spindle-roughing gouge. This tool is formed from a flat blank of steel, and it has a formed tang mounted in a handle. The flute has a semi-circular profile. The cutting edge is perpendicular to the flute, and the bevel is most often sharpened at a 35- to 45-degree angle, straight across.
There are many different sizes of roughing gouges. Shown in this article is a 1″ (25mm) gouge, meaning the flute is 1″ wide. This tool should be used only for spindle turning, where the wood grain is running parallel to the lathe bed. Never use it on a crossgrain bowl because the broad cutting edge can grab into the endgrain and cause a bad catch. Also, the metal tang inside the handle is relatively short and might not withstand the forces of a catch in endgrain.
Set the toolrest to the same height as the tailstock live center and check to see that the corners of the blank clear the toolrest when rotated by hand. Check again to see that the tailstock is firmly secured and the blank is held tightly between the drive and live centers. I set the lathe speed to about 800 to 1000 rpm; if you have an electronic variable speed lathe, start it at the lowest setting and bring it up to speed gradually.
A good habit for new turners is to use the ABC approach to turning: A stands. for Anchoring the tool on the toolrest; B is for riding the Bevel on the wood; and C stands for raising the handle to pick up the Cut. In short, Anchor – Bevel – Cut.
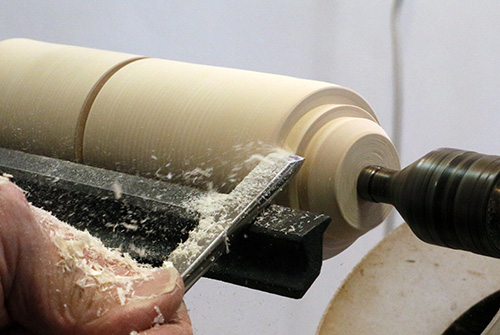
Anchor the tool by placing it firmly on the toolrest with the handle down and bevel of the gouge not touching the wood. Raise the handle so that the bevel bounces on the corners of the blank as it spins. Then pull the tool back a bit and raise the handle until the edge of the tool starts to cut the wood. With the cutting edge engaged, you can move the tool to the left or right to pare away the corners. This is called roughing the blank round.

There are several ways to hold a roughing gouge. I am right-handed, so I hold the gouge handle in my right hand. My left hand has an underhanded grip, with my index finger running along the front of the toolrest. When cutting, I move my whole body to the right and left, keeping the orientation of the tool consistent as it moves across the toolrest.
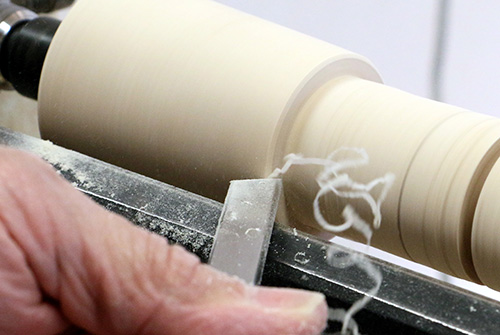
The round shape of the roughing gouge provides different opportunities for cutting angles. Held 90 degrees to the blank, straight on, the cutting action is like peeling the wood from the blank. The cutting edge is going to cut a groove as you move it across the surface, cutting directly through the surface of the wood fibers.
Positioning the handle to the left or right, at an angle of 45 degrees to the blank, will provide a different cutting action, shearing the wood fibers as it moves across the surface. The cut can be made in either direction, to the left or right, but strive to keep the bevel on the wood.
I generally begin with the straight-on peeling cut to remove the sharp corners and then change to a planing cut by angling the handle in the direction of the cut. Now the cutting edge contacts the wood at an angle and shears the fibers as it travels across the blank, leaving a smoother finish than the peeling cut.
Mark Blank
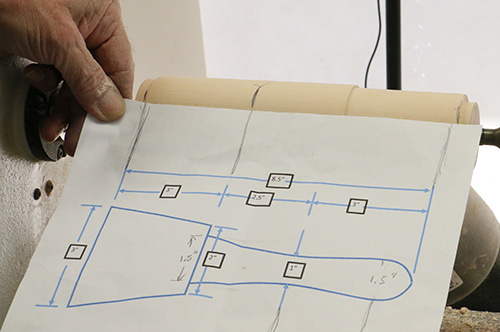
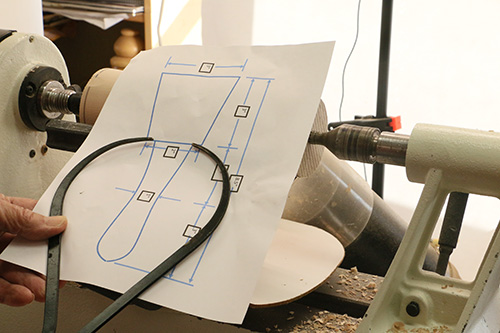
After roughing the blank round, mark the dimensions of the mallet parts on the blank. This can be done by eye, using a ruler, or by transferring the layout from the dimensions shown in the drawing. You can download a full-sized drawing as a PDF.
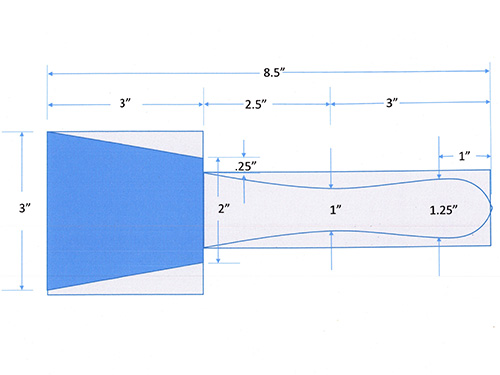
Printed at full size, this drawing makes it easy to mark the lengths of the mallet head and handle on the wood. As shown in the drawing, this mallet comprises a shaped 3″ × 3″ (8cm × 8cm) head and a 1-1/2″ × 5-1/2″ (38mm × 14cm) handle.
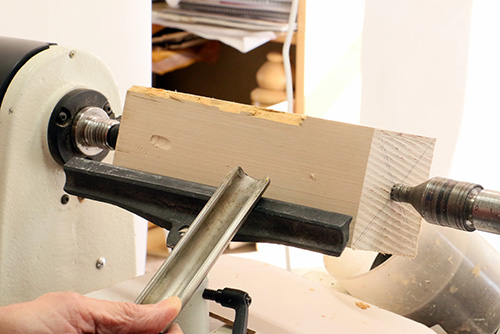
Rough Out Handle
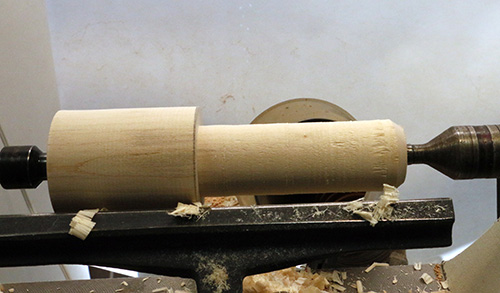
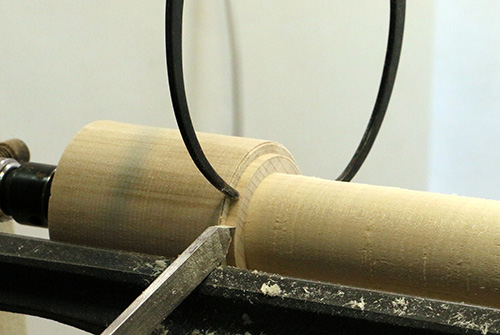
Begin by removing the waste wood just below the mallet head, down to the largest diameter of the handle. Set a caliper to 1-1/2″, and use a parting tool to cut a groove between the mallet head and the handle. Then make a second groove at the end of the handle 1-1/2″ in diameter.
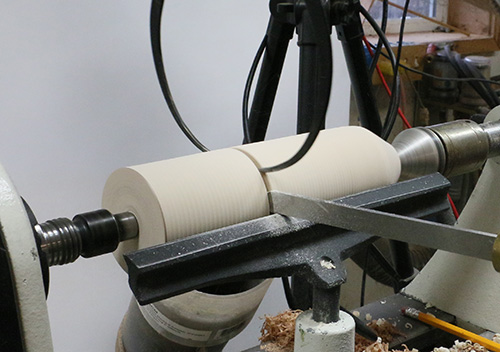
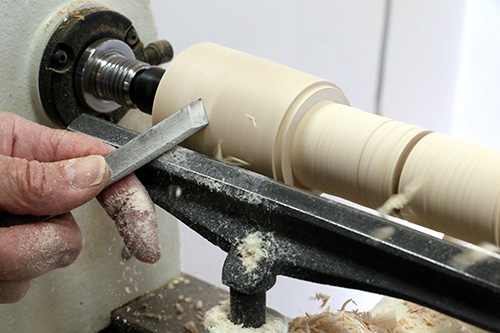
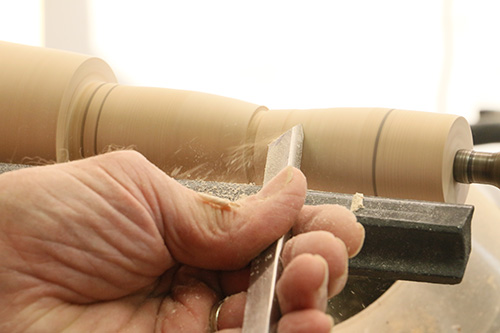
The handle diameter never exceeds 1-1/2″, so the handle, from the mallet head to the end of the blank, can be roughed to that diameter. A skew is a good tool for this job. The skew is basically a knife at the end of a blank of steel.
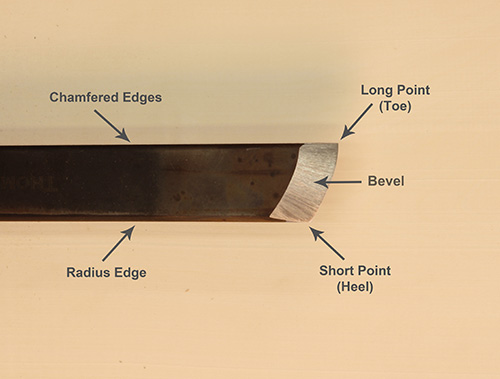
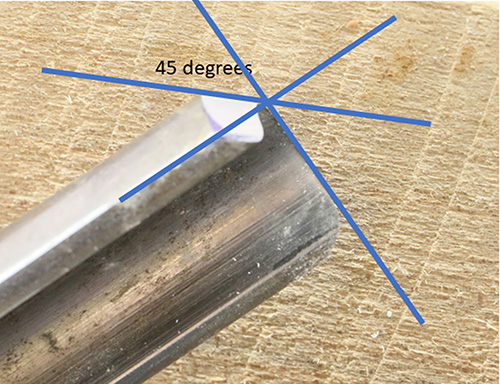
The size of a skew is noted by the width of the steel blank, so a 1″ skew is 1″ wide, and 1/8″ to 3⁄16″ (3mm to 5mm) thick. There are two bevels, one on each side of the cutting edge. If the platform of the grinder is set to 25 degrees, the included angle between the bevels will be 40 degrees, which works well for most purposes.
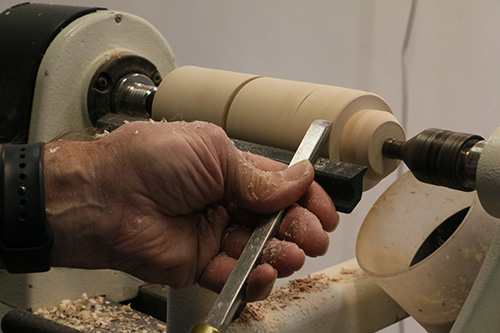
The mallet handle can be roughed to dimension by making a peeling cut with the skew. Anchor the tool flat on the toolrest with the cutting edge parallel to the wood blank. With the handle down, rub the bevel on the wood, then raise the handle to start the cut and “peel” the wood from the blank.
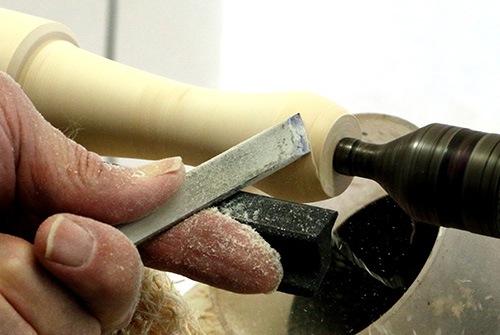
Do not engage the full width of the cutting edge in the wood at first. Start by peeling a 1/4″ (6mm) width from the blank until you get the feel of it, then widen the cut if the tool is cutting well.
Peel down about 1/2″ (13mm) deep and repeat this cut as you move toward the headstock until you reach the bottom of the mallet head. Then go back to the tailstock end of the handle and repeat until you have reached the desired dimension.
Taper Mallet Head
A peeling cut can remove wood rapidly, but it leaves a rough surface on the wood. To achieve a better surface, I use a planing cut with the skew, which slices the fibers as it moves across the wood, leaving a nice smooth surface. Anchor the skew on the toolrest so that the cutting edge is at a 45-degree angle to the wood.
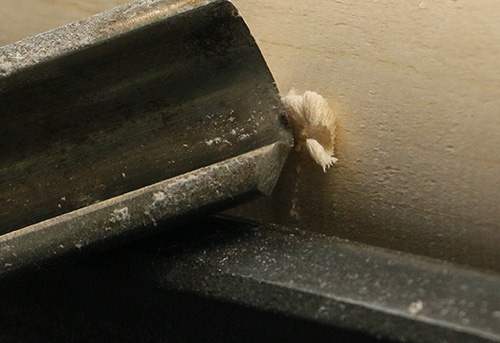
The bevel contacts the wood with the heel (short point) down and the toe (long point) up, but the cutting edge is still not engaged. To do this, the skew no longer sits flat on the toolrest, but is twisted slightly so the bevel rides on the wood. The bevel should be contacting the wood between the center and the heel. To pick up the cut, raise the handle slightly. As soon as the edge begins to cut, maintain bevel contact with the wood and move the skew in the direction you are cutting. Learners get in trouble with the skew if they contact the wood with the cutting edge before gaining bevel support. If the cutting edge of the skew gets into the wood without bevel support, it will dig in and send the skew scooting backward. This happens instantly and leaves a spiral trail across the surface of the wood.
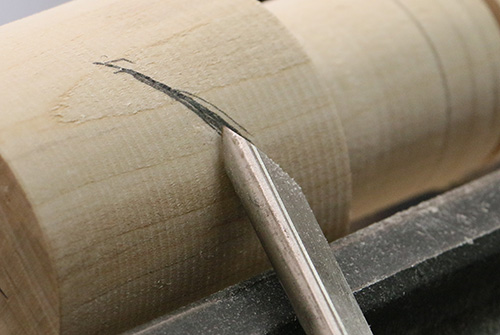
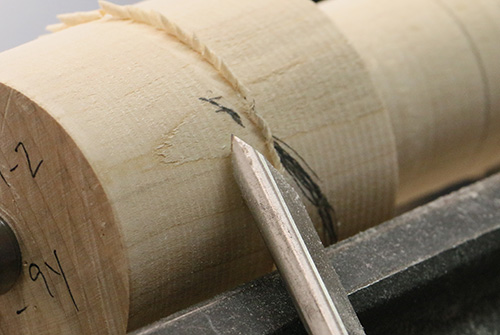
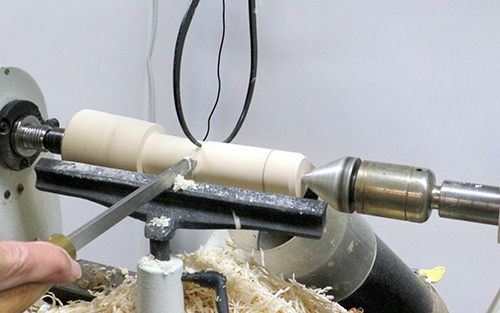
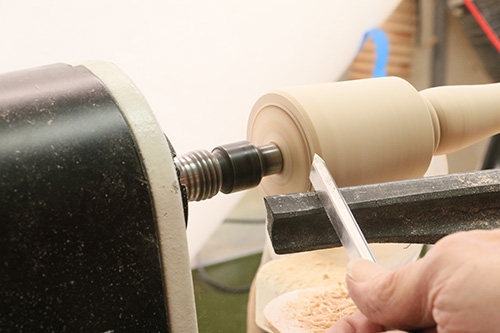
You can use the planing cut to taper the head of the mallet from 3″ to 2″ (8cm to 5cm) in diameter. But first use a parting tool and caliper to make a 2″ groove at the end of the mallet head as a guide.
Then start the taper about 1″ from the bottom of the mallet head, working from left to right so you are cutting “downhill” (with the grain). Take shallow cuts, starting each one further toward the headstock and working toward the tailstock, until you achieve the desired taper.
Shape Handle
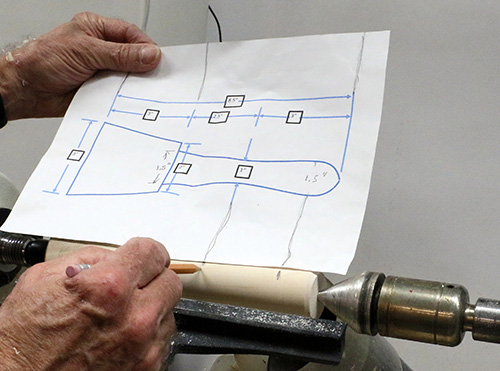
Transfer two dimensions from the full-sized drawing to the handle. The first is where the handle narrows to 1″ (the cove), and the second is where the handle rounds off at the end.
Use a parting tool to define the depth of the cove.
Then use planing cuts with the skew to taper the handle from the end of the mallet head to the middle of the cove, and, in the other direction, from where the handle rounds off to the middle of the cove.
The final cut on the handle is to round off its end. Start with the bevel on the wood near the end of the handle and use the heel of the skew to round it off.
Final Shaping and Sanding
The skew can also be used as a negative-rake scraper. Laying it flat on the toolrest and raising the handle above the cutting edge, cut a chamfer on the top and bottom edges of the mallet head.
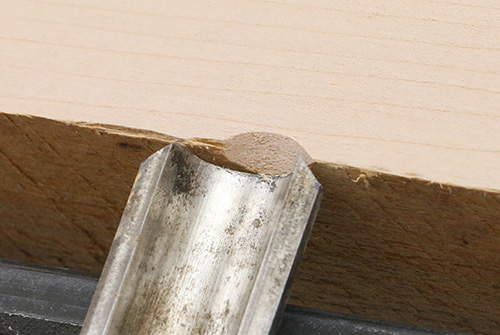
Use the skew, toe down, to slice off the top of the mallet head. The technique here is to start the cut straight in with the skew 90 degrees to the wood surface, then ride the bevel against the surface of the wood. The inner bevel should point in the direction of the cut.
If you did a good job with the skew, you might be able to start sanding with 220-grit abrasive. I typically sand to 400 grit. After sanding with the lathe on, turn the lathe off and sand in the direction of the grain. Apply the finish of your choice, and enjoy this new shop tool.
Walt Wager, Professor Emeritus at Florida State University, has been turning for nineteen years and teaching for eight years at Camelot’s Woodworking Studio in Tallahassee, Florida. Walt can be contacted through his website, waltwager.com.


