Last time out, Rob asked what you’re building in the shop this spring. Here’s what we heard from some eZine readers.
“[My spring woodworking project is a] workshop makeover. It started with the idea that I’d like a more comfortable floor for my basement shop. But it has grown into something larger. Since I had to remove everything from the shop anyway, I’m rethinking the entire layout of the shop. Over the last 10 years, tools and equipment have been added and just kind of fit in where they fit. It’s time to reorganize and start over again. Not only am I moving equipment around so redoing the duct collection ductwork, I’ve also purchased a new cyclone to replace my old shop-built one. I also redid my lumber storage in the other part of the basement as well. Frankly, I have no idea what I will build next once the shop makeover is done. I’m just hoping to get it done in some reasonable amount of time!” – Scott Chapman
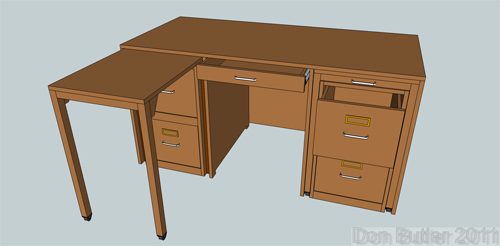
“This may be my most ambitious project ever. If I finish it. The desk is designed to go into a specific space, so there are no top overhangs on the back or sides. There are four full-sized file drawers with full extension drawer slides, one center drawer and two pull-out desk returns with their own wheels. All of this is per the user of the desk, who will be (if I finish it) my wife.” – Don Butler
On Doing (Or Not Doing) Doors
In last issue’s WebSurfer’s Review, we highlighted a discussion prompted by a woodworker who was trying to decide whether to buy new or make the replacements for his interior doors. This respondent says “neither.”- Editor
“I would reuse as many doors as possible. You can’t buy wood as good as was used in the 30s. What they junked passes for #1 grade now. Do not sand or scrape the paint off dry. Use a liquid paint remover or have them cleaned by a pro. As for the doors that need to be replaced, I would suggest looking in a salvage yard. Again, the old doors will have better quality wood and may better match the style of your house. Another option would be to rebuild the doors making new parts as needed. Generally, my thinking is to build those things you can’t buy.” – David Wright
Continuing the Countersinking Discussion
Also, last time out, there was a query in the Q&A section countersinking a rule joint without leaving a notch. There’s more discussion of that topic over in this issue’s Q&A section, too (following the original reader’s clarification of his issue), but we also heard this comment from another eZine reader. – Editor
“The problem that Jim encounters is easily solved. My initial reaction is that Jim is adding the hinge to either the top or the leaf and then coming back to cut the mortise for the other part.
“Lay the top and leaf on top of your workbench upside down. Cut the mortise for each side before even screwing the hinge on. Tim indicated that the problem may be mounting the hinge upside down. Although you can lay the hinge with the pin facing the top or out, it doesn’t matter, except for the work involved. However, there are some considerations that need to be taken. First, is where does the pin fall? Is it on the top or leaf side or split between the two? This is personal and aesthetic preference. “Second, how far away are the legs from the leaf when it is down? If the pin is toward the top, then the leaf will have restricted travel when it is down. If the pin is away from the top, the then leaf will have full travel and may hit the leg. My preference is to give the leaf full travel. This way if the leaf is hit when it is down, there will be no strain on the rule joint and the screws will stay strong. What I do is lay the hinge, with the pin side away from the top, into the mortises and screw it in. No notch is then visible.
“The second problem that I see is the selection of the hinge. Furniture hinges are hinges are made differently than door hinges. The big box stores usually do not carry furniture hinges, and you need to special order them. What you are looking for is a special drop-leaf hinge that, when laid out, is completely flat on one side. If you look at the hinge in the photo that accompanied the question, you will note that the pin casing is not flat but curves on both sides of the hinge. These hinges are more expensive but worth it. Do a Google search on the term “drop-leaf table hinges.” In addition to the various suppliers, you will find an excellent discussion on installing drop-leaf hinges.
“One final thing I noticed is that you are taking the time to cut the notch, so why not take the time to also mortise the hinges? This will look nicer and add a more professional look to the finished table.” – Phil Rasmussen
Still Funny?
And, even this late in April, we have people who are still chuckling over our annual April Fool’s Day edition of the eZine from April 1 … we think. – Editor
“I just received another copy of your online newsletter stating that the first was an April Fool’s copy. The only thing is, now I have a backyard full of animals, birds, etc. and an ark half-done. What am I to do with the animals and a half-finished ark? A quick reply would help, because elephants do make a big mess and the neighbors are starting to complain.” – Larry Baker
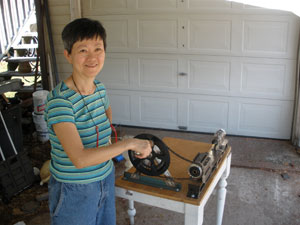
“Your human-powered lathe is of a poor design. I have attached photos of my hand powered bike gear lathe. I save the $30 to $50 electrical hookup cost at craft shows.” – Donald and Nancy Winburn
Stop the Shell Stink
And, in response to a questioner in eZine Issue 298, expert answerer Tim Inman mentioned in passing his wife’s collection of seashells – and their occasional odor. This reader had a solution for that. – Editor
“Having lived in Florida for many years and knowing what is going on with your wife’s seashell collection, below are several solutions to a smelly bathroom on a warm humid day. But before we consider the solutions, let’s discuss two things. I assume that the shells are in a glass jar. If for no other reason – GET RID OF THE JAR! A glass jar is not the place for bare feet in the bathroom. Think safety here. Second is that seashells are porous and contain many microorganisms which are now dead and rotting. So the shells need to be treated again for health and odor reasons.
“Solutions: 1. Go to a hobby store (Michael’s, for example), buy a can or two of clear resin, cast and encase the shells in a block of “plastic.” This has many pros, such as, if dropped or tipped over, you don’t have a mess of shells to pick up. If you are going to keep the shells in a jar, switch to a plastic jar or canister. 2. Put a tight-fitting, nonporous lid on the jar/canister and don’t open it on humid days. Take the jar of shells out of the bathroom to another room where the humidity will be lower. 3. Take all the shells out of the jar and clean them. I don’t mean soap and water. You need to get rid of the organic material that is left in and on the shell. Depending on who you listen to, you would use bleach or ammonia, but never the two combined. Some people soak the shells for a period of time; others boil them. If you decide to boil them, do so very gently and beware that the shell may dissolve or crack. When boiling, use some bleach OR ammonia in the water. Good luck and enjoy a sweeter environment. Also, your wife will appreciate it.” – Phil Rasmussen


