This article, “Working with Banksia Pods,” by Cindy Drozda, is from the pages of American Woodturner and is brought to you by the America Association of Woodturners (AAW) in partnership with Woodworker’s Journal.
I like to call the banksia pod a pinecone from down under. It performs the same function as a pinecone, being the seed carrier of the banksia plant, which is not technically a pine, though it is an evergreen. The Banksia genus of plants gets its name from Sir Joseph Banks, the botanist who sailed with Captain Cook’s Endeavour voyage that arrived in Australia in 1770.
Banksia plants range in size from shrubs and larger bushes to trees of around fifty feet in height. They can be found growing outdoors in Australia, Papua New Guinea, and New Zealand. Of the seventy-five named species, sixty-one are found in western Australia, including the Banksia grandis, the species that generates the large seedpods. Although it’s the size of the seedpod that makes it attractive to artists, the name probably refers to the tree’s large leaf size.
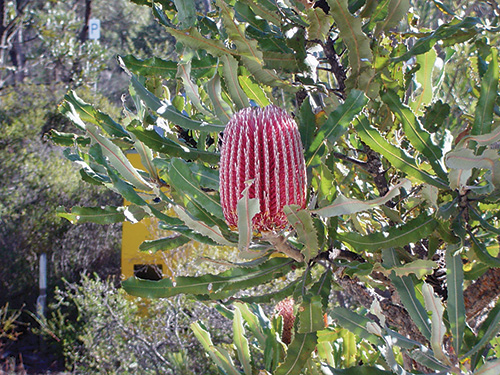
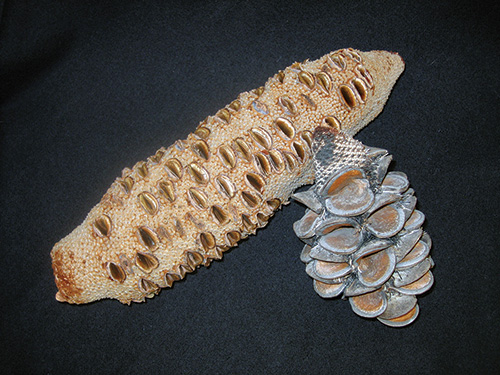
The pods, or cones, commonly used for woodturning are the fruit of the plant. These cones can be from 3″ to 16″ (8cm to 41cm) long. Once the stunning, upright, golden yellow or red flowers fall off, the cone matures on the tree and the seeds develop. There can be both mature cones and flowers on the tree at the same time. Often it is the heat of a forest fire that causes the seed case holes, which give these pods their unique appearance, to burst open and release their seeds.
I saw my first banksia pod in the mid-1990s at our local store and was captivated. It was the oddest piece of material I’d ever seen. I knew it could be turned but didn’t have a clue how to begin or what to make out of it. So, for quite a few years the pods were kept on my windowsill as artifacts. When I saw a box made by Bonnie Klein from a banksia pod, I knew what I wanted to make. How to get from rough banksia to box—that was my first adventure. Here are some things I have learned about banksia over the years.
Choose the Right Pod for the Project
How do I choose a “good” banksia seedpod? Not all banksia are created equal. I look for equal distribution of eyes because I like that look better. But really, it depends on what you like and what you’re going to make. Rather than asking, “Is it good?” ask yourself, “What is the best use for this one?” or “Which is the best banksia for my project?”
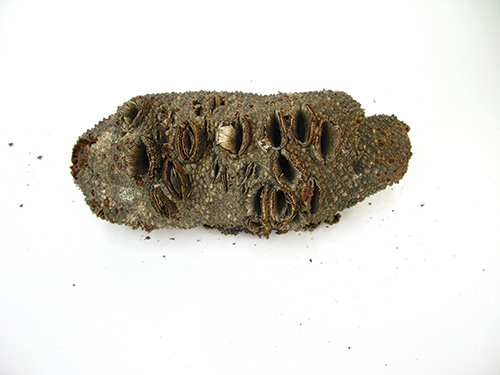
The lighter, browner ones tend to be sounder inside. Whitish or yellowish color on the exterior can indicate a punky interior that will tend to tear out when turned but might have some nice color variation. A greyish exterior and broken or weathered-looking eyes might mean a punky interior, or might not.
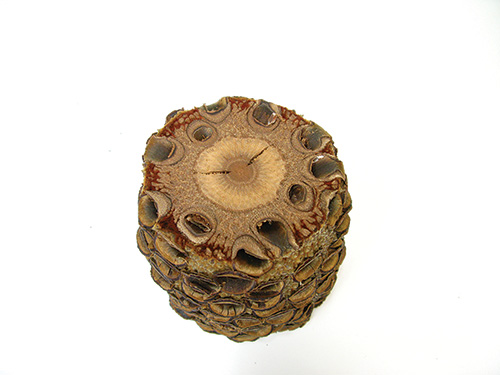
After inspecting the exterior, the best way to evaluate a banksia is by cutting the ends off, or cutting it in half, on the bandsaw and looking at the cross section. You might see a bug hole in the very center, which may or may not go all the way through. A punky banksia will have lighter-colored areas and might show tearout from the bandsaw cut. If it is soft enough to dent with your fingernail, it is punky and will most likely tear out more easily when turned.
Cracks at the core might not yield a good finial, knob, or stem (depending on your design) but could make a great-looking mushroom cap. Punky cores usually have a lot of color variation and look nice on a mushroom or weed pot. The ones with random distribution of eyes can make good weed pots or partial natural-edge turnings.
Nicely formed, undamaged eyes and a less-weathered exterior make a better natural-edged piece, but if you are turning the exterior away, the weathered ones work just as well. A sound pod without a punky core will be easier for making a box.
Anatomy of a Banksia Pod
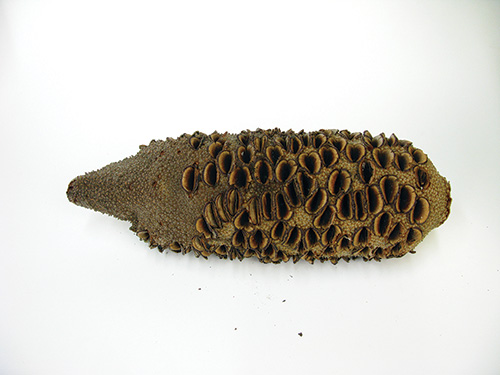
The banksia consists of a darker brown core that looks like the pith of a branch. This core has no grain to it and will break off quite easily at 1/2″ (13mm) diameter. The eyes stop short of the core, so it usually has no voids—unless there is a bug hole. Bug holes typically go up only into that core area and may go all the way through from one end to the other. Or not.
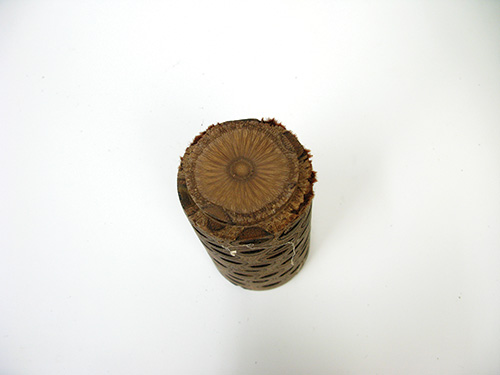
Most visible on the ends, where there are not any eyes, is a pattern in the cross-section of a banksia that looks like a sunflower. A slice of this section could work quite nicely as an inlay piece.
The core is surrounded by a roughly concentric zone that is the nicest cutting and strongest. The eyes get smaller toward the center of the banksia pod, stopping at the core. Surrounding this clean-cutting zone is a more porous area that is still nice to turn. It is in this zone where the eyes are the biggest and attached less firmly. It often looks like there is a small space around them. On a thin-walled piece, the eyes are prone to fly out of the matrix in this zone. Drenching with cyanoacrylate (CA) glue or vacuum-stabilizing with resin takes care of that issue if I don’t want the eyes to be missing. Not that missing eyes is necessarily a problem—a nice, though bigger, void is left when the eyes come out. This might be the look you’re after.
The exterior zone consists of “fur” coated in a thin layer of hard glaze. That fur is what gives banksia such a bad reputation. It makes an awful mess when cut. The fur zone also is the most prone to coming apart. Pieces can fly off and eyes can fly out when cutting in this zone. With a natural-edge turning, I use this exterior furry zone as part of the finished piece. Light cuts and plenty of lathe speed seem to give the best results. Drenching with thin CA, and plenty of it, will keep the edges together, but I don’t like using CA because it may not have the longevity that I want for my work. I prefer thin epoxy or other resin. The fur zone doesn’t take detail well, being, well, furry!
Make sure the banksia are dry. They are usually fairly (or completely) dry by the time they mature, fall off the tree, and get shipped to the U.S. for us to buy. They tend not to move much as they dry, and if they shrink when drying, it tends to be in a symmetrical manner. I have some banksia boxes that still have the same fit after many years. Even so, I still like to dry every banksia I use in my kiln for a few months so I don’t get any surprises.
What to Make from Banksia Pods
Banksia pod sizes range from extra large ones at almost 4″ (10cm) in diameter to the smaller 1″- (25mm-) diameter variety I saw growing wild in Brisbane when I was demonstrating at Turnfest. Those tiny ones were 3″ to 4″ (8cm to 10cm) long. The jumbos can be a foot long or more. The most common size is about 3″ in diameter and 8″ to 10″ (20cm to 25cm) long. After the outer fur is turned away, this diameter pod, or cone, will net a 2-1/4″- to 2-1/2″- (57mm- to 64mm-) diameter piece.
Banksia pods offer a lot of natural texture and surfaces to work with, but there is no worry about grain direction, as with wood. A natural outer surface (like the bark around a branch) and a small diameter but long length make a pod suitable for projects that you would think to make out of a tree branch. Some examples are banana bowls, goblets, mushrooms, boxes, small vessels, and weed pots. Since the core of a pod has no grain structure or grain strength, a thin finial made of it would break off very easily. Thin-walled turnings and thin sections are more apt to break than a comparable shape turned from wood. Using the tailstock helps to lower the failure rate. Natural-edge turnings tend to cut with less eye loss when cutting from the outer edge inward, but other than that, they can be cut in any direction.
You should always wear eye protection when turning, but be aware that when roughing the exterior of a banksia pod, there will be fur and sharp particles flying off. Also, expect to need a bath after turning a banksia pod, as they are very dusty.
Start Turning
So far, all of my banksia projects start with cutting the ends off. This allows me to mount the banksia between centers on the lathe and gives me more information about the material and its suitability for what I’m making (as described above).
Be careful cutting the banksia pod ends off on a bandsaw. Use a V-shaped sled to keep the banksia from rolling out of control.
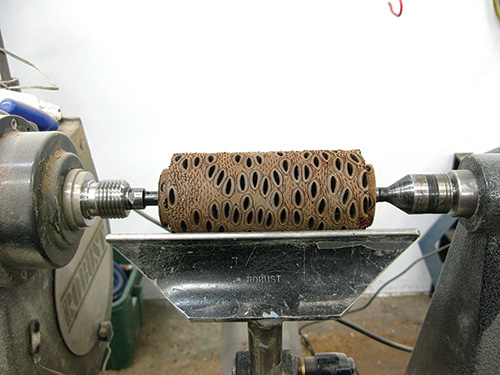
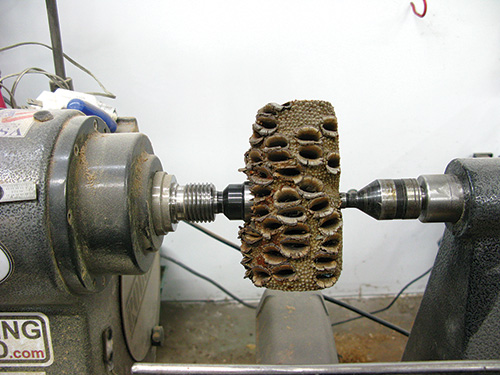
After cutting the ends off, the center core of the banksia can be positioned to engage the live and drive centers when mounting the material on the lathe. This works to center the banksia evenly most of the time. While it’s between centers, a tenon can be formed for mounting into a chuck. I have not had good luck cutting the end off and just gluing it flat onto a wasteblock with wood glue. Banksia pods don’t seem to glue well, with the failure being at the glue line. I have not tried using a faceplate with screws directly into the banksia. Use the tailstock whenever possible for the best success rate. You can also mount a banksia pod between centers with the pod’s core running perpendicular to the lathe bed, depending on the needs of your project.
Banksia scrape, cut, and sand well, but they are abrasive and will dull your tools much faster than when cutting wood. High speed steel, the new “powder metal” tools, carbide-tipped tools and drill bits, and good quality abrasives are really valuable for turning banksia. I like to cut at high lathe speeds but drill and sand at slow speeds.
A banksia jam-fits better onto a wooden wasteblock than onto another piece of banksia. Using a wasteblock of soft maple, alder, poplar, mahogany, or other compressible wood gives a better and more secure holding. Jam-fitting a delicate, thin-walled banksia turning into a recess instead of over a tenon will reduce the risk of cracking the workpiece. Jam-fits with thin-walled banksia pieces are never very strongly gripped. I use tape for insurance when finishing the bottom without the tailstock. It is easy to break the piece or knock it off the jam chuck. Too much tailstock pressure can also break a thin-walled piece.
Use CA glue, or stabilizing resin, to strengthen thin-walled pieces. When hollowing to the maximum diameter of the pod, the eyes tend to fall out. CA soaked over the outside of the piece before hollowing will glue in the eyes and will not stain the finished piece. Be sure to let the CA dry completely before turning on the lathe.
I recently started using vacuum-stabilizing with resin to strengthen the banksia for thin-walled turnings. It does a great job of keeping the eyes in (as an alternative to CA glue). Unfortunately, this method does not harden up the infamous fur around the outside. If you want to do that, CA or a thin-bodied resin is good.
I have seen banksia pods cast in resin, filling the holes, though I have not done that myself (yet).
Finish off of the Lathe
Some finishes that I like include wipe-on polyurethane, diluted polyurethane, thin-bodied penetrating oil (to minimize having to wipe finish from inside the eyes), and spray-on film finishes such as lacquer, polyurethane, and shellac. It is very tedious to scrape wax or French polish out of banksia eyes. That is why I finish off the lathe. To keep the oil finish from accumulating in the voids, I blow it off with an air compressor right after wiping the excess finish off.
As with any turning, the secret to a nice finish is in the sanding. I will sand banksia to 600 grit if I am planning to spray a film finish. For a wipe-on finish I will sand and polish to 4000 grit and just apply one coat of finish. The material is so dense that not much finish will soak in, and additional coats don’t seem to offer any advantage.
Bleaching the banksia piece after turning and sanding gives an interesting effect. I have stained my bleached banksia turnings with dyes and with white pickling stain. The look is otherworldly!
Be sure to sign your work. Metallic gel ink pens write on the sanded surface of a banksia and show up well. Be sure that your chosen finish will not cause the ink to run. I usually use a vibrating engraver to sign my banksia pieces. Filling the engraving gives it more contrast. For best results filling engraving, fill all of the surface voids with epoxy or CA glue and do the engraving after the finish has dried.
Buying Banksia
How can you get some banksia to turn? It sounds like fun to go to Australia and gather your own banksia, but plant products with the bark on can’t be legally brought into the U.S. in your luggage. It’s better to buy them from an importer who has already done all of the import paperwork and gone through the fumigation and quarantine necessary.
You can get banksia from wood suppliers online, but then you will get what they pick for you. I recommend going to a symposium tradeshow and picking out your own. When I do order them online, I buy plenty of them so I will be more likely to get suitable banksia for various projects.
I found the toughest thing was to take the first step. My recommendation is to jump right in. Buy three of them, cut the ends off, mount them between centers, and turn a tenon on one end of each. Then turn some weed pots, natural edge or not. Don’t try for thin walls or fitted parts at first. These first three will teach you how banksia cut and how to use the various textures in the banksia.
Banksia seedpods are a truly renewable resource, since no trees are cut down to harvest them. Buy an extra pod or three and don’t be afraid to lose one on a new idea. Working with banksia pods is an adventure, but the results are well worth the effort.
Cindy Drozda has been turning wood since 1985 and is now a fulltime woodturning artist who shares her knowledge and passion as an international demonstrator and teacher. Her website is cindydrozda.com.
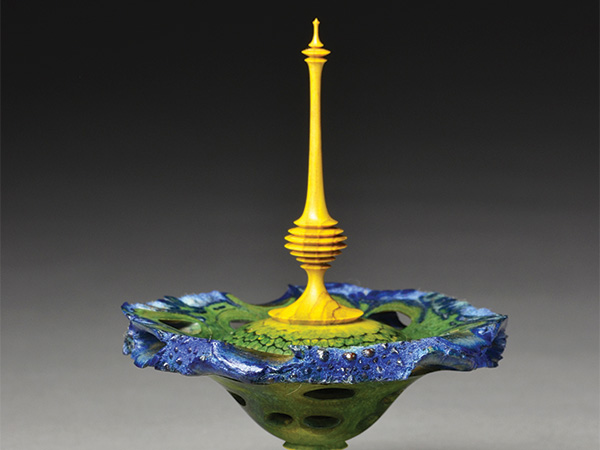
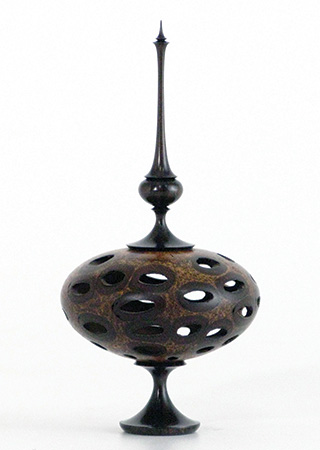
Lead Photo: Karmonic Vibrations, 2013, Bleached and dyed Banksia seedpod, dyed Jerusalem olive wood, 3mm green opal in 14K gold setting, 4-1/2″ × 3-1/4″ (11cm × 8cm). Photo by: Tib Shaw, AAW


