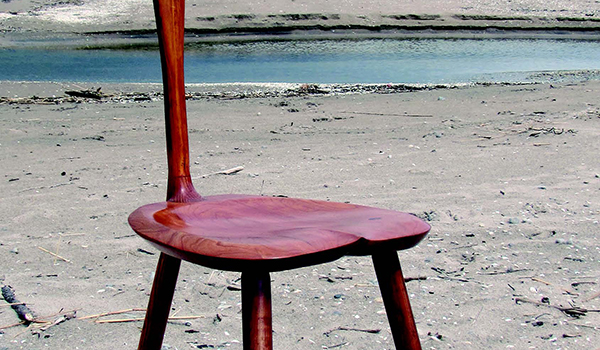
I enjoy making furniture from repurposed wood or found objects. If you live in an area where boating is popular, you might just find some old oars lying about. Once discovered, many of these garage sale finds are destined to be “wall hangers” in a restaurant or a man cave. Instead, why not make a chair from an oar and bring new life to a long-forgotten object? My first oar came from an old boat at our family cottage. I acquired a second pair of oars from an Internet classified ad site.
The three-legged design and slender back of an old Irish Tuam, or Sligo, chair provided the inspiration for this version. Although primarily a decorative or hallway chair, it is fully functional. The legs angle outward for stability. The oar blade, slanted at 5˚, supports your back, and the deeply sculpted seat is very comfortable.
Like a Windsor chair, the seat is the main structural element. Round tapered tenons attach the front legs. The rear leg/back assembly is attached using a built-up construction I call a Maloof joint: a feature of Sam Maloof’s iconic rocking chair. An optional marquetry panel decorates the chair back.
Getting Started: The Legs
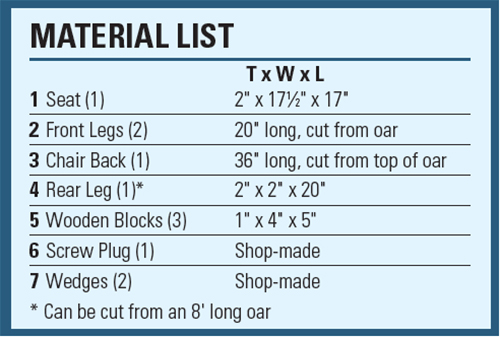
The oar needs to be at least 6′ 6″ long and 1-1/2″ to 1-3/4″ in diameter. From this length, you can cut the chair back and two front legs as shown in the Drawings.
I turn a 1-3/4″-diameter back leg from an additional straight-grained 2″ x 2″ blank about 20″ long. If you have an 8′ oar, you will be able to cut all four of the main pieces: two front legs, the back leg and the seat back.
Once cut from the oar, turn an “oar handle” on the second leg to match the handle on the first leg. Some oars taper in diameter along their length. If this is what you have, turn both pieces to a consistent diameter. Finally, rough out a tapered 6° tenon on the front legs. You will return later to finalize the tenons.
Fabricating the Angled Back
The chair back and back leg are joined together with their tenons encased within laminated blocks of wood. Those blocks also provide the additional material to cut the three-sided dado for the Maloof joint.
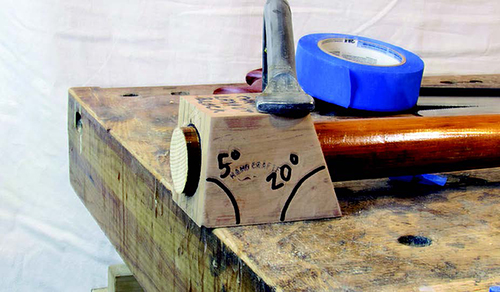
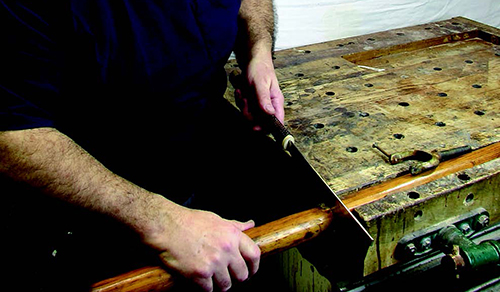
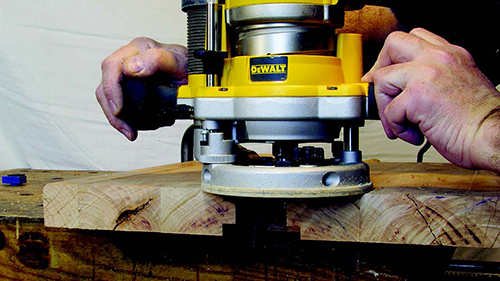
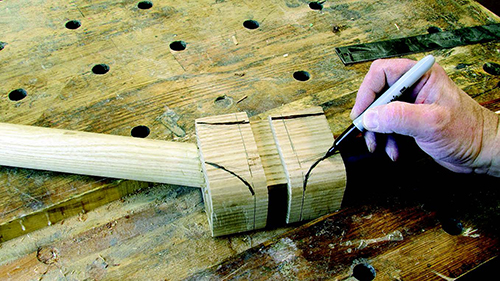
To get started, I used a shop-made angle block to guide the angles and mark out the two 1″ x 1-1/4″ tenons. On each face of the block, mark the vertical centerline of the hole. One-half inch on either side, mark two additional lines that define the tenon cheeks. It is important that the tenon cheeks on the chair back are cut at 90° to the face of the oar blade. Otherwise, when the chair is assembled, the face will look twisted.
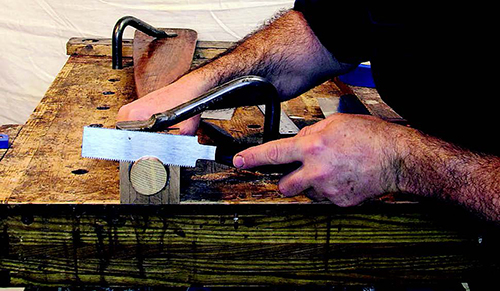
Add a spacer block underneath the blade so that the oar is parallel to the workbench top andm insert the other end into the angled layout block using the 5° face. Clamp the oar blade parallel to the benchtop. Once positioned, clamp the angle block to the bench. With a flush-trim saw, cut the face at 5° and then use the reference lines to mark the tenon cheeks.
Without loosening the clamp on the oar blade, slightly loosen the holdfast on the angle block and slide it back 2-1/2″. Secure it again and then extend the cheek layout lines back from the front face. The tenon shoulders can be cut with a flush-trim saw using the angle block as a guide. I saw the cheeks by hand, taking care to ensure that the cheeks are cut parallel to the axis of the back.
Use the 20° face of the angle block to lay out and cut the tenon for the back leg and form the tenon in the same way. The next step is to sandwich the tenons within blocks of wood for the Maloof joint. I used ash for the added blocks and back leg because of its strength.

Clamp the back leg tenon to the first block. Then butt the seatback tenon in place and test for a tight fit. The ends of tenons should touch and the shoulders should fit tightly to the edges of the block. Trim the block or tenon length as needed.
Before gluing the tenons, clamp them in place and visually check that the assembly is straight and plumb. If not, one of the cheeks is tapered or skewed. Plane the cheek as needed to make it parallel to the vertical axis of the back and leg.
Begin by gluing the back leg tenon to the first block. Once dry, position the seat back tenon and glue it in place.
To fill in the center section, cut two filler pieces from the second block, and fit and glue them in place. Next, plane the top face surface of the glue-up to remove any unevenness between the tenons and filler pieces.
Glue on the third block to complete the sandwich. Finally, check that the front face and sides of the block are square to one another. Make any needed adjustments with a hand plane.
Making the Seat

Glue up enough 2″-thick boards to make up your seat blank. Cherry provided a good color match for the oars that I acquired. Take some time to arrange the boards in order to create a pleasing grain pattern.
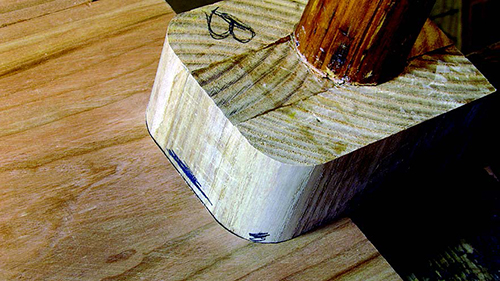
Once the seat blank is cut to size and squared, it’s time to form the seat portion of the Maloof joint. This joint is incredibly strong, and once sculpted it is also very attractive.
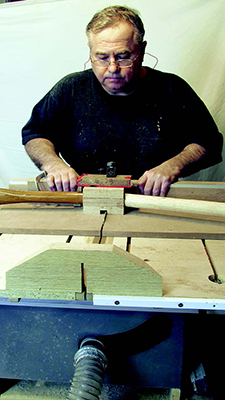
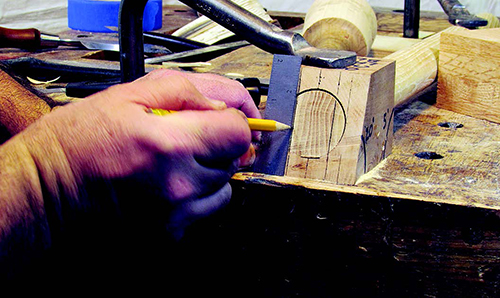
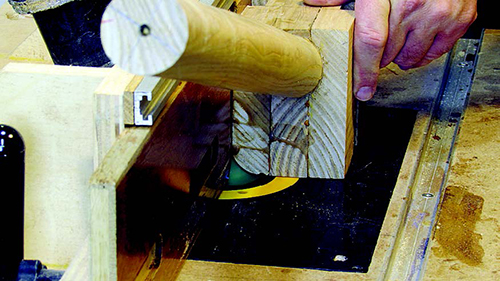
Use a crosscut sled to make a series of kerf cuts to form a notch into the seat blank. The notch is 1-1/4″ deep. Cut the notch 1″ narrower than the width of the built-up wooden blocks. I cut the notch 1-15/16″ wide.
Smooth the saw kerfs in the notch by paring with a chisel. Finally, rout the top and bottom of the notch with a 1/2″ rabbeting bit that has a 1-1/2″-diameter cutter. Rout a 1/2″-deep rabbet on the top and bottom of the notch, leaving 1″ of material between the rabbets.
Test-fit the built-up leg component of the Maloof joint in the seat opening. If it is too tight, adjust the thickness with a hand plane so that it slips into the opening of the seat joint.
To complete the Maloof joint, cut a 1″-wide dado on each side and the front face of the leg component. I use my crosscut sled to make this cut. I set the blade at just shy of 1/2″ high. Then I used a narrow shoulder plane to clean up the kerf marks and bring the dado to its 1/2″ final depth. Plane away just enough for the back to fit snugly into the seat joint.
To complete the block portion of the joint, rout the edges with a 3/4″-radius roundover bit.
Insert the back onto the seat, tapping it into place with a mallet. Adjust the fit by planing, sanding or using a rasp. Mark the high spots and remove the material that is keeping the joint from seating properly.
Drilling Holes for the Legs
To begin, locate the center point of the leg sockets on the underside of the seat. Then mark the site line measuring back 11-1/2″ from the front edge of the seat and joining this point to the socket center point. The leg is slanted 18° from vertical along the site line.
I use a 5/8″ spade bit to drill the socket in the seat from the bottom.
Bore the hole in stages, periodically checking the angle. I use a 5/8″ dowel inserted in the hole to check the angle. Adjust accordingly, if you stray.
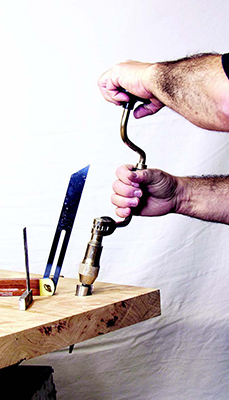
Once the holes have been drilled, use a reamer to taper the inside of the hole to a 6° angle.
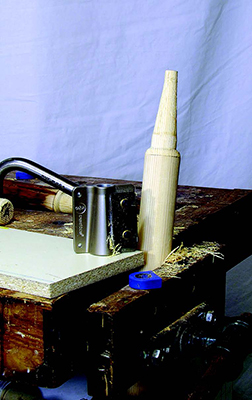
To finalize the tapered tenon on each leg, I use a 5/8″ tapered tenon cutter. As you shape the tenon’s end, periodically insert the leg into the tapered mortise and check the height. Continue turning the taper until the height from the top of the seat to the bottom of the leg is slightly more than 17″. (Once the legs are glued in place, it’s easy enough to make final height adjustments by sanding away some material from the bottoms of the legs.) Editor’s Note: If you do not have a reamer and a tapered tenon cutter, you can modify the leg mounting technique.
Shaping the Seat
Now that the seat joinery is complete, it’s time to sculpt the seat. Use the Drawings to mark the seat shape on the face and sides of the seat. Then cut the outer shape of the seat at the band saw. Sand away any saw marks and fair the curves.
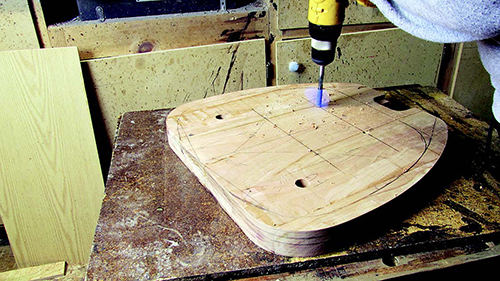
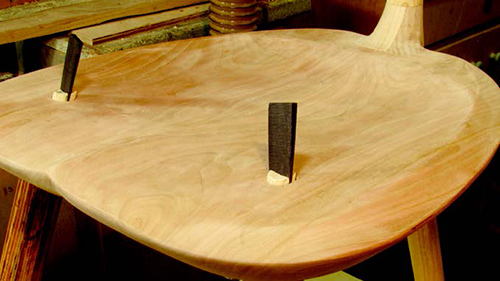
I like to set the contour depths at various places on the seat by drilling a series of depth holes. These will provide reference points as you carve the shape of the seat.
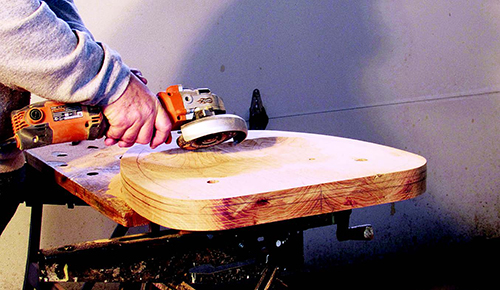
There are many ways to sculpt seat contours, and all of them work well enough. I prefer to rough-carve the seat using an angle grinder and a Kutzall® Dish Wheel. Hog out material to the depth holes, leaving the point of the hole still visible. Grind close, but not to, your layout lines.
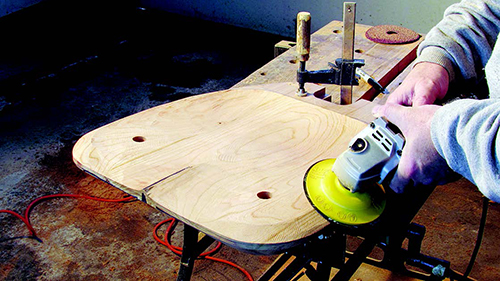
Once the seat has been rough-ground, use a 30-grit sanding disk to bring the seat to its final shape. Be cautious here: remove a minimal amount of material from around the leg mortises. You want to leave as much seat thickness in these areas as possible, for strength. The best way to judge the seat’s transition and fairness of curves is with your fingers. By feeling across the seat, you discover any high or low spots and are able to check the symmetry between the two halves of the seat.
Next, form the bevels on the top and bottom of the seat using your layout lines as a guide. Thinning the edge gives the illusion of lightness to what is otherwise a thick seat.
Flip the seat over and round over the front edge with a rasp to create the “smile” on the underside of the seat that accentuates the pommel. I fine-tune the shaping with a rasp and my random orbit sander using 80- or 100-grit disks. Then, with the sander and by hand, I progress through the higher grits until I achieve a scratch-free surface.
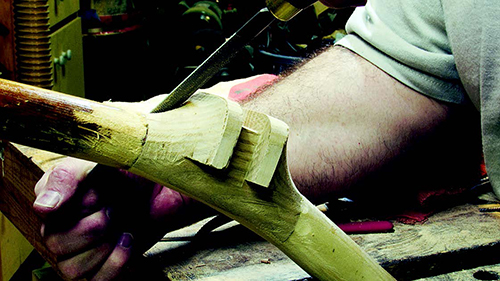
Carving the Maloof Joint
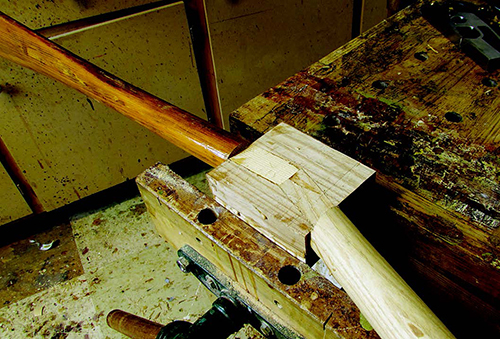
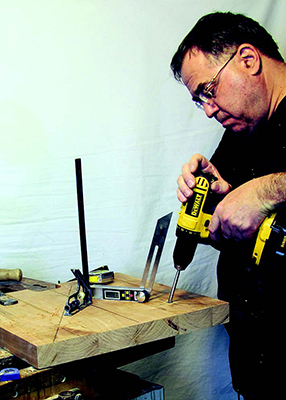
It s time to sculpt the back leg joint. Begin by marking the transition curves on the leg block, and rough-cut them at the band saw. Refine the joint curves with a rasp. Shape as much as you can with the back assembly off the seat. Then temporarily install it to finalize the shape, fair the curves and blend the joint seamlessly into the seat. Once you are satisfied, drill a pilot hole through the back and into the seat for a 3″-long, #12 wood screw.
Do a final sanding of the seat, legs and back in preparation for assembly and finishing. Hold off on final assembly until you have decorated the oar blade (if that’s what you plan to do).
Decorating the Back
I inlaid a marquetry scene into the blade of the oar. There is more information about that in the “More on the Web” content online. A painted or wood burned decoration would be as suitable if the thought of marquetry might be a bit overwhelming. You can also leave it plain.
Installing the Legs
Assembling the chair is straightforward, but it’s a good idea to do a dry run, making sure you have all the clamps and cauls you will need. Apply glue to the Maloof joint, tap it in place and then use a clamp to draw it tight. Install the screw and cover it with a wood plug.
Orient the front legs with the straight grain facing forward. Mark a line across the top of the tenon, perpendicular to the grain direction, and cut a slot in the tapered tenon to accommodate a wedge.
Apply glue and hammer the legs into the seat. Glue and drive the wood wedges in to lock the legs in place. Then trim and sand the tenons flush with the seat.
Applying a Finish
I left much of the original color and patina of the oar. After applying a spit-coat of shellac, I stained the new parts and those areas where the original finish was removed. Several coats of wipe-on poly were applied to the whole chair, rubbed out with 0000 steel wool and waxed. I was happy with the results.
Conclusion
If you like the look of this project, keep your eyes peeled for used oars. You might find them at a garage sale, in online classified ads, or when taking a trip to the seashore. Then go ahead and make a chair from an oar.
Click Here to download a PDF of the related drawings.


