I was looking at the plans for the Vintner’s Valet in [eZine 268] and have a question. There are no dimensions for the angled cuts or advice on how to cut them for the glass moldings. Can you help? Since they are made from 3/4″ stock, I’d assume the angle would start at 3/8″? How wide should the ‘flat’ on top be? I can’t quite get my head around how to cut them safely, either. Thanks for any advice you can provide. – Kent Krynock
Joanna Werch Takes: While we’re on the subject of the Vintner’s Valet offered as a Free Plan in the last eZine, we’ll touch on a question Kent didn’t ask — but others did, regarding the spacing of the cutouts on the wine bottle racks and wine glass rack.
For pieces 2 and 3, the wine bottle racks, as shown in the Technical Drawing on page 125, Spacing between the ends and the cutouts is 3/4-inch; spacing between the cutouts is 1/2-inch.
For the wine glass rack (piece 13), as noted in the Technical Drawings on page 124, it depends on the size of your stemware. Dimensions for the spacers, according to what kind of stemware you’re using, are given on the Technical Drawings; dimensions for piece 13 as a whole are included in the Material List.
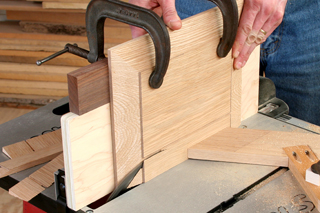
Chris Marshall: To make the glass moldings, I’d start by cutting blanks for the molding strips to the Material List dimensions. Then, with the workpiece face down, I’d make two shallow rip cuts to define the width of the top flat portion in between the broader bevels (3/4 in. wide). I would make those rip cuts 1/4 in. deep. Next, I’d stand the workpiece on-edge against the rip fence, with the rip cuts facing out. Raise the saw blade and tilt it until the teeth just intersect those rip cuts you’ve already made. I’d aim for the outside (thin) edges of these moldings to be 1/4 in., which requires a blade tilt of about 13 degrees. So, in effect, I would cut these moldings to shape just like you would for milling a raised door panel on the table saw. Experiment with scrap wood first, of course, to get your saw settings just where you need them. And, use a featherboard on the infeed side of the blade (only!) to keep the wood pressed against the rip fence when making the bevel cuts. The slivers of offcuts need to fall away from the blade as soon as they are cut free.

