When examining a piece of furniture, even non-woodworkers will often open drawers and search for that pleasing interplay of pins and tails that mark dovetail joints. In the same way, it’s hard not to fawn over a blanket chest adorned with through dovetails on its corners. There’s a truism at work here: dovetails are one of the calling cards of high craftsmanship. And, in spite of the fact that we woodworkers have other joinery options that also form equally rugged connections, they just don’t get the same nod of approval as dovetails. So, it’s only natural that, sooner or later, you’re going to want to learn to make these interlocking, timelessly popular joints.
At that point you’ll face a choice: learn to saw and chop them by hand — the classic method. Or buy a dovetail jig and whip them out with a router instead. Both are entirely viable options, but router-cut dovetails require less hand-and-eye coordination. They’re also quick to churn out, once your jig and router setup are carefully dialed in. If this power tool method seems a better fit for you, here’s what to keep in mind.
On the Level
When I started routing dovetails 20 or so years ago, it didn’t take long to learn a few humbling lessons you may face, too. First, dovetail jigs aren’t panaceas for simplicity. If you hope to unpack a new dovetail jig on a Saturday morning and be milling flawless joints in an hour or two, temper your enthusiasm. To cut a properly fitting joint, most jigs will require that you fine-tune a combination of settings on both the jig and the router bit depth. The trouble is, achieving these critical settings isn’t always quick or easy to understand.
Part of this challenge comes from the nature of dovetails themselves, regardless of how they are cut: pins or tails must fit their sockets within close tolerances. Joints with repeating geometry like these are also subject to cumulative error. Settings can’t begin to drift, even in the slightest, over the width of the parts or the joint will be progressively thrown out of registration. The wider the joint, the more important that every router pass is done with precision.
Then there’s the matter of a jig’s ease of use. I don’t envy the engineers who’ve been tasked to make their company’s dovetail jig simple to set up and operate, more versatile than the competition and still priced affordably for the average home-shop woodworker. It would be no small order! Some jig designs show the spit and polish of brilliant engineering: they’re a breeze to dial in and systematically troubleshoot so you know clearly what to tweak next. Others can be more enigmatic, suffering from design shortcomings or cryptic instruction manuals.
Thankfully, I’ve seen dovetail jigs become generally more user-friendly over the years, and some fine new jigs have come to market, too. You’ll probably also be able to find YouTube videos for just about any dovetail jig you buy that can clarify details in the manual or offer tips and tricks to shorten your learning curve. With any jig, plan on making several test cuts before expecting a piston-fitting dovetail. And be patient with your process. You’ll get there eventually!
How Dovetail Jigs Work
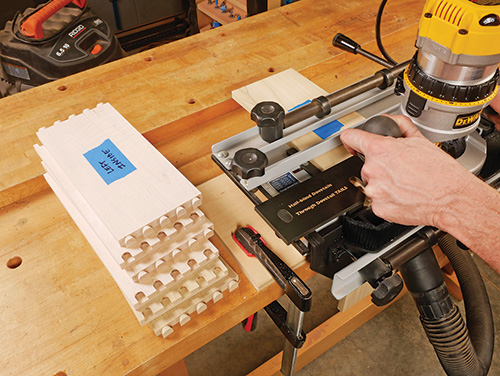
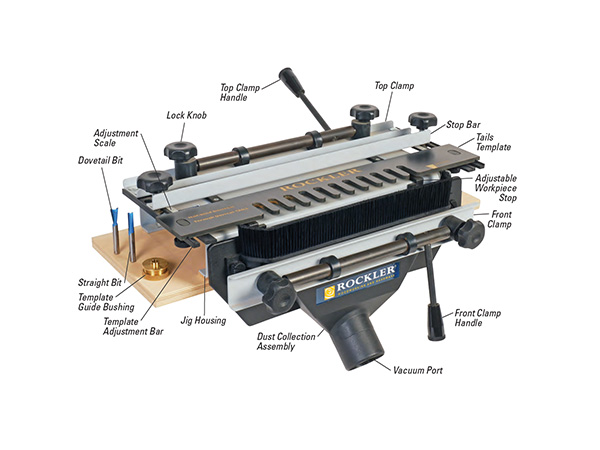
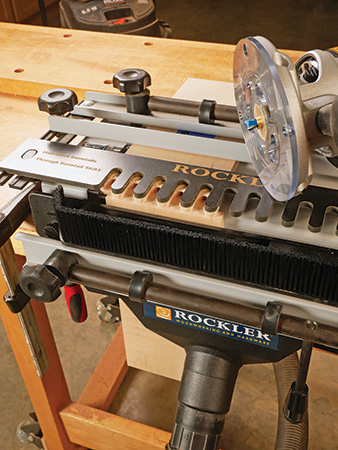
Dovetail jigs are really just elaborate examples of template routing. The router’s path is limited by a template to cut a specific pattern of pins or tails and the sockets in between. In most cases, you feed the router over the template, which is mounted on top of the jig’s housing. For a few jigs, a handheld router is unnecessary: the template with a workpiece clamped to it is inverted and guided over the router bit on a router table instead.
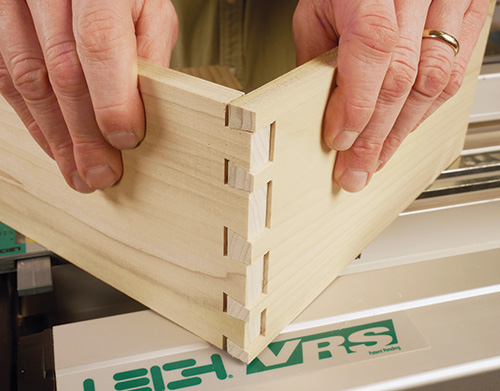
Depending on the joint, workpieces are presented to the jig’s template with either the board’s edge facing up or a face side up. Clamps in front or on top of the jig’s housing lock boards in place for routing. In the case of half-blind joints, both the pin and tail boards are cut simultaneously. For through dovetails, the tail and pin boards are cut with separate templates, router bits and setups, one board at a time.
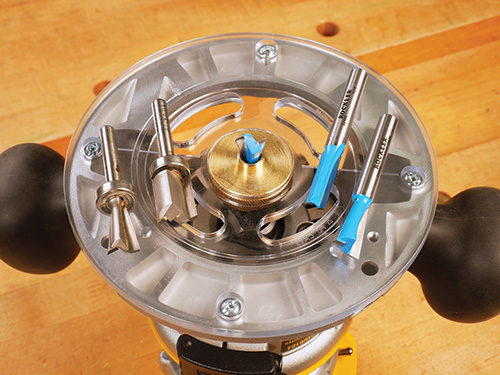
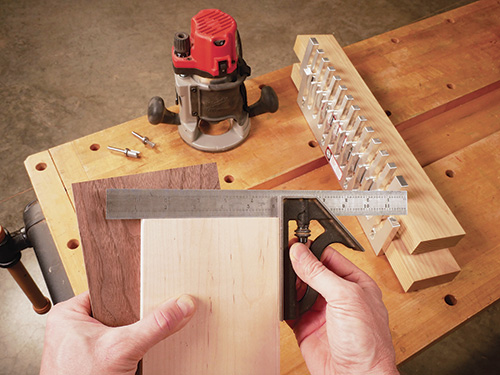
Most dovetail jigs require that a guide bushing be mounted to the router’s baseplate to follow the openings in the template. Or the bit may have an integral pilot bearing on top that takes the place of the guide bushing. You’ll also need an 8° or 14° dovetail router bit, depending on the joint’s geometry. For through dovetails, a straight-cutting router bit is also required. These bits are often provided with the jig, as are the guide collar or collars required to operate them. But standard aftermarket bits are suitable options, too, provided the cutting angle is correct for the joint style.
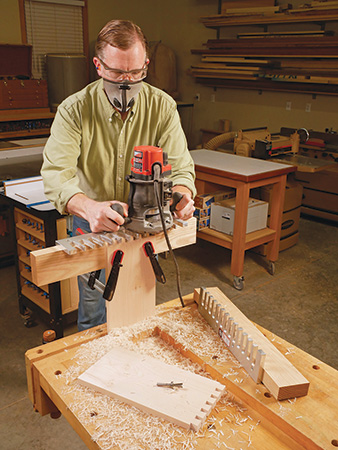
A mid-sized or larger router with a 1/2″-capacity collet is the right choice for making the demanding cuts these dovetail jigs require. I find that the lower center of gravity of a fixed-base router makes it easier to handle and preferable to a plunge router. The fixed base makes precise depth-of-cut changes a little easier too — you’re not working against the spring compression of a plunge router this way.
Fixed-template Jigs
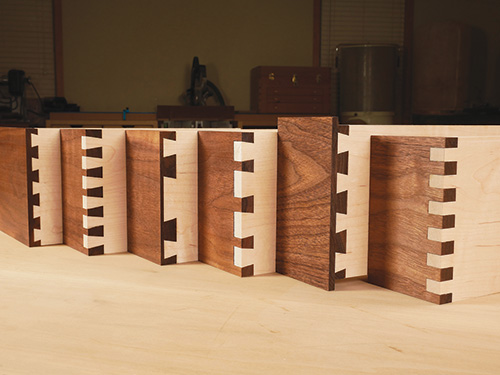
There are two primary families of dovetail jigs, based on their template style. Fixed-template dovetail jigs, like Rockler’s, uses one template for cutting the tails of a through dovetail pattern (and both the pins and tails of a half-blind joint) with a dovetail-shaped router bit. The template’s slots are straight and parallel. For through dovetails, a second interchangeable template enables the “pin” side of the joint to be cut using a straight router bit instead of the dovetail cutter. Here, the template’s fingers are angled, rather parallel, in order to mill angled faces on the pins that fit between the tails.
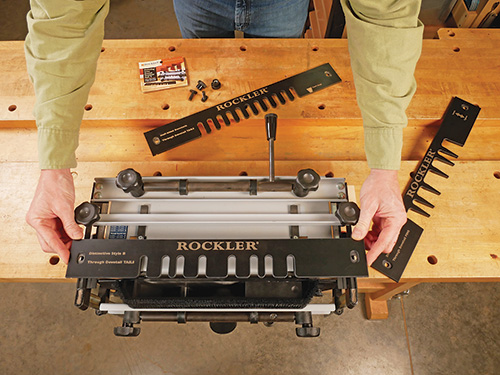
The templates that come standard with a fixed-template jig typically cut a pattern of pins and tails that have the same size and spacing. But optional templates can expand the range of joints to patterns with larger tails, irregular spacing between the pins and tails and even box joint styles.
Adjustable-template Jigs
One of the benefits of learning to hand-cut dovetails is that you can choose any pattern of pins and tails that suits your preference and application. That’s impossible to do with a fixed-template jig; spacing is always predetermined by the template, and it can’t be changed.

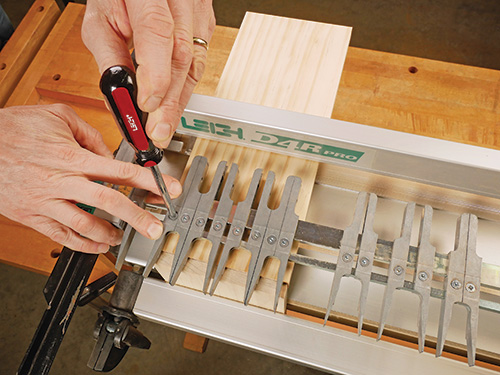
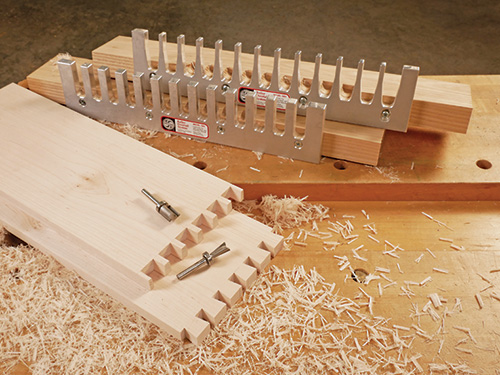
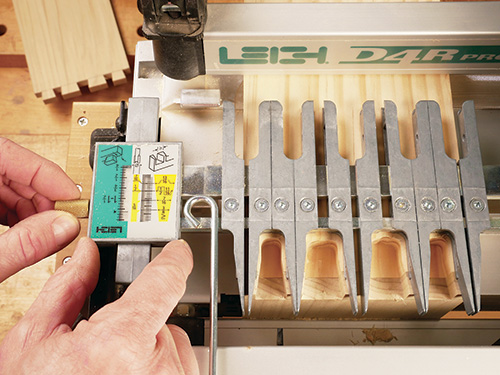
If customizing your dovetail joint layouts is important to you, an adjustable-template jig can help. Here’s what makes this family of jigs distinct: a collection of paired metal fingers create the template that guides the router bit in a handheld router. One end of each pair of fingers forms a parallel slot for cutting tails with a dovetail bit. The other end of the fingers are angled to guide the pin cuts of the joint using a straight router bit. The same metal fingers will cut a range of joints in both half-blind and through dovetail styles.
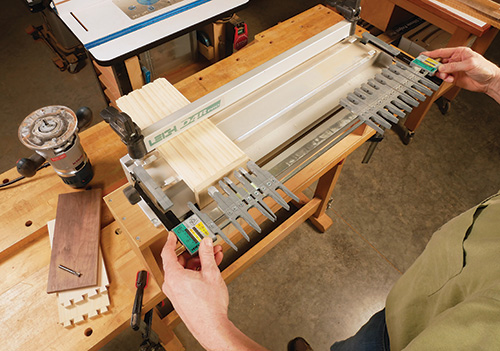
Each pair of fingers can be unlocked and opened or closed to create wider or narrower pins and tails. Even better, adjusting one end of the fingers automatically dials in the other end for the mating cut. Pairs can be spread apart from other pairs along the jig’s mounting bars to vary the joint layout and spacing however you like. Once you set the pattern, tails are cut with the template oriented outward in the jig. To cut the pins, just flip the template over and reinstall, and switch router bits.
Other Variations

If you’d rather not steer a heavy router over the top of a conventional dovetail jig, a “top-down” option, such as the RTJ400 from Leigh Industries might be a better choice. Here, you can use a router table and benefit from its larger work surface to support the jig when feeding workpieces through their cuts. Effectively, the jig is a fixed template with an integral clamping system. It functions similarly to a conventional fixed-template jig, just upside down.
Another even more streamlined option for dovetail jigs amounts to a pair of fixed templates and nothing more. With these, you fasten a piece of wood to each template to serve as a backup board during cutting. It also provides a clamping surface for workpieces. Keller & Company innovated this “template only” dovetailing method in the late 1970s, and it remains one of the simplest systems on the market.
Aside from their ease of use, there’s no limit to the width of workpieces you can rout with Keller’s aluminum or phenolic dovetailing templates. With other dovetail jig styles, workpieces must be narrower than the clamping apparatus that holds them in place. Depending on the jig, that might only be 12″ — too narrow for large projects.
Dovetailing Challenges
As I suggested at the outset, dialing a dovetail jig in for accuracy usually takes some trial and error. Shifting the jig’s template slightly forward or backward, changing the bit’s depth of cut or altering how workpieces are offset from one another inside the jig all influence how well the joint parts align and fit together. Here are a few of the common problems you’ll probably encounter when working with your jig. If you’re just getting started, expect several or even all of these situations to occur sooner or later.
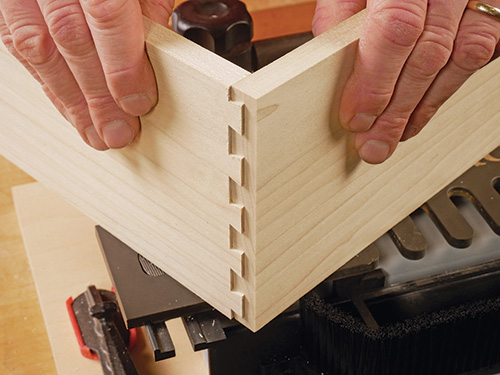
– Overly loose or tight joints. A properly made half-blind or through dovetail joint should slip together without noticeable gaps, but you shouldn’t have to pound them together either. Overly tight fits on a dry joint will only cause you more trouble, once glue is applied and the wood begins to swell. Conversely, loose joints are inherently weak and look sloppy, too.
What’s the fix? Typically, loose or tight joints are the result of a router bit that’s set too deeply (loose fit) for the cut or not deep enough (tight fit). On the next test joint, try a tiny change to your router’s depth of cut, and you’ll probably see a noticeable improvement in how the parts come together. Sneak up on a “push” fit, making only slight depth adjustments each time. On a good day, it may take at least two or three more test cuts after the first try before you’ll achieve a proper joint.
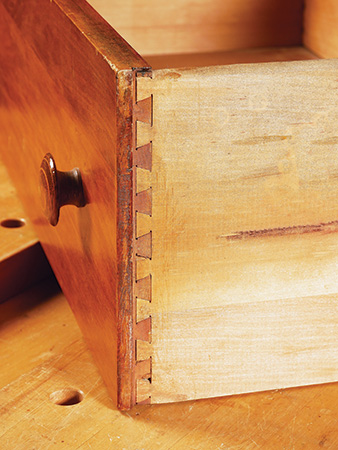
– Half-blind joints don’t fit together flush. It’s common for the tail board of half-blind joints to either slide too far into the sockets of the pin board or not far enough. In these situations, turn your attention to the template’s depth-of-cut setting — not the router bit. A tail board that embeds too deeply into the pin board means the template is allowing the bit to cut too far. Reset the template further forward on the jig housing and try again. Or if the tail board won’t push all the way home, the bit isn’t cutting far enough into the pin board. Move the template backward a smidge and make another test cut. In either case, the amount of mismatch between the parts is the distance you should reset the template.
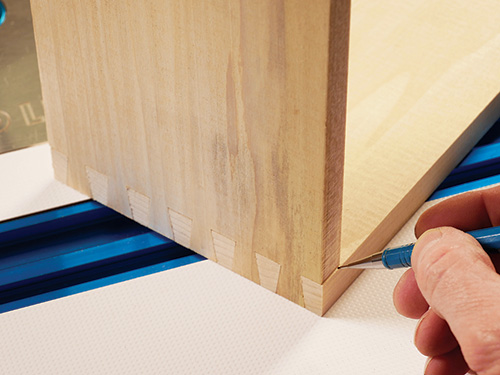
– Part edges misalign. You can see that the edge of this joint’s pin board stands out from the tail board when assembled. In these situations, make sure your pin and tail boards are precisely the same width. Misaligned parts might also indicate that a stop on the jig needs to be adjusted a nudge. If the offset is only minor, the problem might not be worth tweaking the jig; a few swipes with a hand plane or a pass or two over the jointer could be the quicker fix.
– Pins or tails grow or shrink across the joint. Here’s a dastardly problem I once encountered. It occurred well past the stage where my dovetail jig was tuned and cutting beautifully. Some half-blind dovetails on a figured maple drawer I was routing drifted from 3/8″-long tails on one end of a joint to nearly 5/8″ long on the other end. The culprit: my bit was slipping ever so slightly out of the collet in the tough maple, cut by cut. I hope this catastrophe never happens to you, but learn from my mishap: be sure to use a clean router collet in good condition, and periodically check it for tightness as you work — not just before you begin. Dull bits, tough woods, loose collets or simple expansion and contraction of the collet as it heats up and cools off during use all can result in slipping bits…and ruined workpieces.
Tips for Success
Here are a few more tidbits of hard-fought wisdom that might help ease your dovetailing process:
– Take time when preparing your stock. It’s crucial that boards are flat, of uniform thickness and have square ends and edges. Otherwise, prepare for “garbage in, garbage out,” as they say.
– Read and reread your jig’s manual. Unless you use a dovetail jig routinely, you won’t memorize its nuances or probably even keep it set up for use. Make the manual your friend.
– Change settings one at a time and incrementally. A quick way to get befuddled with a dovetail jig is to tweak too many variables at once. Ask any experienced user…

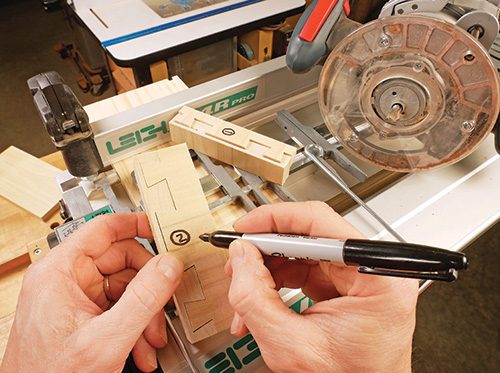
– Save your best sample joints. When a test joint fits just right, by all means save it for future reference. Mark the parts with any relevant information — bit type and depth, template setting, router used, etc. — that can help you replicate the scenario next time. Life is short, so work smarter, not harder.


