You can stain and darken wood using chemical fumes. This is the method that was often used to create the dark oak finish seen on many pieces of antique arts and crafts or mission-style furniture. Our ancestors knew that if you bury white oak in manure, it will turn dark, not from the color of the manure itself, but from the ammonia fumes manure releases. Today we use quicker, cleaner methods for fuming our wood projects.
Why Fuming Works
The fuming process is a chemical stain: we apply a chemical that reacts with something already in wood to create a dye right in the wood itself. Ammonia fumes react with tannin, so only woods that contain tannin, like oak, walnut, cherry and mahogany, will darken when fumed.
You create ammonia fumes by exposing strong ammonium hydroxide to the air. Household cleaning ammonia is too weak to be of much use; it is only a 5% solution. Instead, use 28% ammonium hydroxide, once commonly used in blueprint machines and still available from chemical supply companies.
How to Stain Wood Using Ammonia Fumes
Sand the wood before fuming. The color does not go that deep, so sanding afterwards can result in uneven coloration. Don’t worry if the grain raises a bit; you can safely de-fur the wood with 400-grit paper after fuming.
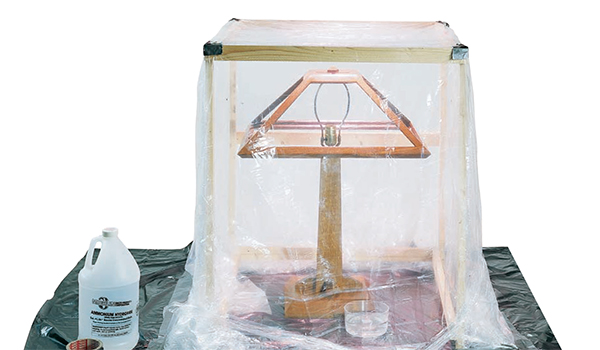
Make an airtight fuming chamber by sealing the edges of a plastic bin or shed with duct tape, or build a simple frame and drape it with plastic sheeting, weighting the edges so no fumes escape. There’s no need for fans inside, as the ammonia fumes will disperse rapidly on their own. Don safety gear, pour some ammonia into a bowl or dish (anything except paper or aluminum), and slip it into the chamber along with the pieces to be fumed.
SAFETY WARNING: Strong ammonia is virulent, so wear goggles, gloves, long sleeves, and a good respirator, and even with all that, limit your exposure. Get the fuming chamber set up, suit up in safety gear, quickly pour the ammonia into a bowl, seal the fuming chamber, and leave the area.
Controlling the Color
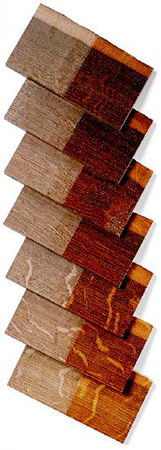
Fuming turns heartwood, which contains a lot of tannin, dark brown — but sapwood, low in tannin, stays light. To color the sapwood, brush it, before fuming, with a tannic acid solution or strong, brewed tea, which contains tannin.
Although you can’t control color as precisely as with stains, you can affect it. The longer you fume, the darker the wood gets. Typical schedules vary from 12 to 72 hours. To test sample scraps for true color, wipe them with mineral spirits, water, or the finish you plan to use.
Hotter air temperatures during fuming create more reddish, as opposed to greenish, hues. Shine a heat lamp through your clear plastic sheet chamber to boost the temperature above 80 degrees for warmer (redder) colors, or leave it cold for cooler (greener) ones. Fumed wood is still raw wood, so you can tweak the color using dye or pigment stain prior to applying clear finish.
Once it’s done, suit up, remove the chamber and the ammonia, and if you are not working outdoors, air out the room and the furniture. Return the ammonia to the bottle and reuse it (although it is now somewhat weaker), or pour it into the toilet and flush. Or, add one cup of 28% ammonia solution to four cups of water to convert it to household ammonia.


