Apply a glaze finish to achieve the perfect wood tone.
The other common method of adding color to wood after it has been sealed is with glaze. While you can add fairly uniform color with it, you can also use glaze to highlight carvings or flutes, create sunbursts and cameos, turn a painted surface into antique white, add age to wood, or even create patterns like fake wood grain and marble. Unlike toner, which is applied just like clear finish, glazing involves both special materials and fairly unique handling techniques. It goes without saying that you should practice all new finishing techniques on scrap wood first, but that goes double for using glaze. Glazing can be a lot of fun and very rewarding, but it does take some skill.
What is glaze?
Glazing is a highly controllable way of floating color in between layers of a finish. When you stain, the wood absorbs the stain, and that has a profound impact on how much color gets taken in and where it lodges, but with glaze you have almost complete control over where the color goes and how much stays on. That is because glaze is applied not to raw wood, but rather atop one or more coats of finish, which prevents the wood from absorbing any of it. In most cases, it is very difficult to reverse stain and start over, but if glazing starts to go wrong, you can simply wipe it off and start again.
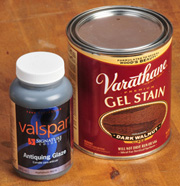
The material itself, called glaze, looks rather similar to stain, and in some cases stains can be used as glazes. Some gel stains, for example, will work nicely as glazes right out of the container, and theoretically, almost any stain could be used as a glaze. However, most glaze formulations are thicker than stain to allow more control and manipulation of the color, and tend to have more intense coloration, since very little glaze will be left on the surface. As with stains, some are fast drying and some slow. Fast glazes give you less time to blend and manipulate the color. Slow glazes afford more working time but also require longer drying time before you can seal the glaze with the next coat of finish.
Buying or mixing glaze
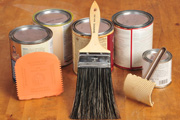
When it comes to the glaze itself you have many choices. You can buy ready-to-use glazes, use a combination of paint and commercial glaze base to create custom color glazes, modify paint to use as glaze, or mix your own glaze from scratch. Normally I would steer you toward the easiest option, which is buying ready-to-use glaze. However, there are many different things you can do with glaze, and each technique demands the ability to move and deposit exactly how much glaze you want exactly where you want it. For that reason, there are times when mixing custom glazes makes a lot of sense. Only then can you gain complete control over the lubricity, color density and drying time of the glaze.
Gel stain, right.
The simplest method is to buy off-the-shelf glaze. It is formulated to dry slowly enough to give you time to blend it evenly on the surface. I was able to find pre-mixed waterbased glazes at most of the major home improvement stores, but there were very few colors available. Just across the aisle, stacks of familiar oil based gel stains offered a huge range of color options, and most of them will also work nicely as glazes right out of the can.
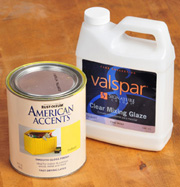

Along with premixed glazes you’ll find glaze base, such as Zinsser Blend and Glaze™. This translucent liquid is designed to be mixed with paint to make a custom colored glaze. Since stores will mix paint in every color of the rainbow, you can easily make up the glaze of your dreams. Blend and Glaze™ is offered in both a waterbased version that mixes with latex paint or artist’s acrylic colors, and a slower drying alkyd version that mixes with oil based paint, or artist’s oil or Japan colors.
Paint can also be modified to work as glaze. Most oil based paints dry slowly enough by themselves, and may need only a bit of thinner or Penetrol to make them workable glazes. The same is true of latex paints, though you will probably want to thin them considerably with Floetrol® to get a slow enough mixture.
If you’re feeling more adventurous, consider mixing glaze from scratch. Start with Japan colors, artist’s oil colors, oil-based enamel paint, oil based asphaltum or gilsonite, or any combination of the four. They are all compatible with one another, and all thin with the same solvents. Add some mineral spirits or naphtha to thin the colorant to working consistency, about the thickness of heavy cream. Naphtha evaporates a bit faster, while mineral spirits, also called paint thinner, gives you a slightly slower glaze. Add a small amount of boiled linseed oil if you need to extend the working time or add lubricity. More lubricity means a more slippery glaze that is easier to manipulate and blend. Don’t overdo it, though. Start with just a teaspoon or two per pint of glaze, and add more only if the glaze is drying too fast. Add too much oil and your glaze may take forever to dry.
How to apply glaze finishes
Start with wood that has been sealed with at least one good coat of whatever finish you choose. With but one exception, you can glaze over any type of coating as long as it is dry. The exception is shellac; most glazes work fine on it, but asphaltum will sometimes bite into the shellac, preventing you from removing it sufficiently. In general, a smoother, thicker finish, perhaps one built of multiple coats, will let the glaze move around more easily, giving you more control over exactly where the color stays. A thinner finish will allow some glaze to collect in the pores, resulting in a more “woody” look that brings out more of the wood character.
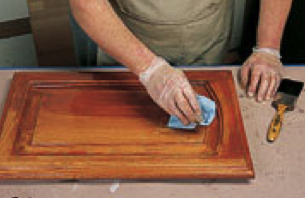
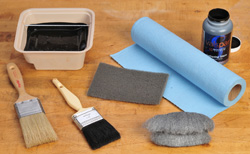
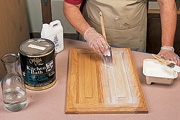
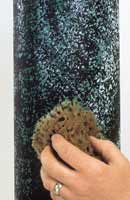
Your basic strategy will be to apply glaze, wipe some off, then blend and move it. To that end you will want an open pan filled with glaze, a brush to apply the wet glaze, a dry brush to blend it, and rags or paper shop towels to both wipe the excess glaze from the wood and from your dry brush, should it get too wet while working. The first brush can be whatever you choose, but I find a very soft bristle brush is best for blending glaze evenly without brush marks. I also keep 0000 steel wool, for oil based glaze, or nylon abrasive pads, for waterbased glaze, as a tool for highlighting, adding grain patterns and removing glaze in a more controlled manner than you can do with rags.
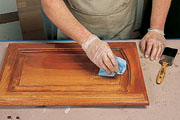
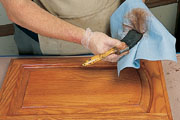
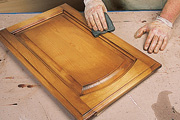
Apply the glaze liberally with a brush, making sure it gets into all recesses, then wipe some off with a rag. Use a dry, soft bristle brush to spread the glaze evenly over the surface. The brush will both move glaze around and pick up excess glaze from puddles in corners. If the bristles get too wet, wipe them off with a paper shop towel. Use the steel wool or nylon abrasive pads to remove glaze gently. Don’t be afraid to go back and forth between tools, adding a bit of graining with the steel wool or nylon pads, then blending it a bit with the soft dry brush.
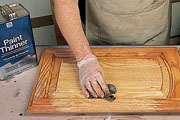
If things really start to go wrong, you can wipe all the glaze back off the finish and start over. To wipe off, use a rag or nylon pad dipped in mineral spirits for oil based glaze, or dipped in water for waterbased glaze, but don’t wait too long to make that decision. Once the glaze starts to dry, your window of opportunity to wipe it off and start over is gone.
Special effects with glaze
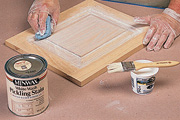
Once you have the hang of it, try a few other colors and techniques to create even more dramatic finishes. Use steel wool or nylon pads to highlight carvings, flutes or areas adjacent to recessed corners by rubbing off a bit more glaze from the high spots. On a flat panel or table top, leave the glaze darker around the perimeter and gradually lighter toward the center to create a cameo or sunburst effect. Make pickled or limed finish with white or off white glaze. That’s especially popular over unstained light colored woods like pine and oak.
There are a wealth of techniques using glazes atop solid color painted surfaces. The simplest is antique white, which uses the same techniques, but with raw umber or burnt umber colored glaze over white paint. With specialty graining tools, which include graining combs, pattern tools and graining brushes, you can make faux bois, or fake wood grain.
Fake marble and stone are also done with glaze, though the tools you use can be extremely varied. Here is where you can let creativity run wild, using all manner of textured fabrics, sea sponges and crumpled paper for variegated background colors, and fine brushes, sharpened dowels and feathers for adding grain and fault lines. Here’s a good marble background effect to try on a painted sample. Coat the sample with a thin layer of glaze, lay a piece of plastic sandwich wrap onto the wet glaze, then lift it off quickly. The same trick works with a piece of newspaper instead of plastic wrap, yet yields an entirely different background pattern. Both work nicely for stone or marble.
Don’t be afraid to create a background pattern, seal it in with another coat of finish after it dries, then go back and add a second pattern in a different color. Create as many layers as you need to mimic the deep, complex textures seen in real marble and semi-precious stone. For most stone work you will find that using colors only slightly different from one another give the most convincing backgrounds, but sometimes very dramatic glazes, such as white over black paint or black over white, can produce interesting results. Click on these links for more on both fake wood graining and marbleizing.
How to create a stone finish
One of my favorite stone finishes, and far and away one of the easiest, is lapis lazuli. Start with the surface painted light blue and completely smooth. Mix a fairly thick, very dark cobalt blue glaze. Apply an even and fairly liberal coat, then lay a full sheet of newspaper, one layer thick, onto the wet glaze and lift it off quickly. As it pulls against the thick glaze it leaves a highly irregular variegated pattern reminiscent of the real thing. Use a fresh sheet of newsprint for each section of glaze, and don’t go back over it.
This is one of those situations where mixing the glaze is even more important than the technique. The glaze must be thick enough to take the pattern and not flow back into a solid color as it dries. If you don’t like the way it came out, quickly remove the glaze and try again, but the key to this finish is the random character created by this low effort method. Once the pattern is to your liking, you can sprinkle a few bits of crumbled gold or silver leaf in a few random spots onto the wet glaze to mimic the tiny pockets of metal often found in real lapis.
Another frightfully easy stone you can make with glaze is travertine, which starts with a beige painted background. Mix several different colors of brown glazes, fairly similar but varying from lighter to darker. Dip an old toothbrush or stippling brush into the glaze and flick the bristles to leave mottled spots of color on the surface. As the colors blend, a rich tapestry of variegated stone will emerge.
Sealing in the glaze
When you are happy with the results, let the glaze dry thoroughly. Usually that takes overnight, but drying time can vary tremendously from one glazing material to another. Once it is dry, seal it with at least one more coat of whatever topcoat you choose, and preferably two or more. Since glaze is applied fairly thin, few compatibility issues arise, but to be safe, I generally seal in oil based glaze with a thin coat of SealCoat™ if I plan to topcoat with waterbased finish. Oil based and solvent based finishes rarely create any problems over glaze, and the SealCoat is usually not needed, though it is important to make sure the glaze is completely dry before you add your final clear coats.


