The final step to a great finish on your next woodworking project.
You can rub out all types of film forming finishes, including shellac, lacquer, oil based varnish and polyurethane, waterbased coatings and catalyzed or conversion coatings. There are three strong reasons for doing so.
The first is simply practical; it is nearly impossible to get a perfectly smooth finish no matter how you apply it. Even in a dedicated clean room, the odds against getting a finish to dry without picking up dust nibs are astronomical, and for those of us who finish in our wood shops, the odds are even worse. Rubbing lets you quickly remove any dust nibs, surface and brush marks or sheen anomalies.
The second reason is overall appearance. Rubbed gloss simply looks different than off the brush or off the gun gloss, and satin does as well. A good satin rub has the elegant look of brushed brass, and a well buffed gloss not only presents a glossy, reflective surface, but a perfectly smooth one as well. The goal of a satin rub is to leave a very uniform scratch pattern going in the direction of the grain, which will refract light evenly. The goal of a gloss rub is to leave a perfectly flat, reflective surface with no visible scratches.
Finally, there is feel. Furniture gets looked at, but it also gets handled and touched, and there is nothing that quite compares to the ultra smooth feel of a well rubbed finish.
Changing Sheen
While not one of the primary reasons, one function of rubbing is to change the sheen of a finish. However, there are limitations to that because of the way satin finishes are formulated. Finishes typically start out gloss, and are made semi-gloss, satin or matte with the addition of something called flatting agent, which makes the finish itself less shiny.
Flatting agent consists of tiny particles embedded in the finish, and they actually make the coating slightly cloudy. Look into a can of satin finish and a can of gloss and the difference in clarity will be immediately obvious. Apply enough coats of satin finish you will see a slight loss of clarity in the build. For that reason, it is often wiser to build up a thick finishes in gloss, which has better clarity. You can then switch to satin for the last couple of coats, if that’s the sheen you prefer, or simply rub the gloss down to satin.
Going the other direction, trying to rub a satin finish to gloss, is not a good idea. While the surface will get a bit more reflective, the embedded flatting agent will prevent you from creating the sort of clear, gelid gloss you most likely want. However, you can rub satin up to semi-gloss, matte up to satin, or rub any finish to a lower sheen.
Dry Time
Before we get into the nuts and bolts of how to rub out a finish, allow me to say a word about drying time. Simply put, the longer you let a finish cure, the easier it will be to rub it, and that goes for any sheen. However, you can get away with rubbing a satin sheen sooner than a gloss one. Try to rub a gloss finish too soon and you’ll find that rub as you might, you still don’t seem to develop a good gloss.
To make matters worse, drying time is a bit of a moving target that depends on a number of factors. Different types of finishes drying at different rates, but beyond that, the drying time is also affected by the amount of time you leave between coats, how thickly you apply each coat, and the temperature and humidity in the drying room. For instance, if you apply three thin coats at one per day, drying goes quickly. Apply three coats in one day, or apply much thicker coats, and some finishes will take nine times as long to cure.
All finishes prefer warm, dry conditions. Cold temperatures or high humidity will extend drying time substantially. For those reasons, the drying time listed on a can label must be taken with a grain of salt. They assume you will be coating under ideal drying conditions and applying appropriately thin coats, but knowing that most people are impatient, manufacturers often print idealized drying times that are much shorter than what you may need under real conditions.
How long must you realistically wait to rub? If you are applying only one thin coat per day in ideal drying conditions, you can usually rub solvent or oil based finishes to satin just a few days after the last coat, though waiting a week is better. When using waterbased finishes, it’s best to wait at least two weeks, and a month if you can afford the time. That’s because some waterbased coatings will react badly to the solvents in paste wax. For gloss, wait four to six weeks no matter what the finish.
How to Rub to a Satin Finish

1. Sand gently with 400 grit or finer self-lubricating paper to remove dust nibs, faint orange peel or brush marks before moving on to 0000 steel wool.
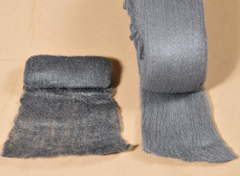
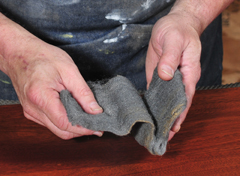
2. Not all steel wool is created equal. Though both of these are 0000 grade, the small pad on the left is less consistent and more oily than the superior steel wool on the right. Good wool will give you a more uniform rub.
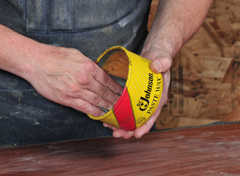
3. Load a pad of 0000 steel wool with paste wax, The wax acts as a lubricant for the rubbing process and helps create a more consistent and better looking surface than dry steel wool.
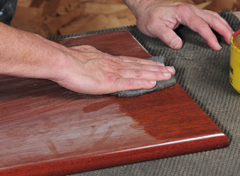
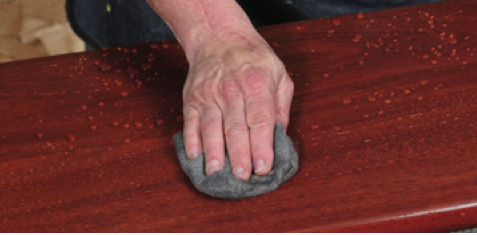
4. Rub the ends first, going with the grain. That way, you won’t give the ends of the board short shrift during the main rubbing process. Hold your hand flat so as not to rub through any sharp edges, and rub the ends with short strokes following the grain.
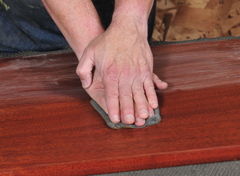
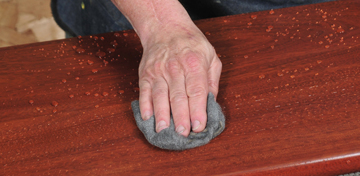
5. Using long strokes and a good bit of pressure, rub in very straight lines from end to end following the direction of the grain. Overlap your strokes. Going side to side from the top of the surface to the bottom and back again equals one pass. To ensure a uniform scratch pattern on the entire surface, make six passes.
6. Open and refold the pad to expose a new surface whenever the first one dulls, and add more paste wax as needed.
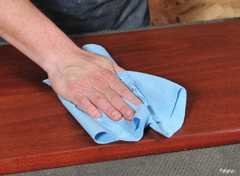
7. As soon as you are done rubbing, wipe off all the wax aggressively using paper shop towels. Do this immediately and do not let the wax dry or it will buff, getting shiny as you rub it off.
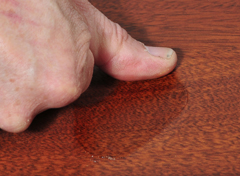
8. Try as you might, you may find that even though you wiped quickly and aggressively, enough wax remains on the surface to smear. If you can leave a smudge by rubbing your thumb across the surface, you need to remove the excess wax.

9. To remove the excess wax, sprinkle a little bit of cold water onto the surface. It should bead up immediately.
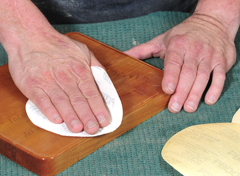
10. With a new, clean 0000 pad, rub again carefully with the grain from end to end, but this time apply no pressure beyond the weight of your hand. When you get to the end, flip the pad over and go back for a second pass. The object is not to make new scratches, but merely to cut off the excess wax.

11. The cold water will help congeal the wax, allowing the pad to remove the excess, which will collect on the steel wool. Wipe off the water and you are done.
The above sequence shows the process for rubbing a table top with a suitably ample finish to a uniform satin sheen. For semi-gloss, follow the same procedure but replace the wax with automotive rubbing or polishing compound. You may have to thin paste type compounds with the appropriate solvent, usually water.
To rub vertical surfaces, simply rub with wax and 0000 steel wool in the direction of the grain, and wipe off the wax immediately. Because vertical surfaces are not viewed at low angles or quite so critically, you can usually get away with a single pass and wipe down rather than the more complicated process I described for table tops.
How to Rub to a Gloss Finish
12. Sand the cured, gloss finish aggressively to make it absolutely flat. Start with 600 or 800 grit self lubricating paper and continue through the grits to 1200 or finer. Use mineral spirits or soapy water as a lubricant if you use wet and dry paper instead of self lubricating paper. The better you sand, the less time you will spend rubbing.

13. Dip a rag dampened with the appropriate solvent (usually water) into the rubbing compound and rub aggressively in circles. It does not matter what direction you go, since you will not be leaving any visible scratches. Wipe off all the compound and take a new rag when you move from rubbing compound to finer polishing compound.
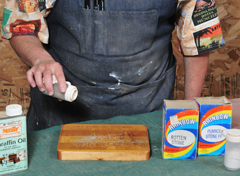
14. If you prefer traditional materials to automotive compounds, use light oil mixed with pumice, which comes in various grits. After the finest pumice grit, switch to rottenstone.
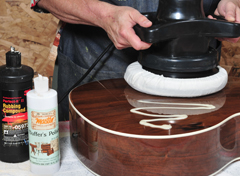
15. Should you prefer power to elbow grease, the electric buffer and polishing compounds you use on your car will also work for wood finishes, and make quick work of buffing larger areas. Be careful near edges, and use light pressure to avoid burning the finish.
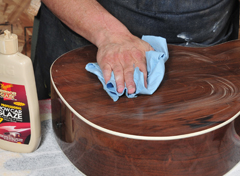
16. The last rub or buff, done with a clean cloth or buffing head, should remove any rubbing residue, leaving a shiny gloss surface. Follow that with an application of automotive swirl mark remover to add an additional fillip of shine. Simply wipe it on and wipe it off.
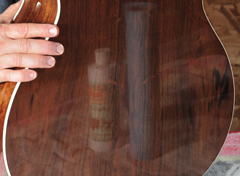
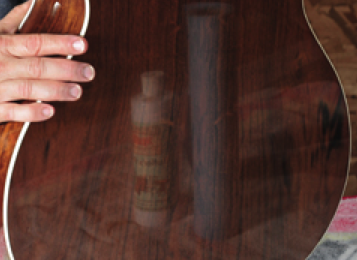
17. A good high gloss rub will reflect objects in it without distortion.


