
Jeff Day shares his insights into the challenging craft of building a bamboo fly rod.
I’ve been a woodworker and a fly fisherman for years, so it was probably inevitable that sooner or later I would build a bamboo fly rod.
Inevitable, perhaps, but not necessarily a walk in the park. It cost me a fishing season. I broke rods long before they left the shop. I made rods that worked better as tomato stakes. I fried one rod to a crisp. I suffered epoxy failures and polyurethane busts. In short, I enjoyed every minute of it, and three rods after I started, I have a rod that I’m not ashamed to show to the world. It would have gone better if I had learned to follow directions at some point in my life, but it’s too late for that. I will never be a legendary rodmaker, but I hope I can save you from some beginner’s mistakes – perhaps all of them – in this article.
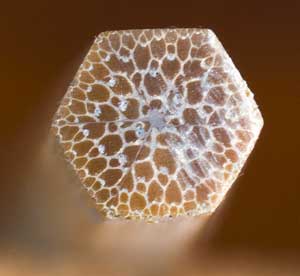
But let’s start at the beginning. A bamboo fly rod is made of six strips of bamboo glued together to form hexagon (photo below). The strips are triangular in cross-section, and since the rod tapers from handle to tip, the triangular strips taper, too — the triangle is bigger at one end of the strip than the other.
All of this is done in three stages: First you rough out a rod blank, splitting the bamboo stem to stern, kiln drying it, and then planing it into long triangular strips — a set of six strips for each section of the rod. In the second stage, you taper the triangular strips with a block plane and a special metal form. Then you glue the pieces together, clamping the pieces together by wrapping them with thread. On a good day, it’s a piece of cake. On a bad day, it’s worse than getting skunked on the stream. Far worse. The final stage is applying the finish and attaching the hardware. I like to think of the stages as lumberjack, cabinetmaker and finisher.
Stage One: Lumberjack
This stage begins with a piece of Tonkin cane, the only cane used in rod making, because its long, dense, fibers make for a powerful rod. In the entire world, Tonkin cane grows in a single 30-square mile patch of China. When trade with China was banned during the Cold War, the only dealer who still had any cane left was Charles Demerest, in Bloomingdale, New Jersey. From 1950 to 1971, his pre-embargo bamboo was the rodmaker’s only supply. Demerest is still one of the few suppliers in the country, and I buy my cane from him because he kept a tradition alive. His bamboo, like all Tonkin cane, is sold in 10-foot lengths, which are usually cut in half for shipping.
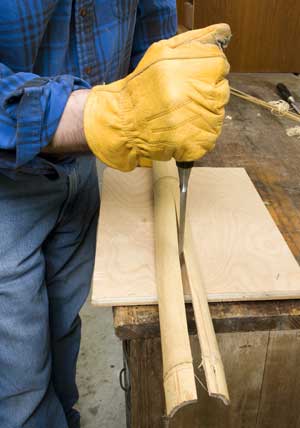
Technically, bamboo is a grass, and a stick is called a culm. The easiest and fastest way to get the strips you need is to split the culm the way Windsor chair makers rive a chair back from a log, and for the same reason. Splitting bamboo gives you a piece with long parallel strands of grain. Rodmakers often make their own splitters out of knives or screwdrivers that they drive into the end of the culm. Mine are chisels with edges that are ground to a rounded point. As the pieces get smaller, I hold the end of the chisel on the bench with one hand, and feed the bamboo into it with the other. Your goal: six strips plus whatever else you can get from the bottom five feet of the culm. This will be the butt section. The tip comes from the upper five feet of the culm, and because rods traditionally have an extra tip, you’ll want to split it into 12 pieces.
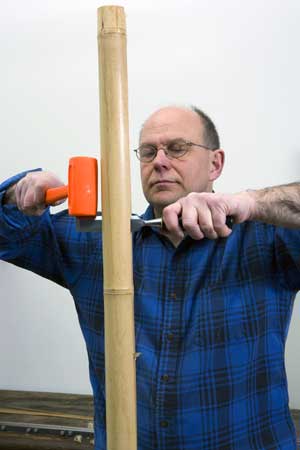
At this point, you make a couple of minor adjustments. A stick of bamboo is divided into shorter sections by a series of bumps, called nodes. You need to get rid of the bumps and deal with the bends that typically occur around them. Fortunately, bamboo bends when heated. Holding the node directly over a heat gun (photo below) until the wood is almost too hot to handle makes the heated section bend like warm plastic. Once you’ve heated it, you can flatten the node completely (or almost so) by clamping it in the vise with the outside face against a jaw. Count to 10, and then clamp the edges between the jaws to straighten out the bends. If any of the nodal bump remains, you sand it out by hand with 240-grit paper and a hard rubber sanding block.
Before we shape each piece into a triangle, there are two steps. The first is to get each piece down to a manageable width. Traditionally, this is done with a hand plane — it may be a grass, but bamboo works like wood. Tradition has its place, but this isn’t really the time for it. I rip the strips to width on the table saw (use lots of featherboards) and then I plane them into triangles on jig in the planer (photo below). The planer jig is a simple oak auxiliary table with 60-degree grooves routed into it. Battens on the bottom fit snugly against the front and back of the planer bed to hold the jig in place. Each groove is slightly shallower than its neighbor — the largest is about 3/8 inches deep and the smallest is about 1/16-inch deep. I feed all the strips into the first groove, flip them edge for edge, and then feed them into the next shallower groove. I work my way down the table until I’ve planed the strips to the size required by the rod.
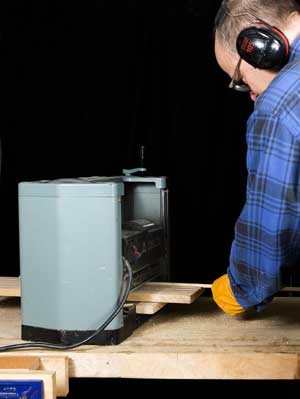
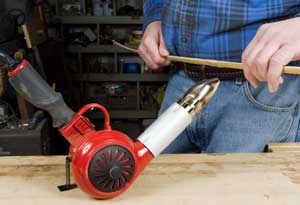
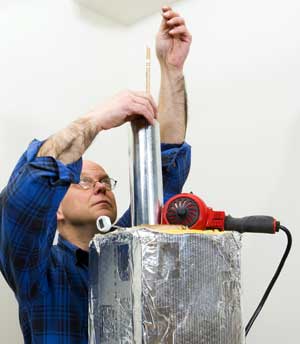
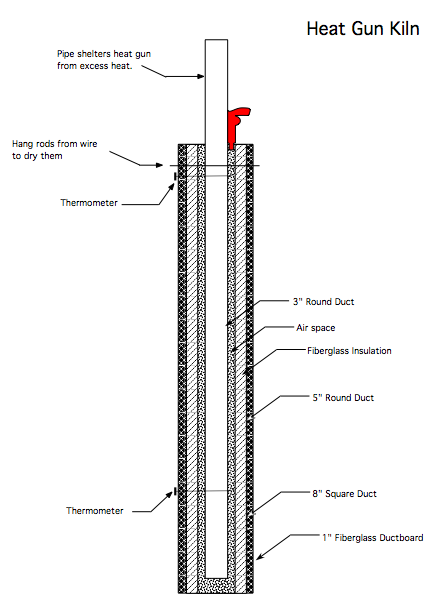
Like any piece of lumber, your strips of bamboo need to be kiln dried. This not only drives out water that might haunt you down the road, it tempers the bamboo, turning what would otherwise be a soft rod into one with backbone. It doesn’t take long — about 10 minutes at 350 degrees for the butts, and slightly less for the tips. The problem, of course, is finding an oven that will hold a strip of bamboo that is still somewhere between four and five feet long. Some people make friends with the folks at their local pizza shop. The current rage is a shop-built oven with a thermostat and electric heating elements mounted inside metal heating duct. (It was on a crude variation of this that I baked a rod into charcoal.) I now use a heat gun, combined with a couple of heat ducts — one inside the other — with lots of insulation around the outer pipe (photo and diagram below). The heat gun shoots heat down the outside duct; it rises into the inner duct at an even temperature. I use two meat thermometers, one at the top and one at the bottom of the ducts to monitor the temperature. I’m lucky: the unit automatically tops out at about 350 degrees, but if necessary, I can regulate the temperature by adjusting the air intake on my heat gun.
Stage Two: Cabinetmaker
Here, tradition rules, I am fine with it. You are working with a finely tuned plane, a razor-sharp blade and a tapering jig that adjusts to the thousandths of an inch. I enjoy it the way I enjoy fly casting—nothing matters but what you’re doing, and what you’re doing is about as good as it gets.
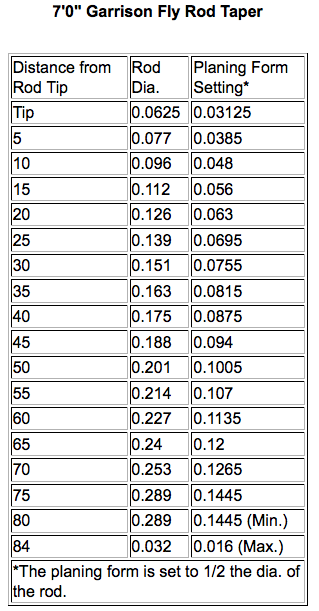
The fact is, that while there is no perfect taper for a rod, there are thousands of bad ones. I chose a time-tested taper developed by Everett Garrison. Garrison made some 700 rods from 1927 until his death in 1975, and they are considered some of the finest ever made. I copied the seven-foot rod he used on the last day he went fishing. The dimensions are listed in the chart (see below) 7’0″ Garrison Fly Rod Taper. Some of his other tapers, as well as his directions for building can be found in his book A Master’s Guide to Building a Bamboo Fly Rod, co-authored with Hoagy Carmichael.
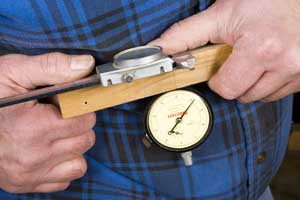
Understanding how rodmaking works means understanding how the tapering jig works. The tapering jig, also called a planing form, is made of two bars of steel five feet long. The edges that face each other are chamfered and form a V-groove when the bars are put together. At one end of the jig the chamfers form a deep valley; at the other end they form a shallow valley. In between, the chamfer forms a valley that slopes evenly between the two ends. The bamboo sits proud of the jig, and you plane it until the plane is riding on the jig. When it is, the bamboo is the same shape as the valley—wide at one end, narrow at the other. Because of the hundreds of different rod tapers, you can adjust the depth of the valley every five inches using a pair of bolts. One bolt pushes the metal bars further apart, the other pulls them together.
Setting the Planing Forms
Setting the forms to the proper taper requires two tools from the machinist’s trade — the dial caliper and a depth indicator with a pointed tip (above). Initially, you set the forms with a depth gauge, and after planing a test strip, you check the setting’s accuracy with the dial caliper.
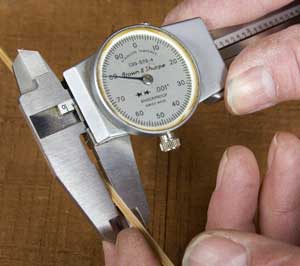

On the face of it, setting the planning forms to get the taper you want is a matter of tightening and loosening a series of bolts. The problem comes in knowing how much to tighten or loosen them. For this, you rely on a machinist’s tool, called a depth gauge, which reads out the depth of a hole in thousandths. Because you’re measuring a V-groove, you put a 60-degree tip on the end of the gauge.
But because of the fine calibration involved, machinist tools have to be “zeroed out. ” On a dial caliper, your bring the jaws together, loosen the lock on the dial, and then turn it so the needle is pointing exactly at zero. For a lot of reasons, this is tricky with a V-point tip, and unless your setting is accurate, you can’t very well adjust the forms.
Here’s the solution. Zero out your dial caliper and then set the opening between the jaws to .100. Put the dial indicator between the jaws, and turn the dial until it reads .866. Lock the dial in place, and you’ve calibrated the depth gage. You’ll note the wooden base on my depth gauge. The 60-degree tip is a bit wide, and catches on the metal base that came with the indicator. A lot of rodmakers use wooden bases, and until I get around to buying a new tip, I will, too.
But depth gauges are like fishermen. They aren’t always truthful. Set the forms .003 inch wider than called for, and plane a spare strip of bamboo. Check the size with your calipers, and adjust the forms until your sample and your calipers tell you you’ve got it right.
As you plane, always keep the outer face of the bamboo, called the rind, against a chamfer, so that you don’t cut through the fibers there, which are the strongest. Alternate planing between the remaining two sides with every pass, so you don’t plane more off one side than the other and end up with asymmetrical strip. Measure with your dial calipers as you go, and if the sides differ, plane the short side until they are equal. Once you’ve planed the butt sections, reset the jig for the tips, and plane away.
A Custom Built Rodmaker’s Plane
At some point early in your rod building, the edge of your plane will dig into the planing forms you’ve just spent a small fortune to buy. Everyone does it, and no one likes it. But special rodmakers’ planes give you the control you need to avoid gouging. They have a groove milled down the middle, creating two outside “rails” that glide along the form. The groove travels over the bamboo, and the blade extends just far enough to do its work without cutting into the planing form. I don’t always use the plane, but when I do, it is virtually impossible to gouge the planing form.

The only rodmaker’s plane on the market is a beautiful piece of work, but you’ll pay for it. Instead, I made my own by routing a groove through a favorite block plane. I used a 5/8-inch straight bit in the router table, and set the distance between the bit and rail to 1/2 inch– the width of a rail. Raise the router bit to make a cut about .001 deep and make a trial run on a piece of wood to check your setting. When everything is right, take the blade out of the plane and run the plane across the spinning bit, holding it tight against the fence. Turn it around, and make a pass with the other side of the plane against the fence. Repeat until the groove is .003 deep.
I tried this on a junky old plane, and when it worked (to my amazement) I tried it for real. Plane, router, and bit are all doing well.
Gluing the Rod Together
When the strips have been planed to final dimension, it is time to glue them together. Initially, I used polyurethane glue. It is widely available, affordable, and waterproof. It fills gaps, has a working time of 20 to 30 minutes, and dries the same color as bamboo. Unfortunately, 20 to 30 minutes isn’t a lot of time when you’re trying to clamp up six pieces of bamboo only slightly thicker than the butt end of a leader. The pieces slipped, slid and twisted as I worked, and to make a long story short, the polyurethane rods were the ones that became tomato stakes. I use industrial epoxy now, which is surprisingly friendly– it dries slowly, so if I have a problem I literally have hours to solve it.
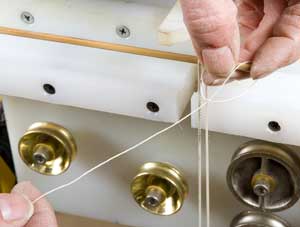
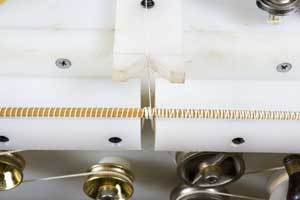
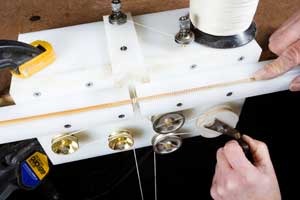
The strips that make up a fly rod aren’t going to clamp together with even the best clamps, so rodmakers clamp them with a shop-made jig (photos below, designed by Everett Garrison) that binds the pieces together in taut, spiraling wraps of upholstery thread. You apply the glue first, of course, using a toothbrush to spread it over all six strips, which are lined up side-by-side on top of a piece of masking tape. You roll the pieces together, and then run them through the binder. A drive belt made of kite line turns the rod and moves it forward as upholstery thread, fed from above, wraps tightly around the rod.
Making a Garrison Binder
It is hard not to look at Garrison binder and think of Rube Goldberg, but at heart, it’s actually a simple machine. The drive belt — a length of kite string with the ends tied together — travels up from a weight and pulley to the rod. The belt wraps twice around the rod, and goes down to the drive wheel. From there, the belt travels back to the weight and pulley, back up to the rod, and so on. Turning the crank on the drive wheel turns the rod and moves it from left to right. The rest of the wheels — made from old pulleys — are simply there to guide the string. The two immediately left of the drive wheel pinch the string against it so the belt won’t slip. The other two wheels guide the string on its trip from the weights, and keep it from twisting.
The purpose of all this is to wrap upholstery thread around the rod and bind the pieces together. The thread feeds from above, is tucked under the drive string at the rod, and spirals around the rod as it moves.
The base of my binder is made of HDPE, an epoxy resistant plastic that works like wood. You can also make the jig out of wood or metal. None of the dimensions are particularly critical. The wheels can go almost anywhere, though the jig does seem to work better if the drive belt runs at an angle as it approaches and leaves the rod. For better traction, put a rubber band around the drive wheel.
The weights are fishing weights, connected to a pulley by a carabiner. I filed a small groove in the face of the pulley so that I could feed the drive belt through it.
Download construction drawings of the Garrison-Rod-Binder
Flatten the Rod
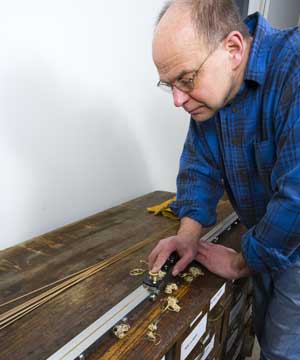
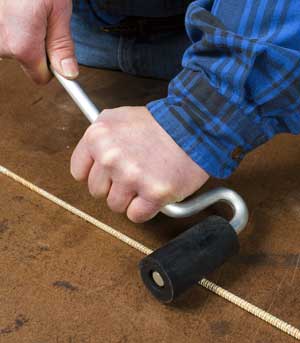
The fishing weights hanging from the drive belt determine the pressure with which the string is applied. On a tip as tiny as this one, as I discovered, the weight of anything more than the pulley is enough to snap the rod until you get a good 10 inches from the tip. At that point I add a 12-ounce weight. I use a 16-ounce weight on the butt section. Once the rod is wrapped, you straighten out any twists, and then roll it under a board, a roller, or both, to straighten it (photo below). I set it under weights on the planing form to keep it straight while the glue cures. There will still be some minor twists and bends when the glue dries, but you can straighten them out with gentle heat from the heat gun.
Stage Three: Finishing
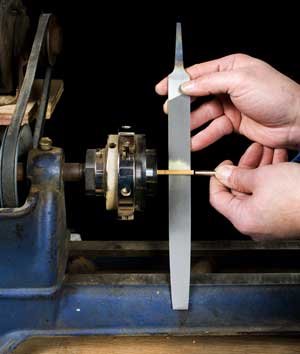
All that remains is putting the ferrules, handle, reel seat and line guides on. Ferrules first: The i.d. of the ferrule is less than the o.d. of the rod, so you file down the ends as the blank turns on the lathe. You’ll need a three- or four- jawed chuck and a support to keep the far end the blank from whipping around. I made my support by bolting a piece of plywood to a table saw outfeed stand. Drill a hole in the plywood, line it with something soft (like a cork with a hole drilled in it) and then feed the rod through the hole to steady it.
The handle and reel seat get glued on next – get ready-made ones for your first couple of rods. You can learn to make your own later.
Finishing, as a friend observed, is half science and half snake oil. Garrison hit upon the method most rodmakers use today. He dipped the rod, narrow end down, into an upright pipe filled with varnish, and pulled it out with a motor running at 1 rpm.
This requires a pretty tall ceiling. I don’t have one, so I began to think about the last days of each semester in my college woodworking courses, when the shop smelled of Waterlox and Watco. It was the dustiest place on the planet, and yet because we were using oil-based finishes that we wiped off, we could still get a blemish-free finishes. So far, I’ve finished my rods with Birchwood Casey® TRU-OIL® Gun Stock Finish — a pure tung oil that is also traditional rod finish. I apply it with a rag, and rub it for about five minutes and set it aside to dry. If there are any imperfections once the coat dries, I sand them gently out with 1,000-grit paper. After three or four coats, the finish rivals varnish.
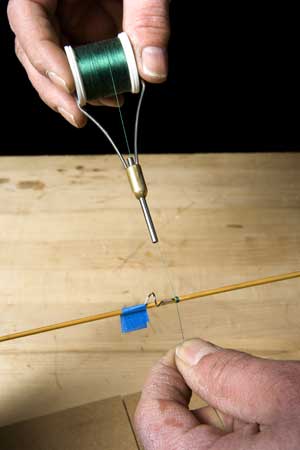
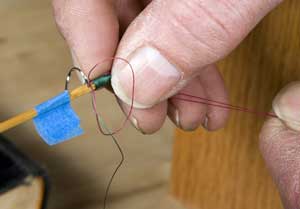
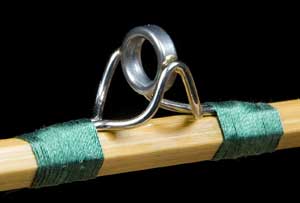
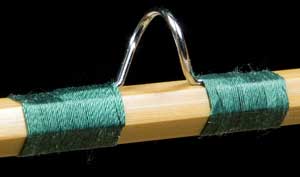
When the finish is dry, you can put on the guides. The loop at the tip of the rod is epoxied in place. The other guides are held in place by silk thread wrapped around the rod. I’ve found my fly tying bobbin is the easiest way to start the wrap. Once I’ve started the wrap, I run the thread through the middle of a book to create some drag, and turn the rod to wrap the guide.
If you started in the fall, and you have made no tomato stakes and started no fires, it will probably be early January by the time you apply the several coats of varnish that hold the silk thread in place. Around here, it will be a couple of more weeks before the blue-winged olive hatch. See you on the stream.


