At their most basic, hollow-chisel mortisers are mechanically and operationally the same as drill presses. Both have a spinning chuck, and both have feed levers that lower and raise the chuck through the workpiece. Both come in benchtop and floor versions. And both use drill bits, although mortising bits are actually specialized augers.
But similarities end there, starting with speed. While large industrial mortisers may offer multiple speeds, those for the home shop are generally single-speed direct-drive units operating at 1,725 rpm (although a few are 3,450 rpm).
Since the bit alone does all cutting on a drill press, the low-torque feed levers take a few rotations for a complete stroke. The feed on a mortiser, meanwhile, fully lowers the auger/chisel assembly in a single, high-torque pull to power the chisel into the workpiece.
Finally, a clamping and hold-down mechanism is absolutely essential on a mortiser. Just as a lot of torque is needed to force the chisel into the wood, substantial holding power is needed to grip the workpiece when retracting the chisel. These hold-downs are typically part of a fence built into the base itself.
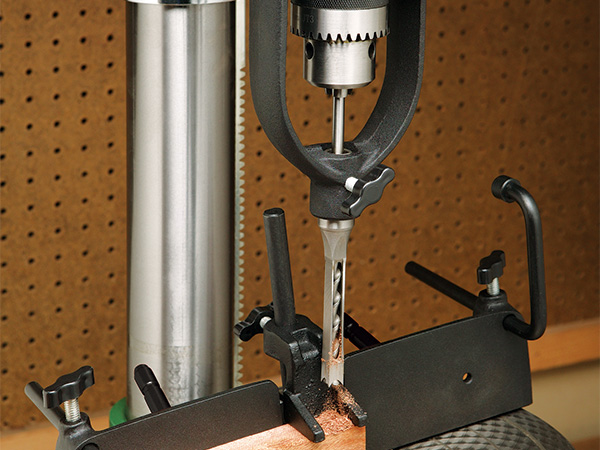
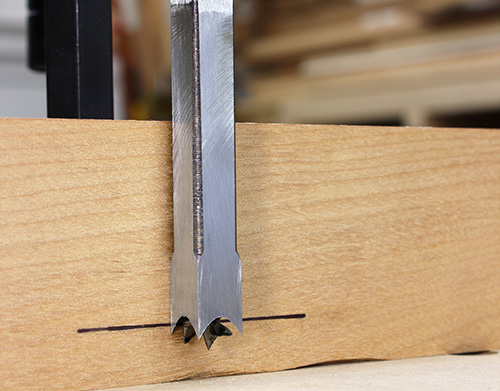
A mortiser’s business end is a two-part assembly consisting of a square, hollow chisel with a very long auger nestled inside. The chisel mounts to the quill, while the bit goes in the chuck. When lowered into the workpiece, the two parts work as a team to create a square hole. Because the auger’s cutting tip is slightly ahead of the cutting edges of the chisel, when lowered into the workpiece it creates a round hole and removes most of the waste. The edges of the chisel follow right behind, with the sharp downward corners squaring up the hole.
Mortiser Safety and Maintenance
Most of the safety practices for drill presses apply to mortisers, but there are two additional things to be aware of with mortisers.
The first is that mortising chisels are wicked sharp all the way around the square opening. What’s more, the corners of that opening are extended downward into extremely sharp points. Be very careful with these, as it’s easy to unintentionally brush a hand against them when setting up a workpiece (he says with the conviction of experience).
Mortisers also require a good deal of muscle power, and an extended period of usage can result in an arm that aches for a day or two afterward — pace yourself when mortising to avoid overdoing it.
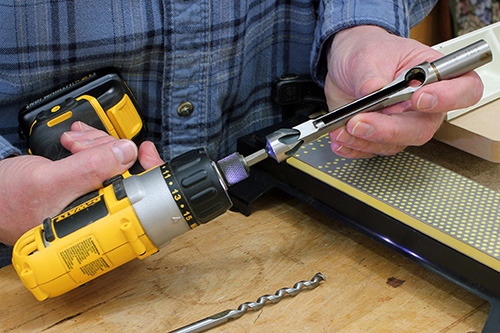
Mortiser chisels, like any chisels, must be sharp at all times. A dull mortising chisel not only creates splintery mortises, it also greatly increases the force needed to drive it into the wood.
Hone these chisels regularly with a dedicated hollow-chisel sharpener. These look a lot like countersinking bits, but have honing edges or an abrasive surface. Chucked into a standard drill/driver, periodically hone out the opening to resharpen the cutting edges. After doing the inside, hone the flat sides of the opening to remove any burrs.
Using a Mortiser
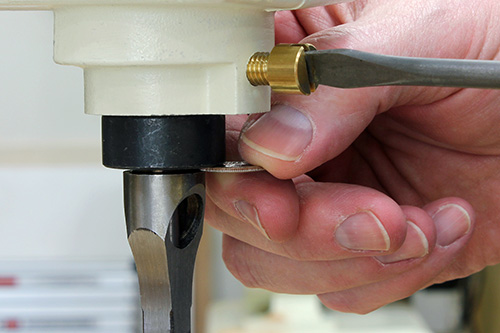
Installing the chisel is a three-step process. Ideally, the cutting tip of the auger never touches the chisel opening. If it did, it couldn’t bore the lead hole ahead of the chisel, chips couldn’t be directed up and out through the side openings of the chisel and, worse, the rubbing would quickly build up extreme heat, potentially ruining the chisel. Instead, the parts are installed such that the bit is slightly ahead of the chisel. To accomplish this, the chisel goes on first, snugged up to the quill with a small spacer — a dime is perfect for this.
With the chisel temporarily secured, slide the auger up through the center of the chisel. (To avoid getting cut, use a small scrap of wood to raise it.) When it’s seated in the chisel, secure the auger in the chuck as you would any drill bit.
Finally, loosen the chisel, remove the dime, and slide the top of the chisel firmly against the quill. Make sure the rear face of the chisel is aligned with the front of the fence, and retighten it.
Unless cutting through-mortises, the next step is to set the mortise depth. Mark the outside of the workpiece to match the length of the tenon, and then lower the chisel to the line. The bottom of a stopped mortise is pretty ragged, and although it’s hidden inside the joint, you still need enough room for the tenon to seat, plus a bit of space for glue to collect when the tenon is inserted, so you want the mortise bottom beyond the end of the tenon. Lower the chisel a bit farther; about halfway between the downward corners and the curved edges is about right. Holding the chisel at this point, set the depth control.
If you haven’t already, outline the location of your mortise on the workpiece. Adjust the fence to center the workpiece under the tip of the auger and lock it down. Now, adjust the hold-down to keep the workpiece from rising when the chisel is retracted. The hold-down should rest atop the workpiece snugly enough to keep it down on the table, but not so tight that you can’t slide the workpiece from side to side.
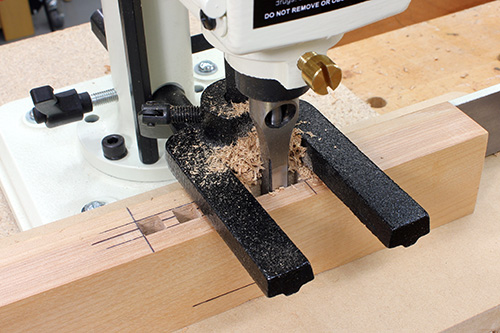
Plug in the machine and turn it on, then lower the chisel smoothly into the wood at one end of your mortise outline. The drill will clear the way, but it will take some muscle on the lever to drive in the chisel. Raise the chisel, slide the workpiece so the other end of the mortise is lined up, and repeat the process.
With the ends of the mortise defined, nibble out the waste in the middle with a series of overlapping plunges into the wood until the entire mortise is cleared.


