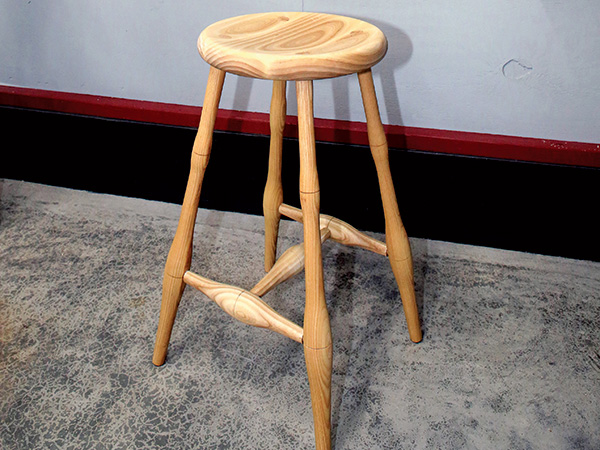
With the holidays approaching, I thought a Windsor stool might be a fun gift project to make. The round seat is an easy faceplate turning job, and the legs are a simplified double-bobbin style that is much easier to turn than the classic baluster leg of typical Windsor chairs.
Drilling the Leg Sockets
We’ll drill the seat for the four leg sockets first, because the tenons can be sized to a tight “slide fit” with these socket holes when turning the legs. A drawback to this approach is that these spinning sockets can cause injury if you don’t keep your fingers well clear during turning.
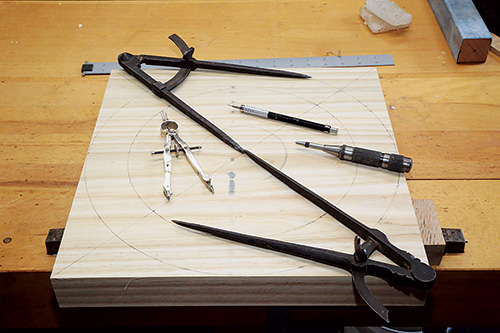
To prepare for drilling, cut your seat blank to 14-1/8″ square, then draw diagonal lines from corner to corner on a planed face to find the center point. This will become the seat’s bottom face. Now set your compass to a 5-3/16″ radius and draw a circle at the center point. Where this circle crosses the four diagonals marks the leg socket locations. Reset the compass to 7″ and draw the seat’s outer circumference. Finally, draw a centered circle that matches the diameter of the faceplate you plan to use for turning the seat blank.
Head to your band saw and cut the seat blank round. Then extend the four diagonal layout lines onto the edges of the blank with a square. Punch each leg socket’s center point with an awl.
These four holes are 1″ in diameter, angle outward and pass all the way through the seat. You’ll bore them on the drill press. Install a backer board on its table to help minimize tearout when the drill bit passes through the seat blank and to protect your drill bit and table. Square the edges of the table to the drill press base.
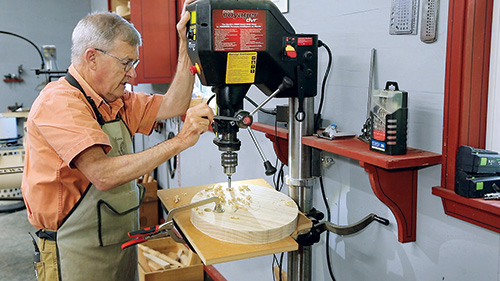
I used a sharp Fisch Wave Cutter Forstner bit for boring these holes. After tilting my drill press table 11 degrees to the right, I drilled a little way into the backer board to create a reference hole that marks the bit’s center point.
Then I used a square to draw a line across the backer board that went through the center of my reference hole. I could now place the seat on the table, lower the bit and center it on the first punch mark. While holding the drill bit against the punch mark, I rotated the seat blank until the layout line on its opposite edge was aligned to the layout line on the backer board. I could then clamp the seat in place and drill the hole. Repeat for the other holes.
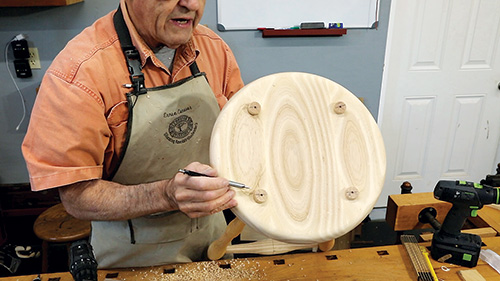
Once those are done, attach your faceplate to the seat blank with stout sheet metal screws threaded into pilot holes. Since these screw holes are on the seat’s bottom face, they won’t show.
Shaping, Sanding the Seat
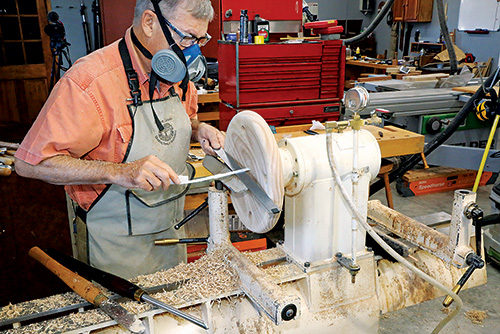
Mount the faceplate to your lathe and set the speed to around 800 rpm. Use a large scraper or bowl gouge to round the blank’s top and bottom edges to a half circle. Then dish out the outer face to a depth of 3/4″ to make it more comfortable to sit on. When you’re satisfied with the seat’s shape, use an orbital sander to smooth it with the seat spinning on the lathe. Or you can hand-sand the seat instead, but not while the lathe is running.
Turning the Legs
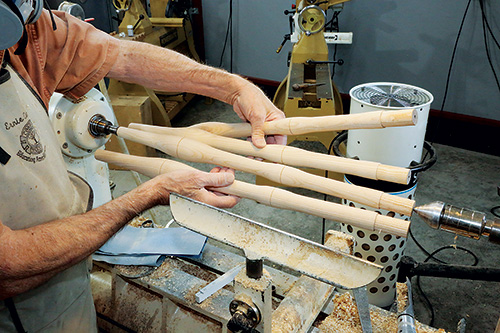
Turning the four legs is straightforward spindle work. Rip and crosscut four 1-7/8″-square x 25″-long billets and mount one between centers. The first order of business is to turn the billet to just round (1-7/8″ diameter) with a roughing out gouge.
The leg’s bottom will be toward the headstock and the top end is against the tailstock. Draw a line around the spindle 7″ from the headstock (center of the larger lower bobbin), then turn the area from 12″ from the headstock to the tailstock to 1-1/4″ diameter with a roughing out gouge. This sequence works from the center to the ends to keep as much strength in the leg as possible and to minimize harmonic vibration.
Now draw a line 16″ from the headstock to mark the center of the leg’s upper bobbin. Take two plunge cuts with the toe of a skew chisel to incise a 1/16″-deep line at the centerline of each bobbin and the same width.
Go ahead and turn the area between the upper and lower bobbins so each looks like a swollen garden hose, and neck down to a shaft diameter of 1-1/16″ in between them. Then turn the bottom half of the lower bobbin to match its upper half, and taper it to a 13/16″ diameter at the headstock.
Lastly, turn the upper half of the upper bobbin, and neck it down to a diameter of 1-1/8″ all the way to the tailstock. Once that’s reduced, make a pencil line 2″ from the tailstock to mark the tenon length, and turn the tenon to 1″ in diameter. (The actual size will depend on the drill bit diameter you bored the leg sockets with.) Using a 1″ open-end wrench as a caliper to size the tenon will usually yield a tenon that is too big, but a very light cut with a skew will refine the fit.
Finish-sand this leg, then remove it so you can turn the other three to match it.
Making the Stretchers
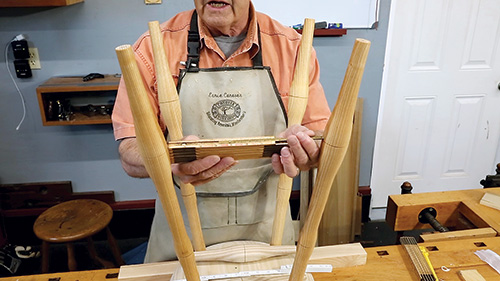
Insert the four legs in their sockets in the seat, and place the stool upside down on your benchtop on two wood strips so the shoulders of the tenons can seat against the seat bottom. You’ll locate the two side stretchers between the legs so they’re oriented across the grain of the seat. The center stretcher will be parallel to the seat grain.
Measure the distance between the bottom bobbins at their center grooves and add 1-9/16″ to this distance to determine the length of the two side stretchers. Their lengths may vary slightly, which is fine. Cut a billet for each one, rough-turn them to 1-7/8″ in diameter and shape them to match the Exploded View Drawing at left. Form 1/2″-diameter, 3/4″-long tenons on the ends. Cut a shallow groove, centered on each side stretcher’s bobbin, just as you did for the legs. Finish-sand the side stretchers to complete them.
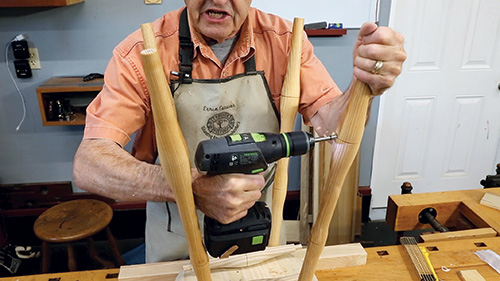
Next, twist the legs in their holes to arrange them so the side stretchers will penetrate through their annual rings and not between the rings; this will reduce the chances of splitting. Bore a 1/2″-diameter, 7/8″-deep socket hole into each leg for the side stretcher, parallel with the seat. Center these holes on the lower bobbin grooves.
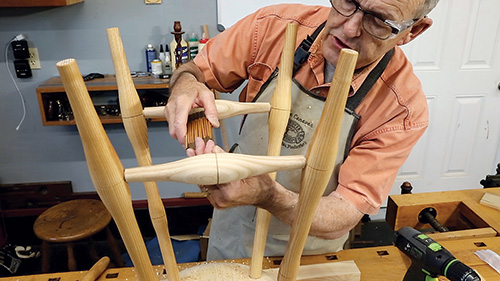
Dry-fit the side stretchers into their sockets. Measure the distance between the side stretcher bobbin grooves and add 1-9/16″. It marks the center stretcher’s length. Turn this stretcher to shape and with 1/2″-diameter, 3/4″-long tenons on its ends. Sand it smooth. Then bore sockets in the side stretchers to fit it.
Gluing the Stool Together
We’ll lock the leg tenons in the seat with wedges. Draw a line across the center of each tenon on its end so it’s 90 degrees to the seat’s grain direction. Use a band saw or back saw to cut a kerf at these lines that extends about three quarters down the length of the tenons. Cut thin, 1″-wide wedges from scrap to fit these kerfs.
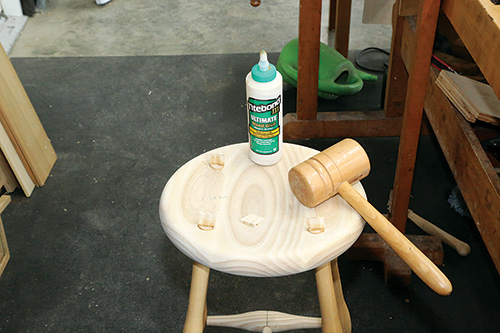
Choose a glue with a long open time, such as Titebond III or even 90-minute epoxy, to assemble your new stool. Apply glue to all of the tenons and into the wedge kerfs, and assemble the stool. Carefully drive the wedges home with a mallet.
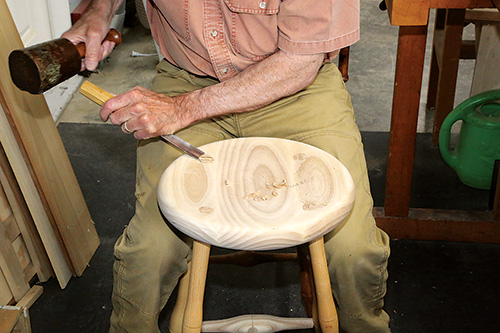
While assembly shouldn’t require force, use a band clamp to draw the legs and stretchers together if needed. When the glue dries, chisel the seat’s protruding tenons flush.
Good Finishing Options
Finish your stool as you like. Multiple coats of a wipe-on finish such as Waterlox or General Finishes Arm-R-Seal are fine. If it’s Christmas Eve already, switch to spray shellac or lacquer instead, which dry quickly and look great!


