This article, “Turn a Birdcage Awl,” by Mike Peace, is from the pages of American Woodturner and is brought to you by the America Association of Woodturners (AAW) in partnership with Woodworker’s Journal.
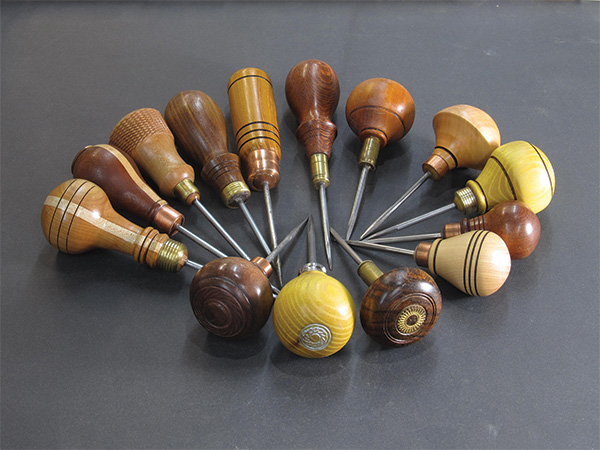
Here is an easy and fun project suitable for beginning turners as well as anyone who needs an awl. Awls make a great gift for anyone with a toolbox! Why are they useful? Woodworkers use scratch awls for scribing lines and making starting holes for screws or drill bits. Leather workers use awls for punching holes in leather for stitching.
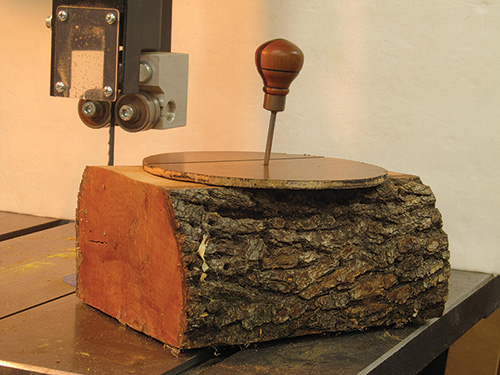
As a woodturner, I use an awl to mark the center of a spindle-turning blank, and I use a small dedicated awl to hold my bowl templates in place instead of a nail or screw. And, with a longer shaft and a longer, straight handle, you have an ice pick instead.
Design
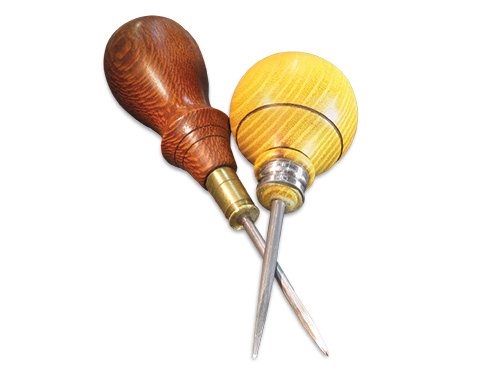
See what fits your hand best for the awl’s intended use. If you are a relatively new turner, I would suggest using some branch or scrap wood and experiment with the handle design by practice-turning some shapes. This will reduce your anxiety when turning that expensive exotic or special scrap of spalted or figured wood you plan to use for the handle. I prefer a large round handle that fits in the palm of my hand for a general-purpose awl. I tend to make mine about 5-1/4″ (13cm) long overall, with the handle about 2″ (5cm) in diameter and 2-1/2″ (6cm) long and the metal shaft about 23/4″ (7cm) long. Scratch awls and ice picks tend to be a bit longer than a general-purpose awl, maybe 7″ (18cm) with a smaller diameter handle.
Project Wood
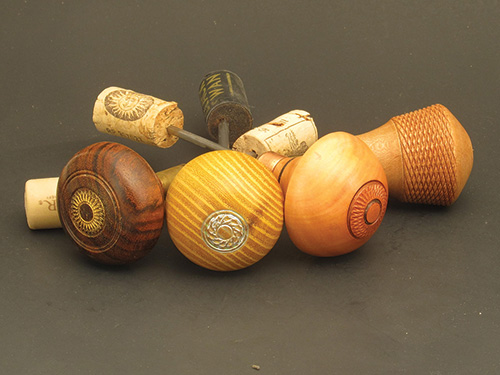
Almost any dry hardwood blank approximately 2″ square and 4″ (10cm) long will do, depending on your design preference. I have used cedar elm, cherry and maple laminated together, Osage orange, dogwood, mesquite, and pear, as well as a variety of exotics such as bocote, zapote, zebrawood, Yucatan rosewood, jatoba, and many more. Figured wood and wood with prominent grain look nice, but plainer woods like maple, dogwood, and pear lend themselves to embellishing with burn rings and texturing.
The Shaft
You should use a piece of high-carbon steel for the awl shaft, as it is strong and hard; do not use an ordinary nail. If you plan to make only one awl, you could use an old drill bit by burying the fluted end into the handle, but it would need to be longer than an ordinary bit. However, making these is addictive, so I recommend buying some rods of music wire, also known as piano wire or spring steel. Music wire is made of high-carbon steel that is pulled through a die at room temperature to form a thin wire, then heat-tempered. The end product is a wire that can endure high amounts of tension and stress repeatedly without losing its strength or elasticity.
Music wire, often used for landing gear on radio-controlled model tairplanes, is available from hobby shops, some hardware stores, and on the Internet (at sites like Amazon or eBay). I buy K&S Music Wire 5/32″ (4mm) diameter by 36″ (91cm) long. It typically comes in a pack of seven rods for about $18, including shipping. If you prefer a sturdier shaft, you can get 3/16″- (5mm-) diameter rod, also in 36″ lengths.
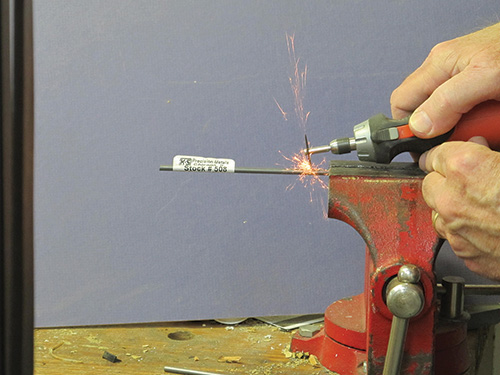
For a general-purpose awl, I cut the shaft about 4″ long. I place the wire in a vise and cut it using a rotary tool with a cutoff wheel, but you could also cut it with an angle grinder with a metal cutting wheel or a jigsaw with a metal cutting blade. Cutting music wire with a hacksaw is a challenge—the wire’s hardness tends to cause the blade to skate over the surface. You should be able to get at least eight shafts from one 36″ rod. So for about 32 cents per shaft, music wire is very cost-effective. The low-carbon, cold-rolled steel you might find at the larger home-supply stores is just too soft to use for an edged tool.
Ferrules

You can make your ferrule from a wide variety of materials, such as a piece of copper pipe, a brass shell casing, or a brass plumbing fitting like a 3/16″ (4.8mm) flare or compression nut. I have also used the inner ball-bearing race from a worn-out bearing from my bandsaw.
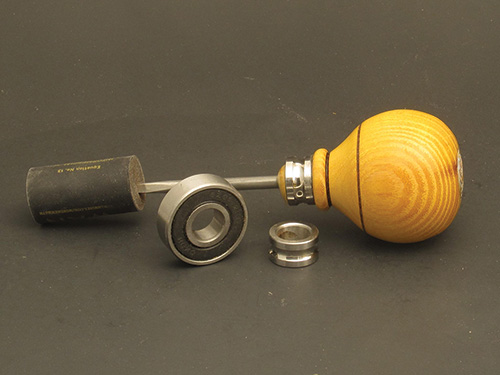
If your brass fitting has exterior threads or flats you want to reduce or eliminate, you can easily file these off by hand with the work held on the lathe. Alternatively, you can use a sharp HSS scraper or parting tool to shape the brass.

Safety Note: Keep the lathe speed about 600 to 700 rpm and take light cuts. After finalshaping, progressively sand the ferrule up to 600 grit to remove the scratches. Be careful not to transfer the dark metallic oxides from the sandpaper onto the wood.
Turn the Handle
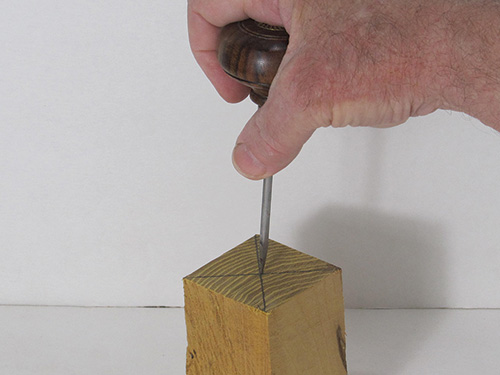
The turning tools you will need for this project are a small spindle gouge, a spindle-roughing gouge, a parting tool, and perhaps a skew or point tool to cut V-grooves. Use a ruler to draw lines diagonally from corner to corner to identify the center. Use an awl to mark the center on each end where the lines cross. (If you don’t yet have an awl, a nail set or even a nail will do to punch a center hole.)
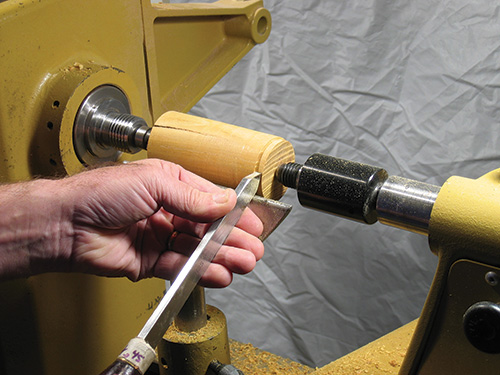
Mount the blank between the drive and live center. Use your spindle-roughing gouge or skew to turn the handle blank round. Use a parting tool to turn a tenon on one end to fit your scroll chuck.
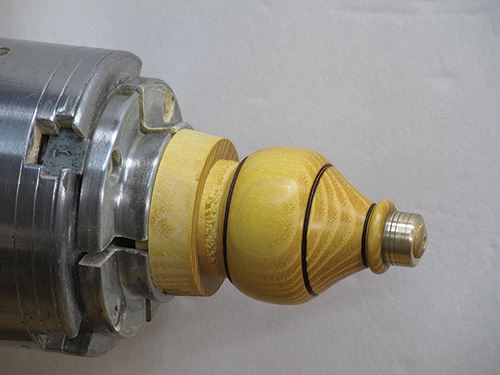
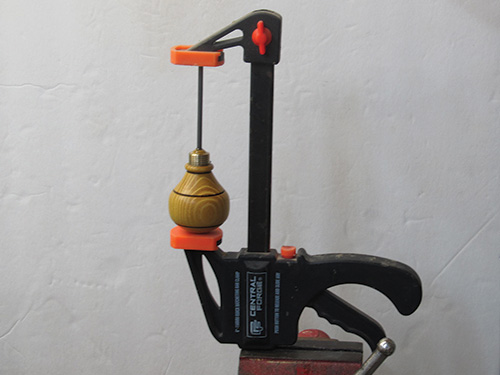
Reverse-mount the blank in the chuck using the tenon you just cut. Now cut a new tenon on the tailstock end with your parting tool, this time as a surface to accept the ferrule. Use the ferrule you are going to use as a guide for marking the length. Add an extra 1/16″ (1.6mm) so the tenon will just sit proud of the ferrule even after any sanding. A ferrule prevents the handle from splitting and provides a smooth transition from the shaft to the handle. Put a slight chamfer on the end of the tenon to make it easier to slide on the ferrule and for a refined final appearance.
Fit the ferrule to the handle tenon. “Sneak up” on sizing the tenon so you will have a snug fit. When you achieve a good fit, use epoxy to glue on the ferrule. I usually leave the blank mounted in the chuck and simply unscrew the chuck from the lathe for this operation. This will ensure the blank will run true when you put the chuck back on the lathe. After the glue has cured, you can finish shaping the handle. Moreover, you can shape and polish the ferrule as necessary.

Next, put a drill bit 1/64″ (0.4mm) larger than the wire shaft size in a drill chuck. (Tip: To center the drill bit in the chuck, insert and tighten it off the lathe.) Now mount the drill chuck in the tailstock and with the lathe turning at about 1000 to 1500 rpm, drill the hole 1-1/4″ (3cm) deep. Clear the chips often and keep your left hand on the drill chuck when retracting. This will ensure you can shut off the lathe in time to prevent injury if you notice the drill chuck being pulled out of the tailstock. You will glue in the wire shaft later, after completing the handle and removing it from the lathe.
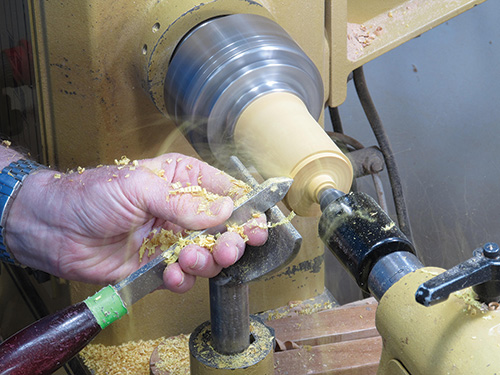
Shape the handle as you see fit with a spindle gouge. Remember, on a spindle project, cutting “downhill” from large diameter to smaller diameter yields the cleanest cut. Carefully shape the handle to the edge of the ferrule so there will be a smooth transition. A bead here is an attractive feature. It also helps with reverse-chucking, as we will see shortly. Finish sanding through the different grits up to about 320 for domestic woods. You may want to go up to 600 grit for exotics that do not take a finish but will polish nicely. When sanding, do not press too hard or turn too fast, or you can overheat the wood and get heat checks, especially with dense-grain exotics.
If you like, you can embellish the handle with beads, V-grooves, burn rings, or texturing. Sand the ferrule up to 600 grit to polish it, as well. Do not reuse the sandpaper after sanding the ferrule or the black oxides from the metal can stain your wood. Now part off the handle, or part down most of the way and make the last cut with a fine-toothed saw with the lathe off. I wrap a piece of tape around the ferrule and reverse-chuck the handle by clamping it on the inside of my chuck jaws with a bead snugly pressed up against the inside of the jaw faces.

With this chucking method, a bead or some other shoulder feature is needed to get a strong enough hold on the blank. This allows me to easily finish-sand the butt of the handle and add an optional textured feature with a texturing tool like a knurling tool, Sorby micro-spiraling tool, or even a chatter tool.
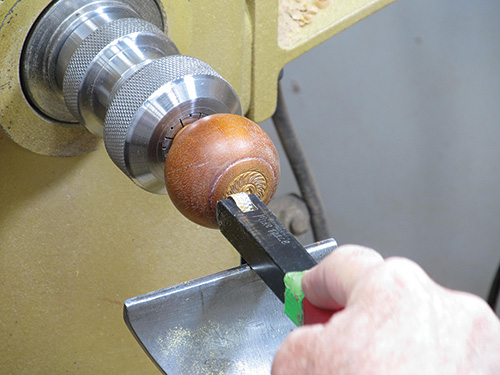
Use a knurling or spiraling tool at a speed no higher than 400 rpm. Start texturing about 3/32″ (2.4mm) to the left of center. Notice that I was able to use a collet chuck as an alternative, secure holding method. A knurling tool with 16 tpi works better in very hard woods than 12 tpi. A non-woven abrasive pad like a green Scotch Brite pad is a great way to clean off any frizzies left by the texturing tool.
I like to frame the textured area with a small bead or V-groove cut with a point tool or the tip of a skew on its side. It is a good idea to practice your texturing technique on an endgrain scrap before using it on a project. Adding a bit of metallic wax to the texturing as a final touch really makes it pop.
Birdcage Awl Grind
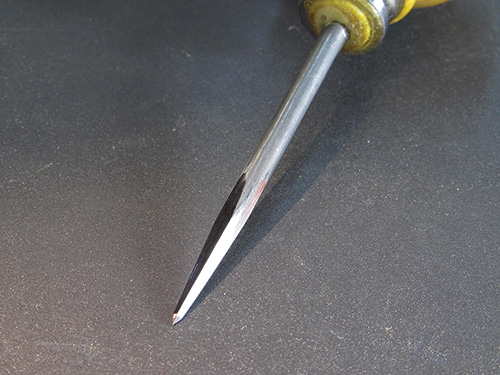
The term birdcage awl refers to the tool’s original use for boring various-sized holes in the construction of birdcages, back when woodworkers commonly made all types and sizes of birdcages for holding and transporting exotic birds and poultry. The birdcage awl is capable of producing a tapered, round hole in wood by actually shearing the wood fibers with its reaming action.
To make a birdcage awl, simply grind the point with a long, square pyramid shape from the point back 1″ to 1-1/4″. The four sharp sides all act as cutting edges when you twist the awl into wood.
Make a Steel Shaft
Cut the music wire for the shaft with a rotary tool equipped with a cut-off wheel. The length depends on your awl design. I prefer to cut mine 4″ long, which allows me to bury the shaft in a 1-1/4″- deep hole, leaving a 2-3/4″-long exposed shaft. To ensure a good glue bond of the metal to wood, rough up the inch of metal that will be glued by rotating it while drawing it quickly along the edge of your grinder. Mix the epoxy with the end of the wire shaft that will go into the hole, and push it in or tap it in with a mallet. I use the five-minute set epoxy, but almost any variety will do. The glue will tend to push out the shaft while curing, so I clamp it to prevent that from happening.
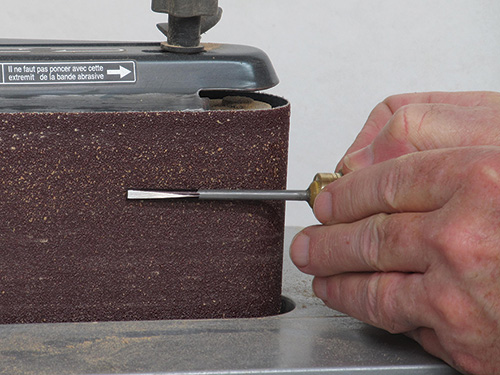
Let the glue cure fully before sharpening. I use a felt-tip pen to mark 1″ (25mm) to 1-1/4″ at the tip. I find it easiest to use a belt sander for shaping the tapered point on the end of the shaft. I do this without a jig by grinding opposing sides and continually checking to ensure each side is flat and of equal length. You can also shape the tip on a grinding wheel, but if you do, I recommend using a scrap of wood with a hole in it to support the awl shaft on the grinding platform.
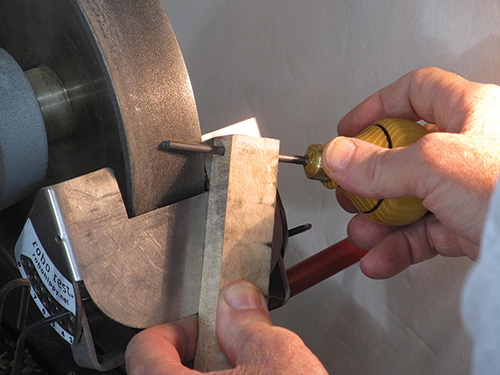
Unless you are shaping a tip from a high-speed-steel (HSS) blank, be careful not to overheat the tip and ruin its temper. Grinding with a CBN (cubic boron nitride) wheel will generate less heat than an aluminum oxide wheel, and the high-carbon music wire will not damage a CBN wheel. Whether using a belt sander or a grinder, use a light touch and quench the metal in water often to prevent bluing.
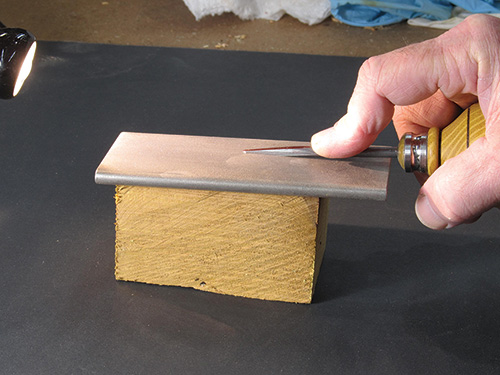
Because of the fragility of the tip, I use a sharpening stone or diamond or CBN hone to fine-tune it by adding a tiny micro-bevel at the very tip. Polish the shaft with sandpaper up to 600 grit. I prefer to use a “birdcage awl” grind with a four-sided taper. This grind is much better than the standard, round-tapered tip for creating starter screw holes.
Finish
Use the finish of your choice on the handle. I typically use a couple of coats of Minwax Antique Oil, applying it off the lathe and letting it dry twenty-four hours between coats. An oil-and-beeswax finish is a good option, too. For exotic woods that do not take a finish very well, such as African blackwood or lignum vitae, you might just sand to finer grits to bring up a shine. I always put a wine cork on the tip as a safety measure if I am giving one away or storing it in a toolbox.
Mike Peace is active in three woodturning chapters in the Atlanta area. He is a frequent demonstrator and regularly uploads woodturning educational videos to his YouTube channel, Mike Peace Woodturning. Before retirement, Mike worked as a software project manager. After serving on active duty in the U.S. Army, he continued service in the reserves, retiring with the rank of Lieutenant Colonel.


