I understand that wood swells and shrinks differently depending on the direction of the grain. How can I make it easy for my students understand this? – Timothy
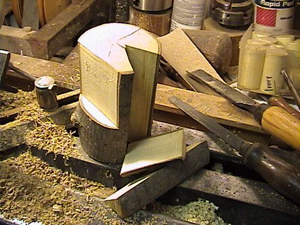
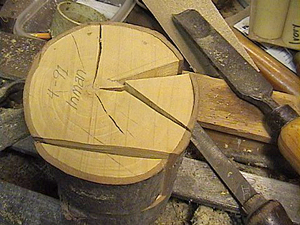
Tim Inman: My old teacher DNA is going to be found sticking to all sides of this question. As a woodworker, it is very important to understand that wood swells and shrinks across the grain. It is virtually unchanged along the length of the grain. Dry wood will swell and shrink very little. Wet or green wood will change a lot as it dries out. So it is important to have dry wood when you make your projects, and to use the wood in ways that take advantage of the natural changeability of the boards. My best advice is to make up a simple little visual aid. It makes everything obvious when you look at it. Keep it around and it becomes more convincing by the day. Some years ago (My little example is dated 4-1991. I date everything.) a storm blew over a maple tree in my yard. I was teaching a basic wood technology class at the time for furniture restorers. I needed a visual. So, I just cut a 6-inch long slice off a 4-inch limb. Then, to show what happens over time as wood dries out, I made some critical cuts.
Using my band saw, I sliced a ‘pie wedge’ piece about one-inch wide out of the entire length. The cuts go radially. All these years later, it is easy to see that the little wedge is still the exact same length as the big limb section. But it has shrunk a lot along the girth. I made another example by cutting a tangential section off the little log. I made it one-half the length of the log so it could show both tangential shrink and the (non) shrink along the length. Again, now it shows that the length has stayed the same, but the width has changed. It has shrunk both through the thickness and across the width. Mine has stayed pretty flat, but sometimes you can get an example that shows which way a board will cup when it dries.
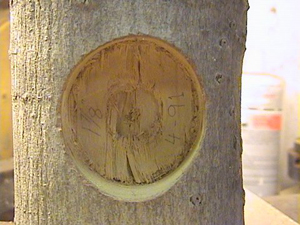
Finally, I drilled a hole partway into the side of my little log. I used a 1-7/8-in. drill. Why? It was handy. I wanted a big hole so I could show the change in dimensions later on. It is especially important for furniture restorers and cabinetmakers to understand that a hole drilled in wood, especially wet wood, will change from a circle to an oval over time. That’s right. The hole will eventually become egg-shaped. My little log now shows very clearly that the hole is the same dimension measured along the length of the log, but it has shrunken a full one-eighth of an inch along the width of the hole – across the grain. Understanding that this happens really helps when building chairs, and when repairing old ones. Why did those spindles get loose? Answer: The wood shrunk, and the holes became egg-shaped.
I keep this wood section sitting on my bookshelf in my office. It doesn’t bother much, and every once in a while, it is really neat to be able to pull it out and observe what has actually happened to the wood. It helps to show to my furniture restoration customers. They need to see in order to believe, too.

