
Everyone loves the silky feel of finely sanded wood. No one loves the tedium of sanding. If only there was a way to get the results without the grind.
There is. Yes, there’s a secret to making sanding go quickly, easily and painlessly, and if you keep reading, I’ll tell you what it is.
You’re welcome.
Overview
To be perfectly honest, most folks sand way too much. The goal is to sand very little, yet still get great results. That’s entirely possible, but in order to do that, you need to know a few things; which paper and grits to use, when to switch grits or papers, how to use sandpaper efficiently, and most importantly, the object of each sanding step. After all, if you don’t know what each sanding step is meant to accomplish, how can you know when to stop sanding?
The Steps
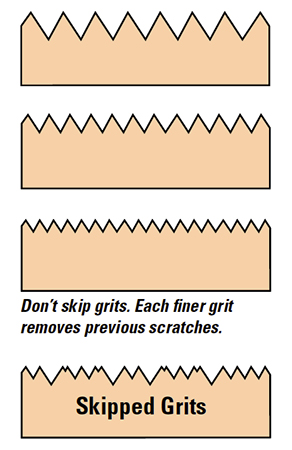
The first round of sanding has two goals: flatten the wood and remove tool marks. That’s all you need to do, and you want to do it as quickly as possible. Therefore, use the coarsest paper that’s practical: usually, 80-grit. Using a harsh grit does this job quickly. If 80 doesn’t do it fast enough, go down a grit to 60, then back to 80, but remember, the goal is to get it flat and remove tool marks quickly.
Once the wood is flat and free of tool marks, you move on to the second, third and all other sanding steps. They all share just one goal: to replace the sanding scratches from the previous grit with finer scratches. You do that by sanding with a grit close to the last one. For instance, go from 60 to 80, from 80 to 120, from 120 to 180, and from 180 to 220.
The Paper
When sanding raw wood, I prefer aluminum oxide grit. It’s sharp, cuts fast and because it is usually friable, it fractures as you use it so that it continues to present a sharp cutting surface to the wood. However, that does not mean you should overuse it. Sanding with dull aluminum oxide paper is false economy; it makes you work harder, go slower and accomplish less. Switch to a fresh sheet frequently and never mind if you haven’t worn away every single bit of grit on the surface.
Now for the tough part: how to tell when it is time to stop sanding and move on to the next grit. I’ve explained what the objective of each step is, but to know when to stop, you need the best sanding techniques, both by hand and with a machine. That’s because the technique itself will tell you when to stop sanding. This may sound hard to believe, but it is true. Bear with me and I’ll show you what I mean.
By Hand
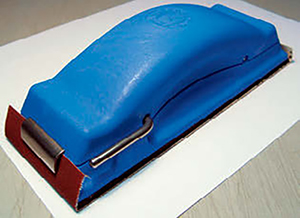
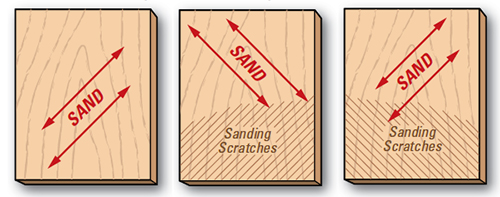
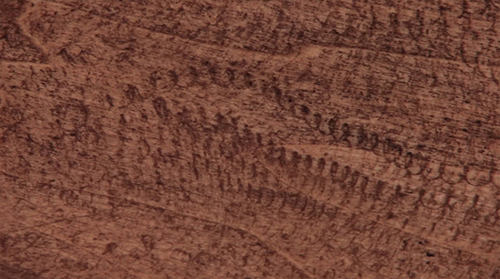
Wrap the sandpaper around a comfortable, hand-sized block lined with cork or rubber on the sanding face. Sand diagonally to the grain. Yes, I said diagonally, NOT with the grain. Diagonal sanding cuts the wood quickly and prevents “washboarding,” which often happens, especially on soft woods, when sanding with the grain. Washboarding occurs when the softer early wood bands erode more quickly than the harder latewood lines.
Now for the clever part. Switch grits, and sand diagonally in the OPPOSITE direction. Conveniently, your new scratches will be at right angles to the previous sanding scratches. As soon as all the scratches from the previous sanding are gone, you are done with that grit. That’s easy to see, since they go in the opposite direction of how you are now sanding. Clever, eh? Now move to the next grit and, once again, change diagonals.
Random Orbit Sander
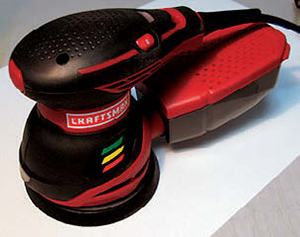
There’s a trick for random orbit sanders as well. You’ve heard “slow and steady wins the race?” With a random orbit sander, the seemingly contradictory trick is to slow down in order to speed up.
There are two rules: don’t press down on the sander too hard, and don’t move it faster than one inch per second. Pressing down will slow the orbital movement, and that means it’s less efficient and won’t sand as fast. Moving the sander too quickly will create “pigtails,” but worse, it will make it almost impossible to know when to stop sanding. You may find yourself scrubbing forever.
However, if you move the sander only one inch per second, you only need to go over each area ONCE. At that speed, one pass will make the sander dwell about five seconds on each spot. Assuming you didn’t skip a grit, that’s just long enough to remove the previous sanding scratches. Hence, move the sander slower, and you’ll get done sanding faster. You’ll also know exactly when to move to the next paper.
Before you insist that you normally move the sander that speed, please take the speed test. See the scale on the left? Start at the top and move your finger to the bottom, but take a full 9.5 seconds to do it. Now be honest; is that really how slowly you usually move your sander?
I thought not.
An Extra-Special Step
One of my favorite sanding tricks is to follow my final grit, often 180, with the same grit, but in garnet paper. This time, sand by hand, going with the grain. The slightly dull garnet paper leaves a surface that takes stain more evenly, and it even helps burnish end grain, limiting its stain absorption somewhat.
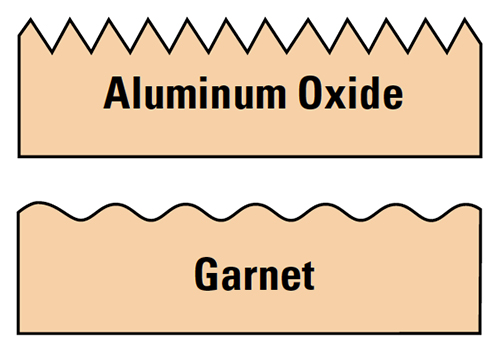
Why does this work? Although aluminum oxide paper is usually friable, garnet paper is not. As you use it, the grit quickly rounds over, leaving a softer, U-shaped scratch rather than the harsher, V-shaped scratches typical of aluminum oxide. By using the same grit size, you quickly and easily align the scratches with the wood grain while softening them up at the same time.
Now that you know the timesaving sanding tricks the pros use, go on out there and sand, quickly and easily.


