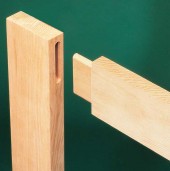
Joining end grain to long grain forms the king of joints.
A mortise and tenon is one of the most ubiquitous and useful means to join wood together. Primarily used in solid wood woodworking to join end grain to edge grain, or long grain, it is a time-honored and proven technique. A mortise and tenon joint is, at its most basic, a peg fit into a hole. It accommodates the dynamic movement of wood fibers and creates a super strong joint. Because it has been around so long, and due to the variety of tools and techniques employed to form these workshop workhorses, there are several variations on this simple theme.
Anatomy of a Mortise and Tenon Joint
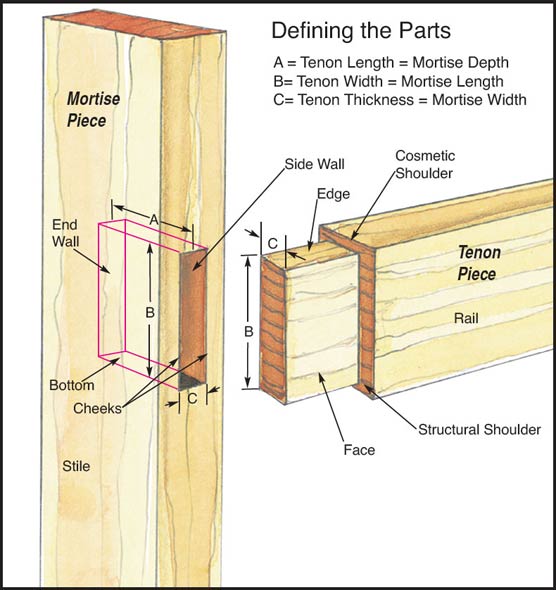
While it may seem a bit over the top, there are at least nine parts to label when it comes to a run of the mill mortise and tenon. Do you need to know all these terms to make a successful mortise and tenon? The answer is no, but the nomenclature helps you to understand the geometry of the joint and how it can vary from use to use. For lack of a better term, we call this the anatomy of the joint, and some of the names are actually derived from our human anatomy. The specific name of the mortise/tenon piece depends on its use or function and its orientation. Most commonly, the mortise piece is usually an upright piece like a stile, while the tenon piece is usually a horizontal piece, such as a stretcher, rail or apron. This drawing will illustrate the various parts and where they occur.
Tenon Piece:
The Rail
Face
Edge
End
Structural Shoulder
Cosmetic Shoulder
Mortise Piece:
The Stile
End wall
Side Walls
Bottom
Cheeks
Mortise and Tenon Rules
Master Woodworker Ian Kirby’s list of 10 rules for making perfect mortise and tenon joints.
1. Hidden mortises should penetrate about halfway into a stile.
2. Create balanced joints.
3. Structural shoulders resist stress.
4. Cosmetic shoulders hide the joint.
5. At the end of a stile, leave a horn to resist splitting.
6. Don’t undercut.
7. The completed joint should slide together with moderate hand pressure.
8. Accurate geometry is the key to effective joinery.
9. With stopped tenons, always cut them 1/16-inch short of the end wall.
10. Use a sufficient amount of glue on the joint, but avoid over gluing.


