Enhancing the Grain
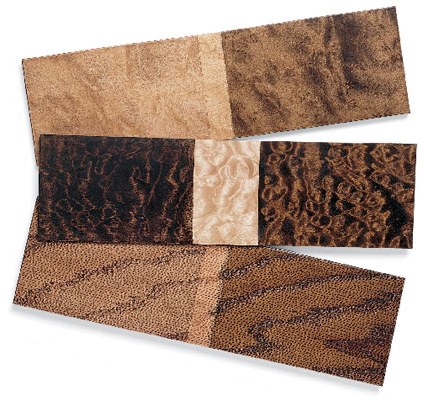
Although color change is its primary function, stain can also intensify or diminish the grain of the wood, depending on the type of wood and the type of stain you use. Therefore, it is important to understand how different types of stains work. The two most common coloring agents in stain are pigment and dye, and they behave quite differently.
In simple terms, pigment is colored dirt ground up into small particles. Dyes are typically soluble salts. Once mixed with their proper solvent, dye crystals dissociate into individual molecules, which are vastly smaller than ground up pigment particles. Thus, dye can get into spaces where pigment can not.
Apply a typical pigment stain to dense, figured maple and most of it will wipe right off with little color change. Use dye and you get both more intense coloration and grain contrast. With oak, just the opposite is true. Pigment lodges in the large pores of oak, creating contrast, while dye colors it with boring uniformity. Thus, dye is best for adding intense color to dense wood, whether for grain enhancement or simple color change, but pigment does a better job of bringing out the grain pattern in large pore woods.
Understanding Pigment Stains
To better understand how it works, let’s create a makeshift pigment stain. Take a handful of ground up dirt, put in into a glass of water, stir a bit and you have the simplest form of pigment stain, and one that can tell us a lot about how pigment stains behave.

Let it sit a while and the dirt (pigment), which is heavier than water, will fall to the bottom. That’s true of most liquid pigment stains. One quick way to tell if a commercial stain contains pigment is that the instructions will tell you to stir it before use and possibly during use as well.
Apply the dirty water to wood and just like stain, it will leave color on the surface. However, once it dries, you can easily brush it off. With stains, that’s not a good thing. We don’t want the color to come off, and therein lies the first major difference between our makeshift stain and the real thing. Our mixture had pigment (dirt) and carrier or solvent (water.) Commercial pigment stains contain a third ingredient: binder.
To make sure the pigment particles stay on the wood, a small amount of binder is added to the mix. Binder is any sort of resin that will dry to a solid film and act like glue to hold the pigment onto the wood. Most stain binders are made of the same resins we use to make finishes.
Does this sound familiar? Pigment stains contain pigment, carrier or solvent, and binder. The other common material that contains those exact same three ingredients is paint. You won’t be far off if you think of pigment stain as very thin paint.
In fact, one ‘quick and dirty’ way of making a custom color pigment stain without having to mix colors yourself is to start with custom colored latex paint. Find a paint chip the exact color of the stain you want, have the clerk at the paint counter mix a quart of latex paint that color, then take it home and reduce it with equal parts water. Try it. The result is a very easy to use, fast drying pigment stain.
The Effects of Binder
If you ever tried staining a second time after the first application dried, you would notice that while the wood absorbs a good bit of color on the first application, it absorbs far less on the second. That’s because the binder forms a very thin film, partially sealing the wood. Although all finishes are compatible over raw wood, not all are compatible over all binders. Hence, some finishes may not be compatible with some stains.
With oil based coatings it’s easy. All oil based coatings will go over any oil based or waterbased stain. Waterbased topcoats are less tolerant. Most companies formulate their waterbased topcoats to go over their own oil based stains, but they may not work over another brand of oil based stain. Waterbased stains, however, are more universal; they’ll go under both waterbased and oil based topcoats.
Understanding Dyes
Dyes are very different. While pigments can lodge in large pores or large sanding scratches, they need binder to hold them in place on smooth wood surfaces. Dyes, though, do not. Because they are so small, dye molecules can go deep into wood and bond to it. As a result, you do not need binder with dyes. In fact, the most common dyes woodworkers use are powders that they mix with water or alcohol, or liquid concentrates, and neither contains binder.
Without binder, dyed wood acts the same as raw wood. It is colored, but there is no film on it. As a result, you need not worry about compatibility issues. Any finish will go over any binder-free dye. While most dyes you buy in woodworking specialty stores are free of binder, you should be aware that some commercial stains combine dye and binder, but we’ll deal with them when we come to commercial stains.
The best way to think of dyes is to imagine what happens when you add sugar to hot water. The sugar crystals, which you can see while they are dry, dissolve completely, become invisible, and mix uniformly in the water. Once dissolved, the mixture need not be stirred again. The sugar will stay in solution. The same is true of dyes. Once you have mixed a dye, and that may involve a small amount of initial stirring, it will not separate or sink to the bottom.
Dyes have two other advantages over pigments besides the fact that there are no binder compatibility issues. The first is that they go deeper into wood. The second is that because the dye itself is translucent, you can add much more intense color to wood without losing any of the depth or grain. Hence, for adding deep, intense color to dense wood, or to color figured woods without losing the figure, dye is your best choice.
Commercial Stains
The majority of commercial stains, those you buy at the home store or paint store, are pigment based, but not all are. Some companies use dye or a mixture of dye and pigment, but they usually contain binder, even when dye is the only coloring agent.
Another strategy of stain companies is to use pigment, but grind it very fine so that it retains the advantages of pigment but goes deeper into the wood, like dye. While these fine grind pigment stains are not the same as dyes, they do come closer and may be just the ticket for some applications.
Applying Stains
There is an easy way to apply stains that works on all types of wood with every type of stain; pigments, dyes, mixtures of dye and pigment, stains with binder and stains without binder, home made stains and commercial stains. It lets the wood itself determine how much stain gets absorbed, resulting in very consistent and predictable staining, and requiring no special skill from you, the finisher. I call it ‘flood and wipe.’
Flood the stain on liberally, then wipe it all off immediately while it is still wet. The wood will absorb what it can, and you will wipe off everything that was not absorbed. By flooding the stain on, instead of applying it sparsely, you give the wood a chance to absorb what it can, and it will reward you by coloring quite evenly for the most part. When you wipe it off, you ensure that there is no layer of excess stain atop the wood. That’s important, since leaving too much of some stains atop the wood can cause finishes to delaminate, turn hazy, or chip off easily. It also ensures that the stain dries in a reasonable amount of time.
While this is the best way for all stains, it is the only way to apply dyes. That’s because when binder-free dye dries, it reverts to powdered form. The last thing you want is to try to get a finish to adhere to wood with a layer of powder on it. Therefore, with dyes, flood and wipe is the only method you should use.
Since flood and wipe means you are not controlling the color intensity by how you apply, you must control it at the mixing bench. Want a more intense dye color? Mix more dye powder or liquid concentrate into less solvent. Want a weaker dye? Add more solvent.
You can do the same thing with pigment stains, since thinning them results in a lighter color intensity, but you have another option with them that you do not have with dyes. Because they contain binder, you can treat them like paint, but only if you use a lot of restraint. In other words, instead of wiping all the pigment stain off aggressively, you can wipe more gently, leaving a bit more pigment stain on the surface.
Be careful, though. Thicker stain application can take vastly longer to dry, and leaving too much on can result in delamination, hazing, or chipping. Also, the more pigment you apply, the more the stain hides the wood. Leave too much pigment on the surface and your finish will look more like opaque paint than stain.
How Sanding Affects Stain
 How fine you sand the wood has very little influence on dye stains because they are so small. However, sanding has a major impact on pigments. Because they lodge in pores and sanding scratches, sanding with a coarser grit will result in more pigment staying on the wood, and more intense color.
End Grain
Wood conditioner also helps control absorption into end grain on exposed board ends, but may not do enough. For more egregious cases, seal the end grain prior to the last sanding. Flood Zinsser SealCoat or thinned hide glue onto the board ends only and wipe off what is not absorbed. Sand lightly to remove surface SealCoat or glue, then stain normally.
Blending Sapwood
The best way to blend light colored sapwood is to dye it prior to staining. Use an artist’s brush or Q-Tip® to apply dye to the sapwood areas, making them the same color as the heartwood; then stain normally. If you don’t have access to dyes, stain the wood, and when the stain is dry, go back over the lighter sapwood areas with either the same stain or a darker one to blend the colors prior to adding clear finish.
What is ‘Natural’ Stain?
‘Natural’ stain is very light colored stain designed to enhance the wood, as does any stain, and add a subtle amber color reminiscent of linseed oil.
What is Pickling Stain?
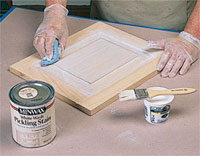 Pickling stain is simply pigmented white stain designed to be applied and wiped off selectively, leaving a bit more white in the corners, recesses and pores. You can make your own using thinned white or off white paint.
What is Gel Stain?
Though people tend to think of gel stains as a unique category, in fact they are just ordinary stains thickened so that they don’t drip or run as easily. At present, most gel stains are oil based pigment stains, so they behave rather like the liquid versions of oil based pigment stains. Like liquids, they vary from brand to brand; some penetrate deeper and color more intensely and others tend to sit more on the surface. Though it is currently off the market, one company used to offer waterbased dye stains in gel format, and true to form, they acted like liquid dyes.
Besides being easier to handle, most oil based gel stains contain more binder than their liquid counterparts. That means you can often leave a slightly heavier layer of gel stain than you could get away with using liquids. Some can even be used as glaze, adding color between coats of finish or on non-wood surfaces like fiberglass. In this respect they fall somewhere between liquid stains and the so called one step stain and finish combinations.
‘One Step’ Stain and Finish
Lately, companies have been offering tinted finishes with names like ‘One Step Stain and Polyurethane’ in both oil and waterbased modes. A similar material, colored Danish oil, has been around for years. The idea is that you can apply both stain and finish in one step.
Most work great on the first coat; you flood it on, wipe it off and it acts like stain. Do it again and you have something akin to double staining, but the real advantage is that unlike stain, you can add as many coats of tinted topcoat as you like. Hence, you can keep making the color more intense, and more opaque as well.
Although tinted topcoat on wood looks slightly different than stain, applying multiple coats is an easy way to creep up on just the color you want, especially with darker colors. However, each coat adds color. That means if you do not apply it very uniformly, you will get uneven coloration. It’s best to practice with these materials first. Also, don’t be afraid to use these tinted materials for one or two coats until the color is just right, then switch to the clear version of the same finish for the remaining coats.


