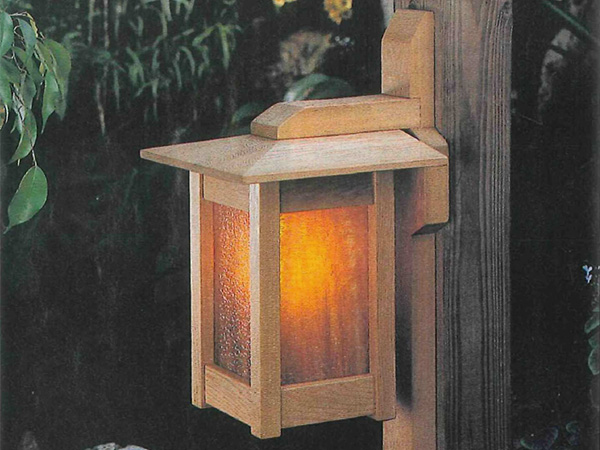
All of the material for this project came from a fairly clear 10′ length of western red cedar 2 x 4. Plan your cuts carefully and you should have no problem extracting enough clear wood from between the knots.
Our lantern also offers a great opportunity to indulge in some dramatic “art glass” for the translucent panels. You can buy colorful glass in almost any shade at stained glass supply stores.
First, Make the Frame Posts
Step 1: Face-joint and plane enough stock for the four posts (A) to W thick, then joint one edge of this piece. Rip the posts to 7/8″ square, then cut them to length. Note: If you intend to form the mortises with a hollow-chisel mortiser, cut the posts 1/2″ longer than finished length to make sure the hollow chisel doesn’t tear out the 1/8″ of stock between the mortise and the top end of the post.
Step 2: Lay out and cut mortises in the posts as dimensioned in figure 1. (We’ve found that a router or spindle mortiser works best on cedar.) Note: If you left the posts 1/2” longer as detailed in the previous step, start the top mortise 5/8″ from the end, then trim off the extra 1/2″ from that end.
Step 3: Tilt your tablesaw blade to 25° from perpendicular. Using a miter-gauge extension and stop block, chamfer around the bottom end of each post. Remove just enough material to form a point in the center without shortening the length. You could also do this with a miter saw and a stop block clamped to the fence.
Machine the Rails, Then Assemble the Frame
Step 1: Surface plane enough stock for the eight rails (B) to 3/4″ thick, then cut the rails to dimension.
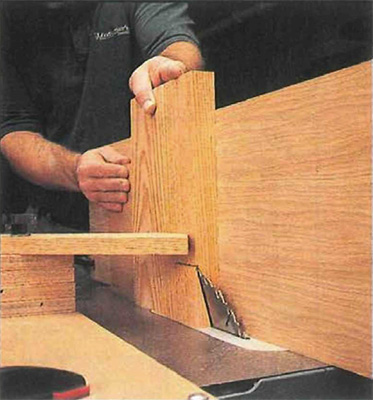
Step 2: Using your miter gauge and tablesaw, cut tenons on the ends of the rails as dimensioned in figure 2. Round over the tenon edges with a rasp or file to fit the mating mortises. Next, miter-cut the tenons as shown. Note: When making this cut, keep the saw blade low so you don’t nick the inside shoulder of the rails. Now, mark the inside face and bottom edge of each rail.
Step 3: Rout a 1/4″ rabbet 1/4″ deep on the inside edge of each rail where shown in figure 2 to accept the glass pane. Next, dry-assemble the rails and posts to check for fit. Mark the points on one post where the rail rabbets intersect it. Disassemble the parts, then transfer the points on that post to the remaining three posts.
Step 4: Set a fence on your router table to rout stopped rabbets into each post. Mark start- and stoplines on the fence. To prevent the cedar from splintering at the ends of the stopped rabbets, first cut a kerf with a hand saw across the stop marks on each post. Rout the 1/4” rabbets, then square up the ends of each with a chisel.
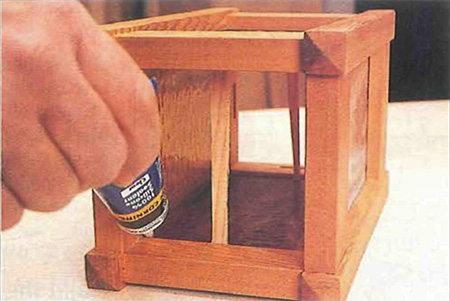
Step 5: Sand the rails and posts to 220-grit and lightly break the edges (excluding the tenon shoulders). Then, using a polyurethane or other waterproof glue, glue and clamp the rails and posts in two stages. (We glued up two post-and-rail frames, then joined these two subassemblies using the remaining rails.)
Prepare the Roof
Step 1: To make a blank for the roof (C), cut three 3-1/8 x 12″ pieces from 1-1/2″-thick stock. Note: This extra length will allow you to trim away any snipe left by the thickness planer. Increase the rough length if you need to. Joint the edges of each piece, then edge-glue and clamp them.
Step 2: After the glue has cured, face-joint and plane the blank to 1-1/16″ thick. Rip it to 9″ wide, then crosscut one end to square the blank.
Step 3: Bevel-cut facets on the square end and both edges of the roof blank. To do this, tilt your tablesaw blade to 14° from perpendicular. Attach a tall auxiliary fence and feather board to your saw. Set the fence so that the bevel cut will leave a 7/32″ square edge around the bottom of the roof as shown in figure 3. Then, hold the roof blank vertically against the fence and feed it carefully across the blade. Note: On some tablesaws, the blade may not cut the entire width of the bevel. This will leave a small point at the top of the facets. Remove these points with a sanding block, taking care to keep the lines crisp.
Step 4: Crosscut the rear (unbeveled) end of the roof blank to complete the 9″-square roof.
Pro Tip
Western red cedar smells wonderful in the shop, but it has some peculiar traits worth noting. First, this super-soft wood damages easily. Lay a piece of cedar on a few harmless looking wood chips, and you’re liable to incur a rash of small dents on its surface. To prevent accidental marring and gouging, clean your bench top frequently, and remove unnecessary tools from the work area. Also, don’t wear jewelry while working this material. A ring or a watchband brushed carelessly across a cedar surface can easily leave an unwanted scratch or indentation.
Cedar’s other idiosyncrasy shows up whenever it comes in contact with moisture and steel. Condensation on the heads of steel nails or screws, for example, will soon make ugly black stains on this wood’s surface. Even the corrosion-resistant coatings on most deck and other outdoor-rated screws fall victim to cedar’s acidic tannins if there’s moisture around. The only failsafe solution is to use stainless-steel screws.
Assemble the Roof To the Frame
Step 1: To make the four buttons (D) that hold the roof to the frame, first cut a 1/2 x 5/8 x 12″ piece of stock.
Step 2: Drill and countersink a shank hole (through the 5/8″ thickness) near both ends of each button blank where dimensioned in figure 4. Next, cut the rabbets across the ends. (We used the tablesaw, and cutoff box making multiple passes.) Then, crosscut the 1″-long buttons from the ends of the blanks.
Step 3: Set up your table-mounted router as shown in figure 5. Install a 1/4″ slotting cutter (with the bearing removed) and elevate the cutter so the top cutting edge is just a hair more (1/64″) than 5/8″ from the table surface. Set a fence so the bit cuts a 3/8″-deep slot when you push the lantern frame against it.
Step 4: To cut the button slots, place the frame top on the router table and position it so the bit centers on the length of a rail. Set the stop block. Clear the bit, turn on the router, then slide the frame forward against the stop block until it touches the fence.
Note: Don’t move the frame sidewise along the fence; the arc formed by the cutler will accept the button. Slot the remaining three rails the same way.
Step 5: Insert the buttons into the rail slots you just cut. Next, invert the frame and center it on the underside of the roof so that the overhang is equal on all sides. Mark the centerpoints of the button shank holes on the roof, then drill 7/64″ pilot holes 5/8″ deep.
Pro Tip
The safest way to make the buttons (or any other small part) is to work with stock at least 12″ long and do all of the machining on the ends or edges of the blank. Then, as the final step, cut the parts to width or length. When you’re done, you’ll have a few inches of leftover waste stock, but your fingers will have been spared close encounters with the blade or bit.
Build the Supports
Step 1: Machine the stock for the vertical support (E), the horizontal support (F), and the wings (G) as dimensioned in the Bill of Materials. Note: We added the wings to cover up an electrical junction box. Measure your junction box to make sure the wings (when assembled to the vertical support) will cover it. If necessary, adjust the wing dimensions. Eliminate the wings if you don’t have a junction box.
Step 2: Tilt your tablesaw blade to 30° from perpendicular and install a tall auxiliary rip fence. Then, cut the chamfers on the ends of the two support parts where dimensioned in figure 6 and figure 7.
Step 3: Using a dado head or crosscut blade, cut a dado in the vertical support to accept the square end of the horizontal support. (See figure 6.) Note: To ensure a snug fit, sneak up on the final dado width, test-fitting the horizontal support as you work.
Step 4: Using the drill press, counterbore and drill the two shank holes for the connector bolts in the vertical support. Next, dry-fit the horizontal support into the dado. Using the holes in the vertical support as guides, drill 9/32″ holes into the end grain of the horizontal support. Next, drill the two cross-dowel holes in the bottom face of the horizontal support.
Note: The size and location of these holes depend on the actual dimensions of your cross-dowels and connector bolts. Use the hardware you have to determine these dimensions rather than those on our drawings.
Step 5: If you plan to connect the light to a wire lead (without a junction box), bore a 1-3/4″ hole 11/16″ deep in the back of the vertical support to allow space for wire connections. (We used a Forstner bit.) Skip this step if you intend to mount the light over a junction box.
Form the Wire Grooves
Step 1: Assemble the horizontal and vertical supports using the crossdowels and connector bolts.
Step 2: To attach the roof to the horizontal support, first countersink and drill 5/32” shank holes through the roof and countersink on the bottom face where dimensioned in figure 3. Next, turn the support assembly Upside down and position the roof on the horizontal support so the end of the support aligns with the starting point of the bevel. (We placed a spacer block between the back edge of the roof and the vertical support to square the parts.) Mark the centerpoints of the four shank holes on the horizontal support, then drill these four 7/64″ pilot holes. Now, temporarily screw the roof to the support.
Step 3: Center the ceramic lamp fixture on the bottom face of the roof, then drill a centered W hole through the roof at the rear edge of the fixture where shown in figure 8. Drill through the roof and 3/16″ deep into the horizontal support.
Step 4: Disassemble the roof from the horizontal support, then disassemble the two supports. Rout a 3/8″ groove 3/16″ deep from the hole you just made to the unchamfered end of the horizontal support. (We used a table-mounted router, fence, and straight bit. For safety we used a push stick with a long bearing surface and handsaw handle.)
Step 5: Lay out and drill a 3/8″ hole through the vertical support that intersects with the groove you just routed in the horizontal support. (See figure 8.) Then, rout a groove in the back face of the vertical support (same dimensions as before) from this hole to the 1-3/4″ recess or to the point where the wires will emerge from the junction box.
Assemble and Finish, Then Install the Glass
Step 1: With the supports and roof disassembled, finish-sand all surfaces, then lightly break the edges. Reassemble the supports, then thread the lamp cord through the back of the vertical support and into the hole in the roof. Next, screw the roof to the horizontal support. Now, wire the light fixture and attach it to the underside of the roof.
Step 2: To finish our lantern, we used a blend of two parts spar urethane to one part mineral spirits. We applied the mixture liberally, allowed it to soak in, and then wiped off the excess. After 24 hours, we repeated the application again.
Step 3: We took the lantern frame to a glass shop, selected the glass, and had an employee cut the panes to fit into the 1/4″ rabbets. If you cut the glass yourself, note that the panes butt together along their vertical edges. To allow for this, subtract twice the thickness of the glass from the width of two of the panes.
Step 4: Install the panes in the rabbets, then secure each pane temporarily with two thin strips of wood bent just enough to hold them firmly in place. Next, apply a bead of clear silicone caulk to the vertical (butted) seams. Note: Apply the caulk to the inside of the seams only—not between the glass and wood. Now, attach the glazed frame to the roof using the buttons.
How To Hang a Custom Light Fixture
The method you use to hang your lantern depends on the type of structure you’ll mount it on. To hang it on a porch or deck post or on wooden siding, simply screw the vertical support to the mounting surface using two #8 flathead woodscrews. Position the screws behind the glass panes to minimize their visibility, and countersink and counterbore the holes. Glue a cedar plug in the counterbore and sand it flush.
If you’ll be mounting the fixture over a junction box, we suggest you attach it directly to the box. Use a pair of roundhead machine screws, threading them into the lugs on the top and bottom of the junction box. For this lantern, buy a pair of extra-long screws, since the screws provided with junction boxes are usually less than 1″ long. Carefully transfer the lug hole centerpoints to the backside of the vertical support. Drill access holes for the screws through the back face, then counterbore the holes on the front face of the support so you can plug the holes and seal the screws. Make the counterbore large enough in diameter so you can install a washer under the screw heads.


