Rarely do creatures speak to us of freedom and frailty as do birds. They brave bitter winter storms, exhausting annual migrations, natural predators and a host of other dangers throughout the year. Yet their enviable gifts of flight and beautiful appearance give us a lift whenever we see them. And while birds of a feather do flock together, most still prefer privacy while raising a family.
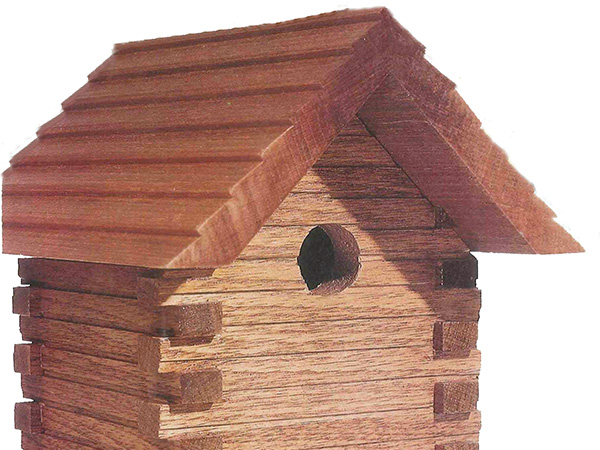
Log Cabin Siding
There are at least two ways to construct the sides of a log cabin birdhouse: You can mill each log individually and construct the building one piece at a time, or you can cheat. I decided to go this latter route and built each wall as a single unit. This is a relatively simple table saw process.
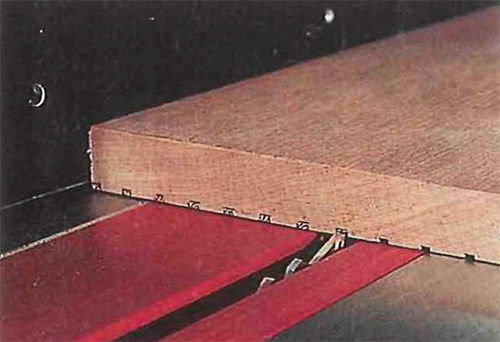
To prevent weak cross-grain problems at the corners you want the grain to run horizontally. So start out by edge gluing two 24-1/2″ lengths of Install a 1/2″ dado head in your table saw to create the interlocking corners where the logs meet. The Full-size Pattern provides the key details and dimensions. Transfer them to your work pieces and use your miter gauge to keep the sides at 90° to the blade while you form the notches on two sides at a time, as shown in Figure 2.
A Shingled Roof
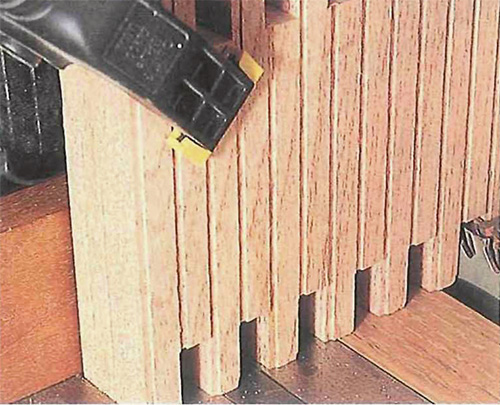
If you’ve built a dollhouse, you know how long it takes to cut and install shingles. I figured out how to get the same effect using a dado head in my table saw. The resulting profile is shown on the Full-size Pattern.
Begin by installing a 1/2″ dado head in the saw and setting it to a 10° angle. As you’re using nominal 1 x 6 stock, set the fence so it is 5-1/2″ away from the farthest tip of the blade: this will line up your first cut with the outside edge of the board. Adjust the cutter height so the lowest point of the angled cut is flush with the top of the saw table.
After a test pass on some scrap, make your first cut in an 18-1/8″ long piece of stock, which you can crosscut later to yield both sides of the roof (pieces 2).
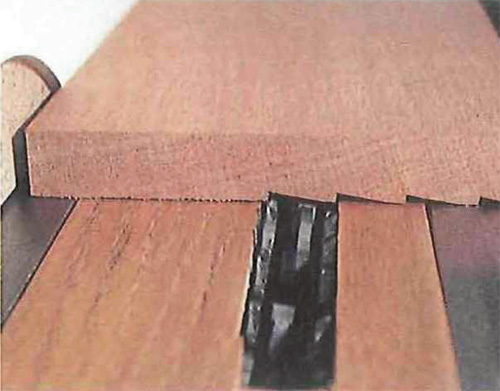
After each cut, reset the fence so the next cut just touches the first. Continue until you complete all seven rows of shingles (see Figure 3). Since the angled cut is a hair shy of 3/4″, you’ll be left with an attractive ridge cap. When you’re done, replace the dado head with a standard blade, set the angle to 45° and trim both edges, as shown on the Full-size Pattern. Set these pieces aside while you finish milling the sidewalls.
Assemble and Trim the Walls
As this cabin is destined to become home to a family of chickadees, the front doorway must be sized accordingly. Choose one of the four sidewalls as the front of the house, then refer to the Full-Size Pattern to locate a 1-1/8″ diameter hole near the top. Clamp a piece of scrap to the back face while you drill the hole, to prevent tearout.
Test fit the four sides together. They shouldn’t be overly tight: in fact, a little play is a good thing as the house will expand and contract quite a bit outdoors.
Glue the sidewalls together with waterproof polyurethane glue. Try to keep the glue toward the inside of the house, as it expands as it dries and is difficult to remove from the intersecting log corners. Gently clamp the assembly, making sure it’s square as you apply pressure.
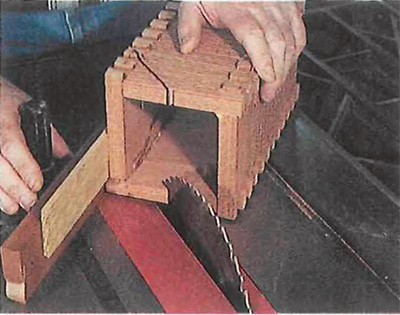
After the glue dries, raise your table saw blade to its full height and set the blade angle to 45°. With the birdhouse clamped firmly to an auxiliary fence on your miter gauge, trim the front and back gables to 45° (refer to the Full-size Pattern). A 10″ saw blade won’t be tall enough to cut all the way to the peak. Simply reset the saw blade back to 90° and, with your miter gauge set at 45°, complete these four cuts (Figure 4).
Attaching the Roof
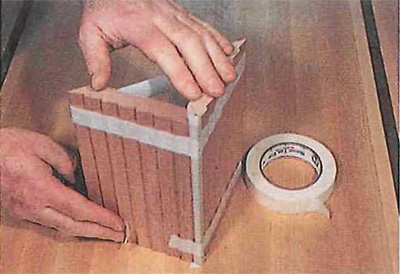
To preserve the delicate edges of the roof, I decided to forgo clamps while gluing the two slopes together. Instead, I made a hinge along the peak with masking tape, applied polyurethane on its underside with a pencil. Then use a sharp knife or a carving bit in a rotary tool to score shallow V-grooves just inside the pencil marks. These will prevent the glue from squeezing out on the visible side of the walls. Gently clamp the roof in place, using glue to secure it. When the glue dries, use a chisel to clean up any squeeze-out on the inside faces to ensure a toxic-free environment.
The Floor is a Clean-out
Trim the floor (piece 3) to the size shown in the Material List, then reset your saw blade and chamfer its front edge to 10°. The door is 1/8″ shy on the sides to provide both ventilation and drainage.
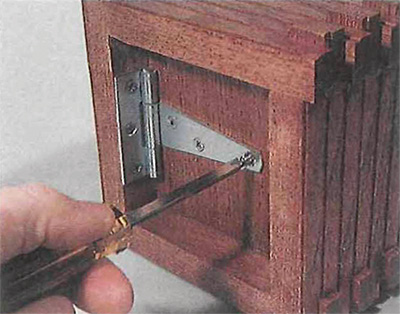
Install the floor with a galvanized T-hinge (piece 4), setting the hinge so its flap is flush with the bottom of the back wall (see Figure 6). Doing so will automatically place the floor about 3/4″ up from the bottom or the sides. This prevents moisture from wicking up into the house. Predrill for the hinge screws (pieces 5) to help prevent splitting the cedar. Cut the cleat (piece 6) to size and secure it with a single stainless steel screw (piece 7). To clean out the house, simply remove the screw, and the floor will swing down automatically.
Wrapping Up
Sand the birdhouse thoroughly before applying a finish to the outside only. Wood preservative usually used on decking is a good choice, as it’s specifically designed for rugged outdoor use. Oils are not a good option as they may be harmful to the birds, and varnish will eventually flake and wear off. Be prepared to recoat the house once a year.
If the finished house has a dark hue, make its home in the shade of a deciduous tree to prevent overheating in late spring and summer when the chicks are young. A round galvanized pole attached to the back wall with pipe clamps is a sound, predator-safe (as in squirrels and cats) approach. I don’t recommend suspending the house, as some species won’t nest in a swaying birdhouse.
You may install your birdhouse in any season, as birds need a safe refuge at several different times of the year. And if you give it to someone as a gift, you’ll be doubly rewarded as both your friend and the birds will be delighted with their new birdhouse.


