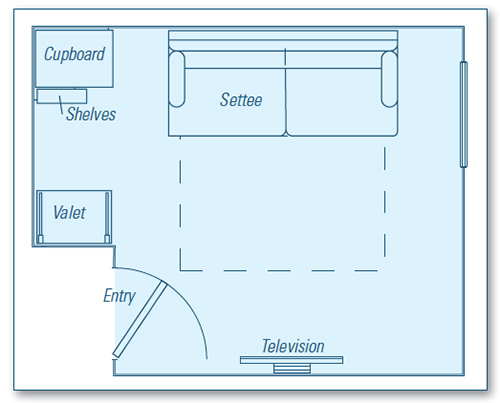
You can see from the layout drawing below that the room this piece was designed for is small. It was once my library and drafting studio. It’s now a sitting room and guest bedroom. As a sitting room, it’s a quiet getaway in which to sit and read or watch a television program in which no one else has any interest. As a bedroom, it’s small but quite accommodating. The settee folds out to a comfortable bed; the cupboard will take care of hanging clothes and the folding things which go on shelves. The small white open shelves will hold a host of small stuff. OK as far as it goes, but imagine yourself arriving at a friend’s house or a hotel for a few days with typical luggage: a carry-on case and a couple of bags. What you need is someplace to set it all down and start unpacking. Later on, at shower time or bedtime, where do you put fresh and discarded clothes? So there is the kernel of the design problem. Hotels have those fold-out luggage stands, but that solves only part of the problem. Two other factors figure in the design parameters. The first one, space, is fairly self-evident. The second was a personal consideration — it had to be a “quick make,” as I didn’t have a lot of time to build it.
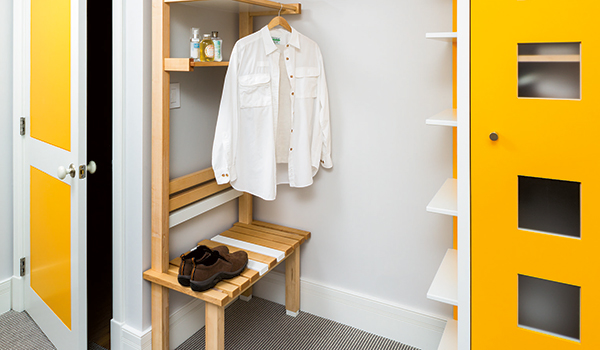
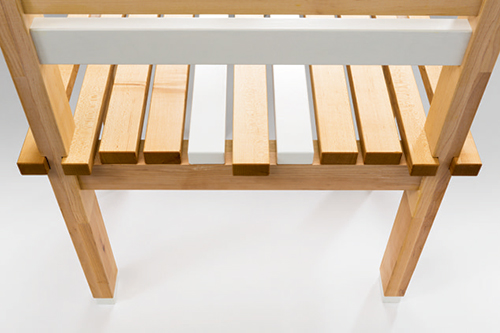
You can see the outcome. It fits into a small footprint and it goes vertical from there. The platform is the height of a chair seat, and it looks chunky and utilitarian enough so that it’s an invitation to dump a case on it without doing any damage.
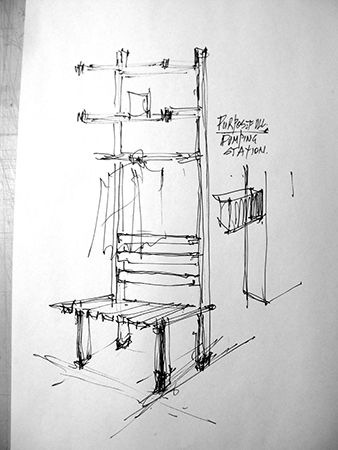
The first shelf is high enough and narrow so that, with a bit of care, your head won’t connect with it as you sit to put on your socks. The middle shelf has a hanging rail, and the top shelf is wide enough to get anything you don’t immediately need out of the way. On a personal note, I must admit to putting socks on whilst seated. With two “new knees,” it’s easier that way. A seat height of 16-1⁄2″ is good for me, but after I had cut the legs, I realized that it’s a bit too low for taller people; hence, the 1″ tall white feet. They are a quarter of an inch smaller in width and length than the leg, so they sit back an eighth of an inch all around. Two screws and a dab of glue hold them in place.
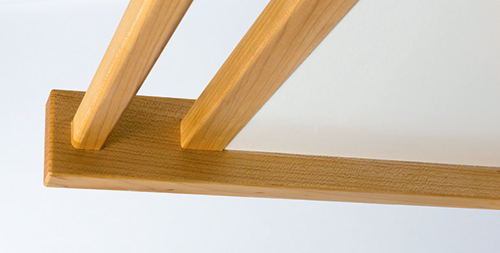
Even if I hadn’t had a change of mind and added them to change the seat height, those rectangular legs meeting the floor with no accommodating detail to form a “foot” would, generally, look very primitive. The block “extensions” would have looked perfectly well without paint, or I could have run a shallow saw kerf or two around them. You need something that says, “I’m a foot that terminates this leg.” Nature does it in all sorts of ways.
Making the Piece
Even though the wood is called soft maple, it’s plenty hard enough to absorb knocks, so that was my wood of choice. You may recall one of the design parameters was that it had to be a “quick make.” Machine-made all the way! I used a jointer, thicknesser and miter saw to achieve accurate dimensions of the parts. A radiussing bit on a router table took care of all the edges. Lamello biscuits join the shelves to shelf supports, and Domino loose tenons take care of major joinery. All the surfaces were “cleaned up” with a hand plane and then finished with Rubio® Monocote oil finish prior to assembly.
The white parts were hand-brushed with a white gloss paint. It’s a matter of choice which parts you paint.
The Way It Is

In the last section of this article, I’m going to take a step back to examine what went on in making this piece, because I believe it’s the beginning of a radical change in small shop woodworking.
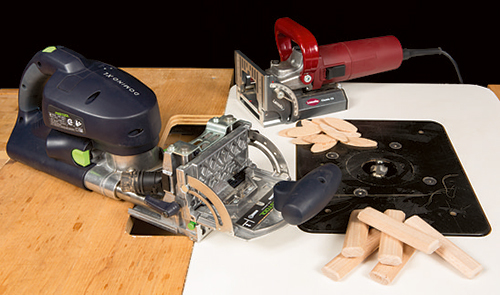
The expression I used was, “machine-made all the way,” and so the preparation of the parts was done using machines, found in most every workshop. However, the joinery I used is not common, and the machine I used is not found in every workshop. That said, history tells us that it is just a matter of time before a Domino type machine is in common use, and then we will be at a watershed in small shop woodworking.
have been replaced in this project with the
tools in the next photo.
Experience tells me that most everyone wanting to learn woodworking believes that if they can learn to make joints, especially dovetails, then they have the keys to the craft. Their premise is not entirely true, of course, but understandable. I’ll develop the point with a quick roundup of joinery.
The three joints we use in making solid wood furniture are butt joints, with which we make wide boards from narrow boards; dovetails, which are used to join wide boards at the corners to form boxes; and mortise-and-tenons, used to join stiles and rails to make frames for panels, as in doors or frame-and-panel case goods, and to join legs to rails to make chairs and tables.
The mortise-and-tenon, simply described, is a square peg in a square hole. It is the most complex joint to design, as well as the most used of the three joints. Its marking, cutting and chopping take time and skill to execute. To mark it out, you need a marking knife, a try square, a marking gauge and a mortise gauge.
For years, tool makers who have tried to mechanize most things have put the mortise-and-tenon joint off machine limits for the most part. While such machines have long been in use in industry, an affordable, dedicated mortise-and-tenon machine has not been successfully reduced for use in the small shop.
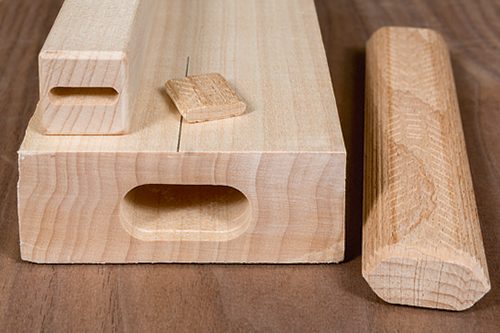
An alternative to the mortise-and-tenon joint is the loose tenon joint. In this joint, a mortise is made in both pieces. The mortises are exactly the same size, and into them goes a third piece made to fit the mortises: hence the name “loose tenon.” The joint has to be made by machine, and a machine system has been used by industry for many years with a tool called a slot mortiser. But no tool maker had come out with an affordable slot mortiser for the small shop. Recently, Festool came out with the Domino machine. It’s a handheld machine which comes in two sizes, with a variety of cutters, meaning the system can be used in typical mortise-and-tenon joint situations. It’s versatile, it’s simple, and it’s accurate. It, arguably, undoes the case for making the mortise and tenon by hand using traditional tools. In short, this tool changes the face of furniture making in the small shop.

Let’s see how that plays out in the case of this valet, first by hand and then by Domino. Once the parts are prepared and we are ready to make the joints, the time it would take to mark and make the 12 mortises and the 12 tenons would be measured in hours, if you had the skill to do so. Now, using the Domino, there is no doubt in my mind that you can make the piece perfectly well; as well as I can, in fact. Marking out requires a pencil and a plastic square. Cutting the 24 slots takes at most a half hour — done.
Having offered my opinion that this machine will change your furniture making, the supposition hangs on the courage and the creativity of woodworkers in small shops to realize its potential.


